farms

The first
stage in the set-up process is to create the BIM Farms and assign the
farms to growout areas and cost centers. There are several tabs required
to create farms, with many fields that require definition prior to creating
the farms.
The following items must be defined prior
to creating farms.
Depending on the level of detail that is
being entered on the farms, the following fields may also be desired prior
to creating farms:
The Farms
document contains the following components:
Create a New
Farm
There are numerous tabs in the new Farm creation process.
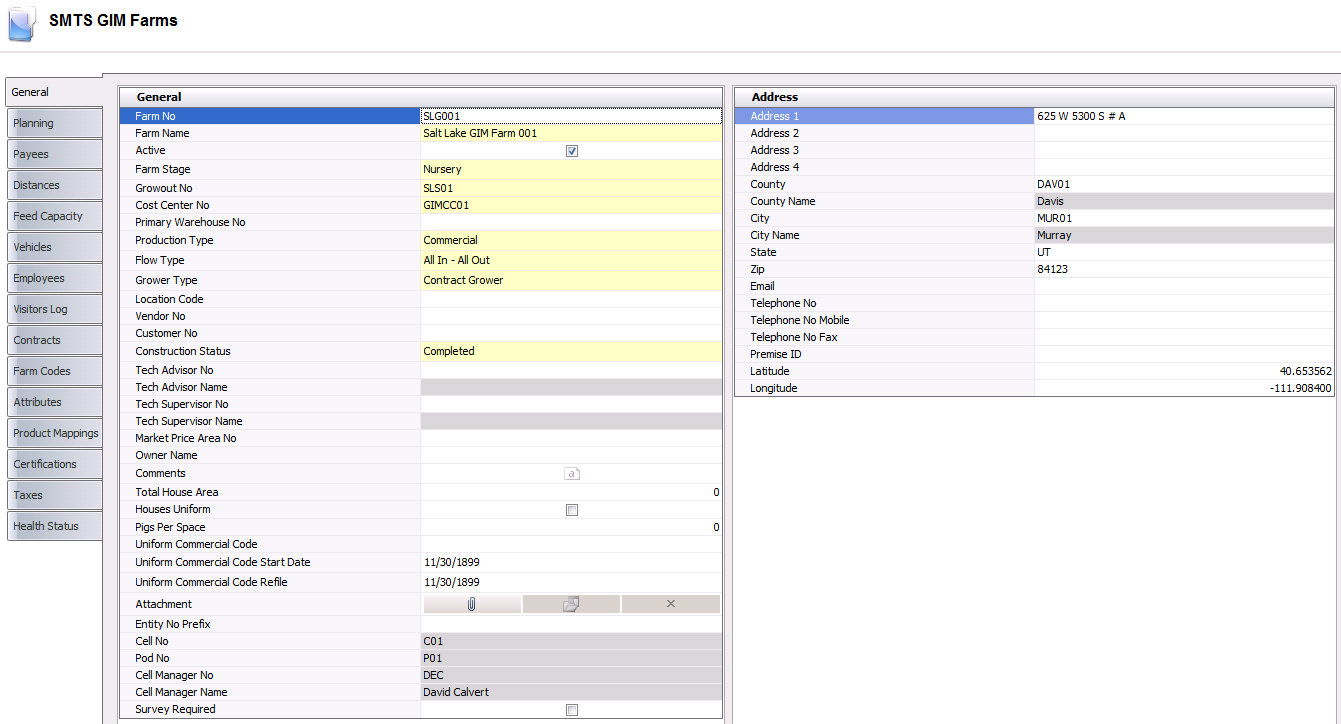
General
The General tab is used to enter the basic details for the farm, such
as address, farm stage, and cost center details. There are two components
in the General tab:
General
- In SMTS>GIM>Master
Data, select Farms.
- In the Farms
main index, click
 to add a new farm.
- Click on the General
grid within the General tab.
- In the Farm No
field, enter a unique identifier to use as a code for the farm (alphanumeric,
max 20 characters). The farm number will be the first segment of the
entity ID.
- In the Farm Name
field, enter a description/name for the farm (alphanumeric, max 40
characters). This field will be displayed throughout the system and
on delivery documents and other documents related to the farm.
- New farms will default as Active.
If the farm is no longer required, de-select the Active flag.
- From the Farm
Stage drop-down menu, select a stage to assign to the farm.
Available options are Finish, Nursery or Wean to Finish.
- From Growout
No, select the growout area for the farm. The growout area
groups farms together for registry, security, and reporting purposes.
Growouts must be predefined in: Admin>Business>General>Definitions>Growout
Codes..
- From Cost Center
No, select the cost center for the farm. Multiple farms can
be assigned to a single cost center. Cost centers must be predefined
in: Admin>Business>General>Definitions>Cost
Centers.
- From Primary
Warehouse No, select the main warehouse for the farm.
This field is optional and will be used in MRP.
From Production
Type, select the genetic type of the pig. Available options
are:
Genetic
Nucleus - Contains all
stages of gilt, sow, nursery and finisher.
Multiplier
- Produces gilt piglets to repopulate the sows on a commercial
production farm. Any farrows produced are sent to the commercial
side for growing to market weight.
Commercial
- Produces pigs that are taken to a plant and then to a packer
for commercial sales.
From Flow Type, select an option to indicate how the product moves through the
farm. Available options are: All In - All Out, Continuous Flow or
Opportunity Floor.
From Grower
Type, select the type of grower for the farm. Available options
are:
Company
Operated - Company-owned entity and company-operated
facility.
Company
Owned - Company-owned entity and company-owned facility.
Contract
Grower - Company-owned entity and producer-owned/operated
facility.
Employee
Owned - Employee-owned entity and employed owned-facility.
External
- Used for external purchase references only.
Independent
- Producer-owned entity and producer-owned/operated
facility.
- Location Code is an optional field that can be used to enter
a location identifier for the location of the farm.
- Vendor No
is used if the farm purchases from other facilities such as feed mills
or warehouses. A vendor number is required to automatically create
the purchase transactions. Select a vendor from the pre-defined list.
Vendors must be previously created in: General>>General>Master
Data>Vendors prior to selecting on the farm.
Customer
No is used if the farms sell products to other facilities such
as plants. A ship-to customer number must be assigned to the
farm for invoicing. Select a customer from the pre-defined list. Customers
must be previously created in: General>General>Master
Data>Customers prior to selecting on the farm.
Use the drop-down
menu to select the Construction Status
to indicate if a farm is under construction. Available options are:
Completed, Planned, or Under.
Tech
Advisor No is an optional field to assign a technical advisor
to the farm. Select an advisor from the list. Technical advisors must
be predefined in: Admin>Business>General>Definitions>Tech
Advisors.
Tech
Advisor Name will default from Tech Advisor No and displays
the name of the advisor.
Tech
Supervisor No is an optional field to assign a technical supervisor
to the farm. Select a supervisor from the list. Technical supervisors
must be predefined in: Admin>Business>General>Definitions>Tech
Supervisors.
Tech
Supervisor Name will default from Tech Supervisor No and displays
the name of the supervisor.
Market
Price Area No sets the area standards for price in lbs or Head
and Min/Max weight. Select the Market Price Area No, if necessary.
From Owner
Name, select the owner of the farm. This optional field is
used if the farm is owned by a party outside of the company. Farm
ownership options are predefined in: General>General>Master
Data>Farm Ownership.
In the Comments
field, enter any additional information related to the farm.
In the Total
Houses Area field, enter the total house area of the farm in
square feet or square meters, depending on the type of measurement
defined in the division.
Select the Houses Uniform flag if all of the
houses and equipment on the farm are uniform in size.
Pigs
Per Space represents the number of pigs that
are kept in each space within the farm.
Uniform
Commercial Code is only used for
US customers and represents the uniform commercial code (UCC) that
is assigned to the grower.
Uniform
Commercial Code Start represents
the current start date for the existing UCC agreement.
Uniform
Commercial Code Refile represents
the renewal date for the existing UCC agreement.
In the Attachment
field, any type of file can be attached. (Example: Word document,
picture, music or video clip).
Entity
No Prefix must be used when the system registry is set to auto
create the Entity No. For more details, see: Registry>Growout>General>Entity
Number Mode. If required,
enter the entity number (alphanumeric, max 10 characters). All farms
within the same growout may have the same prefix.
Cell
No is a derived field used for location areas to manage entities.
Cells are created in Admin>Business>SMTS>Definitions>Cell
Master. Farms are assigned to cells in Admin>Business>SMTS>Definitions>Cell
Pod Farm.
Pod
No is a derived field used for location areas to manage entities.
Pods are locations within cells. Pods are created in the Cell
Master. Farms are assigned to pods in the Cell Pod Farm.
Cell
Manager No is a derived field based on the manager that is
assigned to the cell in the Cell
Master. Cell Managers are defined in Admin>Business>SMTS>Definitions>Cell
Managers.
Cell
Manager Name is derived based on the assigned Cell Manager
No.
Select the flag
if there is a Survey Required
for the farm. This option is available in v7.25+.
Address
The Address tab contains the address details
for the farm.
In
the Address 1-4 fields, enter
the address of the farm.
From
County, select the county
of the farm. Counties must be predefined in Admin>Business>General>Definitions>Counties.
County Name will default from County
and displays the name of the County.
From
City, select the city where
the farm is located. Cities must be predefined in Admin>Business>General>Definitions>Cities.
City Name will default from City,
and displays the name of the city in which the farm is located.
- From State,
select the state/province where the farm is located. States must be
predefined in Admin>Business>General>Definitions>States.
- In the Zip
field, enter the zip code or postal code for the farm.
- Enter the Email
address of the farm, if applicable.
- In the Telephone
No field, enter the telephone
number of the farm.
- In the Telephone
No Mobile field, enter the mobile telephone number of the farm,
if applicable.
- In the Telephone
No Fax field, enter the fax number of the farm, if applicable.
- Premise ID
is an optional field where an additional ID can be entered to identify
the farm.
- Enter the Latitude
and Longitude coordinates
for the farm for mapping and delivery distances.
Planning
The Planning tab is used to define the parameters related to feed and
process planning. There are two required fields that must be entered:
Primary Feed Mill and Plant. All of the remaining fields are optional
and dependent on the level of planning that is being performed. The Planning
tab contains two components:
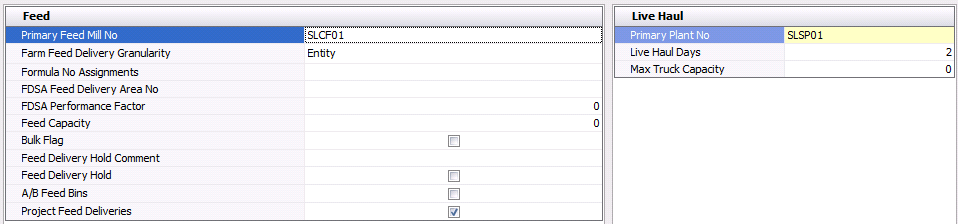
Feed
- From Primary
Feed Mill No, select the primary feed mill that delivers feed
to the farm. This mill will be used for FDSA projections.
- From Farm Feed
Delivery Granularity, select where the feed will be delivered.
Available options are: Entity, Farm, House, or Pen.
- Formula No Assignments
assigns various feed formulas based on feed mill and type of flock.
If required, select the formula assignment from the drop-down menu.
Feed formula assignments are created in: FMTS>FMIM>Master
Data>Formula Assignments.
- FDSA Feed Delivery
Area No provides the ability for a farm to be assigned to a
delivery area to assist in the scheduling of feed deliveries. If required,
select the FDSA feed delivery area. Feed delivery areas are defined
in: Admin>Business>FMTS>FDSA>Feed
Delivery Areas.
- FDSA Performance
Factor is used to adjust the FDSA consumption projected for
the animals on the farm. For example, if a value of "5"
is entered, the value will be increased by 5%. Alternatively if a
value of "-5" is entered, the value will decrease by 5%.
- Feed Capacity
indicates the total feed capacity for the farm. This field is optional
and is entered in lbs or kgs depending on the unit of measure utilized
by the corresponding division.
- Select the Bulk
Flag if the farm does not store feed in bulk bins. If the flag
is not selected, then the feed is stored in bulk bins.
- Select the Feed
Delivery Hold flag if the deliveries are not to be made to
the farm.
- In the Feed Delivery
Hold Comment field, enter any comments related
to the feed delivery hold.
- Selecting the A/B
Feed Bins flag indicates that the farm has A/B bins for FDSA
to alternate feed. Leave blank if the A/B bins are not utilized.
- Select the Project
Feed Deliveries flag to let the FDSA project the next feed
deliveries.
Live Haul
- From Primary
Plant No, select the primary plant that the farm ships products
to.
- In the Live Haul
Days field, enter the number of days required to catch/load
the entity for transportation to the processing plant, if required.
- Max Truck Capacity
indicates the maximum weight a truck can hold.
Payees
The Payees tab defines the name and percentage of each person that is
paid during the settlement process. There is also the option to define
banking information for direct deposit. The Payees tab contains two components:
Payees
- In the Payees
tab, click to create a new payee.
- In the Effective
Date field, enter the date that the payee will be effective.
- In the Payee
Farm Name field, enter the name of the farm where the payee
is from.
- Enter the First
Name of the payee.
- Enter the Last
Name of the payee
- Enter the Middle
Initial of the payee, if applicable.
- Enter the Sex
of the payee, if applicable - Male (M) or Female (F).
- In the Address
1-2 fields, enter the address of the payee.
- Enter the City
in which the payee is located.
- Enter the State
in which the payee is located.
- Enter the Zip
or postal code of the payee.
- Enter the County
in which the payee is located.
- In the Telephone
No field, enter the telephone number of the payee.
- In the Telephone
No Fax field, enter
the fax number of the payee, if applicable.
- Enter the Email
address of the payee, if applicable.
- In the Tax ID
field, enter the government-assigned number to the company used for
identification purposes
- 1099 (Status)
Is used for tax purposes and determines if the payee received a 1099
statement at the end of the year. Select the flag if a a statement
was received. Contract employees receive a 1099 while company employees
will receive a W2.
- From Vendor No,
select the payee vendor.
- Percentage
is used in standard settlements for multiple payees.
These payees are paid via a percentage of the total payment. If required,
enter a percentage number.

Payee Accounts
- Click on the child grid
 in the Effective Date field to open the Payee Accounts section.
- In the Payee Accounts grid, click
to add a new account.
- From Account
Type, select the payee's type of account. Available options
are Checking or Savings.
- In the Account
No field, enter the bank account number of the payee.
- From Protein
Banks, select the payee's bank. Banks must be set up prior
in: General>General>Master
Data>Banks.
- Select the Direct
Deposit Flag if the payee is paid using direct deposit.
- Pre Note
(Pre-authorization) is used in standard settlement payments and is
a zero dollar transaction created and sent through the ACH network
to test the validity of a payor's/payee's bank prior to a direct deposit
transaction. The Pre Note field indicates the date the pseudo transaction
will be sent.
- Percentage
is used to determine what percentage of the total amount is to be
deposited in the account number of that line item. For example,
a Payee may want 100% of their payment deposited into one bank, but
into two different accounts: a checking and a savings.
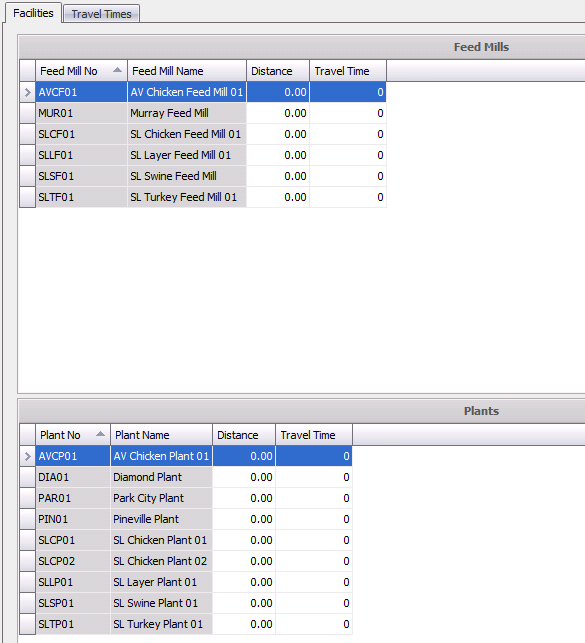
Distances
The Distances tab contains details relating to the distances of the
farms from the receiving entities - Feed Mills and Plants - as well as
travel times between farms. The Distances tab is comprised of two sections:
Facilities
- Feed Mill No/Plant
No identifies the selected feed mill or plant.
- Feed Mill Name/Plant
Name displays the name of the selected entity.
- Enter the Distance,
in miles or kilometers, between the farm and the selected entity.
- Enter the total Travel
Time, in days, between the farm and the selected entity.
Travel Times
The Travel Times tab outlines the travel times between farms, and is
used in the planning modules for feed deliveries, etc.
- In the Travel
Times tab, click to create
a new time.
- From the Destination
Farm No drop-down menu, select the destination farm.
In the Travel
Time field, enter the driving time, in days, between the farm
and the selected destination farm.
- Enter the Distance,
in miles or kilometers, between the farm and the selected destination
farm.

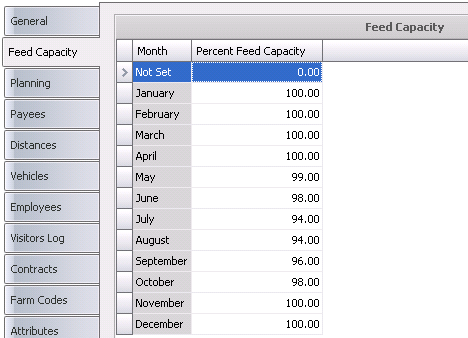
Feed Capacity
The Feed Capacity tab contains percentages that are used to determine
the seasonal capacities of the feed bins, and is used by the planning
modules to adjust the unit amount delivered based on the time of year.
- In the Percent
Feed Capacity field, enter a percentage to indicate the capacity
amount for that month. Commonly referred to as seasonal factors. This
adjustment will be reflected in the bin capacity for each house for
FDSA projections.
Vehicles
The Vehicles tab contains a list of the vehicles used at the farm. Vehicles
must be previously defined in: Admin>Business>General>Definitions>Vehicles.
- In the Vehicles
tab, click to add a new vehicle.
- From Vehicle
Type No, select the type of vehicle used.
- Vehicle Type
Name will default and displays the name of the vehicle.

Employees
The Employees tab defines the contact information for the employees
that work on the farm. Employees must be previously defined in: Admin>Business>General>Definitions>Employees.
- In the Employees
tab, click to add a new employee.
- From Employee
No, select from a pre-defined list of employees. Only employees
assigned to the particular farm will appear.
- Employee Name
will default and displays the name of the employee.
- In the Telephone
No field, enter the telephone number of the employee.
- In the Telephone
No 2 field, enter any additional telephone number.
- Enter the Email
address of the employe, if applicable.
- In the Notes
field, enter any additional information related to the employee.

Visitors Log
The Visitors Log tab allows the farm to keep track of visitors and log
information related to the visits. Farm visitors and veterinarian visits
are entered in: SMTS>GIM>Transactions>Bio-Security.
When these visits are entered, the Visitors Log will automatically be
updated.
- Farm No identifies the
farm that was visited.
- Farm Name
displays the name of the farm that was visited.
- Visitor Name
displays the name of the visitor to the farm.
- Visit Date
displays the date of the farm visit.
- Time In
indicates the time that the visitor arrived at the farm.
- Time Out
indicates the time that the visitor left the farm.
- Company Name
represents the name of the company for whom the visitor works.
- Ref No
is used to identify the visit record.
- The Notes
field contains any additional information related to the visit.
- Purpose No identifies
the reason for the visit.
- Purpose Name
displays a description of the visit.
- Begin Hodometer
indicates the number on the hodometer at the beginning of the trip.
- End Hodometer
indicates the number on the hodometer at the end of the trip.
- Farm Time Out
displays the time the visitor left the farm.
- Tech Advisor
No identifies the technical advisor.
- Tech Advisor
Name displays the name of the tech advisor.
- Tech Supervisor
No identifies the technical supervisor.
- Tech Supervisor
Name displays the name of the tech supervisor.
- Total
Distance indicates the total distance the vehicle travelled
for the farm visit.
- Total Visit Time
will automatically calculate the total time the visitor was at the
farm.
- URL Value is used to include any
attachments.

Contracts
Contracts outline the producer contract
for the contract grower farm that will be used in grower settlements.
Contract pay is defined in the custom specifications for settlements.
The information in the Contracts tab will default from Producer Contracts.
The Contracts tab contains two components:

Producer
Contracts
- Contract No
identifies the contract that is assigned to the farm.
- Contract Name
displays the name of the contract that is assigned to the farm..
- In the Attachment
field, any type of file can be attached. (Example: Word document,
picture, music or video clip).
- Start Date
displays the date that the contract becomes effective
- End Date
displays the end that the contract is no longer effective.
- Renewal Date
displays the date that the contract was created.
Contract Pay
- Pay No
identifies the reason for the payment, and is derived from Settlements.
- Pay Name
displays the reason for the payment.
- The Active
flag will be selected if the contract is currently active.
Attributes
Attributes are assigned to farms and houses are defined in: Admin>Business>General>Definitions>Attributes.
When a new entity is created, the attributes default in with an option
for the user to modify.
- Click the drop-down menu on the selected attribute
(Example: Floor Cover) and select the required code. The description
will default in.

Product Mappings
Product Mappings defines the source and destination products when the
entities are transferred.
- Enter the Effective
Date of the product.
- From Source
Product No, select the source product.
- Product Name
will default in with a description of the source product.
- From Dest
Product No, select the destination product.
- Product Name
will default in with a description of the destination product.

Certifications
The Certifications tab contains information related to the certifications
that the farm has in place. Certifications are usually required by local
or federal authorities for product tracing. For example, in France, every
piece of chicken purchased has a tracking number on it that can be traced
back to the certification number assigned to the farm that produced that
chicken. Certifications are also used in Free Range and Organic
certification tracking. Certifications must be set up prior in: Admin>Business>General>Definitions>Certifications.
- In the Certifications
tab, click to add a new certification.
- In the Select Certifications dialog box, click
the Certification No drop-down
menu and select from one of the pre-defined certifications.
- Click 'OK'. The Certifications tab will have information
populated.
- Certification
No displays the code for the certification.
- Certification
Name displays the name of the certification.
- The Active
flag will be selected by default. If the certification is no longer
required, de-select the flag.
- Start Date
indicates the date that the certification is required.
- End Date
indicates the end that the certification is no longer required.
- In the Memo
field, enter any additional information related to the certification.
- In the Attachment
field, any type of file can be attached. (Example: Word document,
picture, music or video clip).

Taxes
Taxes must be pre-defined in Tax
Codes. Tax Codes are defined to calculate
taxes on grower payments.
- In the Taxes
tab, click to add a new tax code.
- From Tax No,
select the required tax type.
- Tax Name
will default in with a description of the tax.

Health Status
The fields in the Health Status tab are read-only and represent the
most recent health status transactions based on the posted Farm
Status transaction for the lab test code. This option is only available
in versions 7.26+.

- Record Type identifies
the type of record.
- Trans Date
displays the date of the health status transaction
- Analysis No identifies
the analysis code for the lab test.
- Analysis Name
displays a description of the analysis.
- Ref No
is a unique reference number used to identify the health status transaction.
- Health Status
displays a description of the health and will be either Positive
or Negative.
- Processing Control
Status is a read-only field that represents the processing
status of the pigs. This will default to `Not Tracked`. Available
options are:
- Tracked
- will have no impact on process planning, but will be displayed
in Health Status views.
- End of Day
- GPA will schedule the entities to be
killed at the end of the day.
- End
of Week - GPA will schedule the
entities to be killed at the end of the week.
- Not
Tracked - the analysis code is
not tracked in the farm or entity, therefore has no impact on
planning processing.
- Transfer Control
Status is a read-only field that represents the transfer status
of the pigs. This will default to `Not Tracked`. Available options
are:
- Tracked
- will have no impact on the transfer, but will be displayed in
Health Status views.
- Transfer
to Same Status - source entities can be transferred to
a destination entity with the same status for the lab test code.
- No Transfer
- entities cannot be transferred.
- No Tracked
- the analysis code is not tracked
in the farm or entity, therefore has no impact on transfers.
- Placement Control
Status is a read-only field that represents the placement status
of the shog.
- The Comments
field contains any additional information related to the transaction.
- Close and save the farm record.
Additional
Options
In the Farms index and transaction screen, there are additional options.
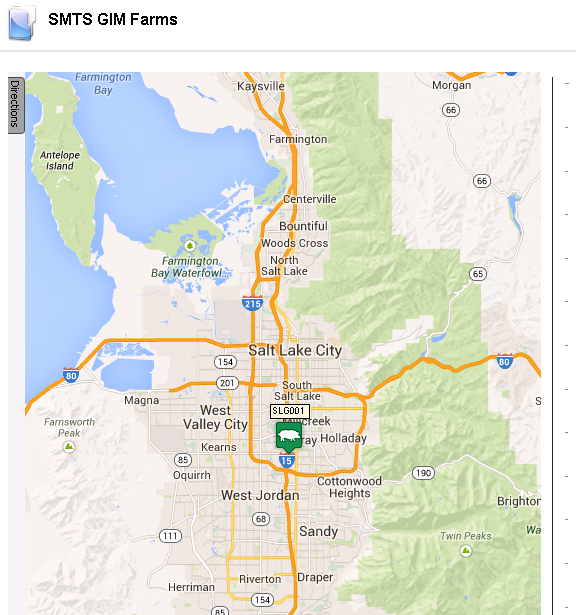
Show Map
- In the Farms index, select the required farm and
click the Options
 button
and select Show Map. A map
with the farm location will appear.
button
and select Show Map. A map
with the farm location will appear.
Farm Transaction Options
The Farm Transaction Options menu contains the following:
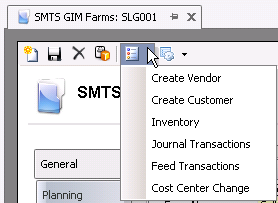
Create Vendor
- In the Farms transaction screen, click the Options
button and select Create
Vendor.
- The Vendor
creation screen will appear.
Create Customer
- In the Farms transaction screen, click the Options
button and select Create Customer.
- The Customer
creation screen will appear.
Inventory
- In the Farms transaction screen, click the Options
button and select Inventory.
All
entity inventory for the selected farm will appear.

Journal Transactions
- In the Farms transaction screen, click the Options
button and select Journal Transactions.
The Journal Transactions screen will open with a list of all journal
transactions associated with the farm.

Feed Transactions
- In the Farms transaction screen, click the Options
button and select Feed Transactions.
The Feed Deliveries screen will open with a list of all feed deliveries
associated with the farm.
Receiving Transactions
- In the Farms transaction screen, click the Options
button and select Feed Transactions.
The Farm Receiving
transaction screen will open with a list of all feed deliveries associated
with the farm.
Cost Center Change
- In the Farms transaction screen, click the Options
button and select Cost Center Change.
The Change Cost Center dialog box will open.
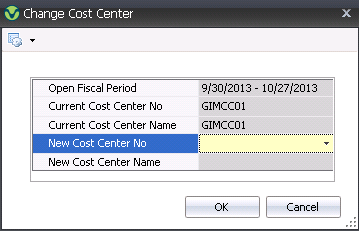
- Select the New
Cost Center No and then click the OK button toe change the
cost center.