vendors

A vendor is a company or person that will
supply goods or services. Vendors are used throughout the purchasing process
and intercompany transactions. Third party feed mills, plants, hatcheries
and warehouses are all required to be assigned to vendors for transactions
to be created. Vendors are also assigned to farms for grower payments
and intercompany transactions. Vendors reside in General>Master
Data>Vendors, which contains the basic information required
to process purchase transactions.
Table Names: ProteinVendors, ProteinVendorsBusiness,
ProteinVendorsContacts, ProteinVendorContactDetails, ProteinVendorDetails
Create a Vendor
There are several tabs available to enter
the vendor details.
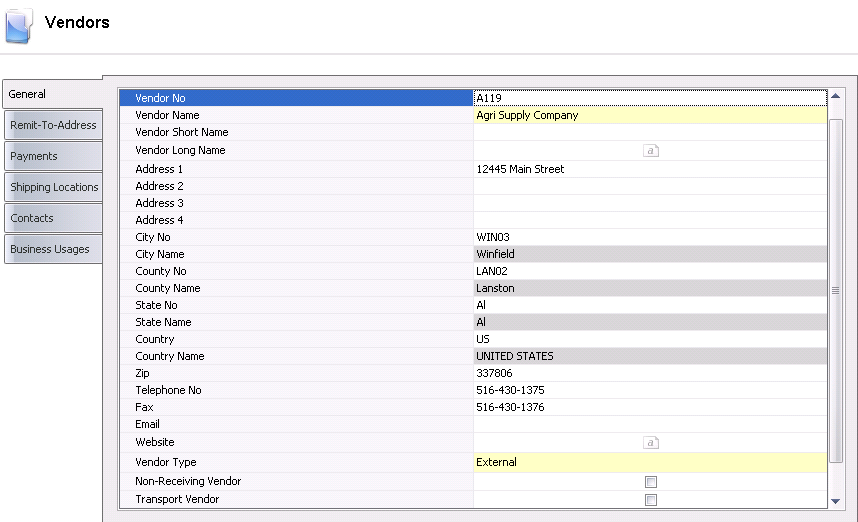
General
The General tab is used to enter the basic details for the vendor.
- In General>Master
Data, select Vendors.
- In the Vendors
index, click
 to create a new vendor record.
- In the Vendor
No field, enter the code that is used to identify
the vendor (alphanumeric, max 20 characters).
- In the Vendor
Name field, enter the name to identify the vendor (alphanumeric,
max 50 characters).
- Vendor Short
Name is an optional field to enter a short-form or common name
for the vendor (alphanumeric, max 50 characters).
- In the Address
1-4 fields,
enter the address details for the vendor.
- From City
No, select the city code for where the selected
vendor is located. City Name
will default from City No, and displays the name of the city in which
the selected vendor is located. Cities must be predefined in .
- From County
No, select the county code for where the selected
vendor is located. County Name will
default and displays the name of the county in which the selected
vendor is located. Counties must be predefined in .
- From State
No, select the state code for where the selected
vendor is located. State Name
will default and displays the name of the state in which the selected
vendor is located. States must be predefined in .
- From Country,
select the country code for where the selected vendor is located.
Country Name will default
and displays the name of the country in which the selected vendor
is located. Countries must be predefined in .
- In the Zip/Postal
Code field,
enter the zip code or postal code for the vendor.
- In the Telephone
No field, enter the main telephone number for
the customer. Additional contact information can be entered on the
Contacts
tab.
- In the Fax
field, enter the main fax number for the customer.
- In the Email field, enter
the main e-mail address for the customer (if applicable).
- In the Website field,
enter the website address for the customer (if applicable).
- From Vendor
Type, select whether the vendor is an internal
or external vendor.
Internal
- The vendor belongs to the same organization and journal transactions
for the vendor are recorded to the intercompany purchase accounts
(PURIC).
External:
The vendor is external and journal transactions for the vendor
are recorded to the external purchase accounts (PUR).
- From Transport
Vendor, click to select if the vendor is a freight
vendor. Vendors must be defined as transport vendors to be assigned
to freight products or selected as a haulage vendor in purchase transactions.
- Non-Receiving
Vendor is selected if the vendor is used for purchase orders
but another vendor is paid for the product. Complete details are outlined
in .
- Internal AP Vendor
is a field required for grower settlements to identify the vendor.
- The Active
field indicates if the vendor is active or inactive. If the vendor
is no longer required, de-select the option.
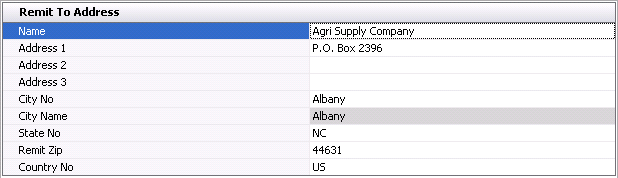
Remit-to-Address
The Remit-to-Address is an optional tab where the payment will be processed.
There is no logic assigned to this field and it is only used to interface
data to the financial system for payment if the vendors are created within
MTech. The Remit-to-Address tab is used if the purchase is made from Vendor
A but then Vendor B is paid.
- In the Name
field, enter the name to identify the vendor (alphanumeric, max 50
characters).
- In the Address
1-3 fields,
enter the address details for the vendor.
- From City
No, select the city code for which the selected
vendor is located. City Name
will default from City No, and displays the name of the city in which
the selected vendor is located.
- From State
No, select the state code for which the selected
vendor is located.
- In the Remit
Zip
field, enter the zip code or postal code for the vendor.
- From Country
No, select the country code for which the selected
vendor is located.
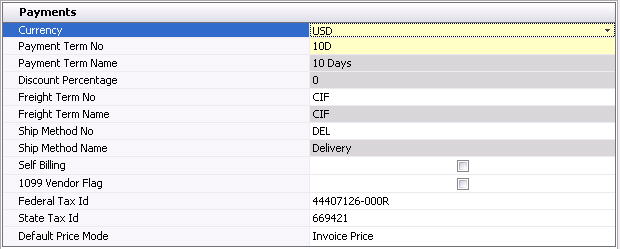
Payments
The Payments tab defines the vendor details related to payment processing.
- Currency
is a required field that indicates the default currency for the vendor.
The default currency will transfer to contracts and purchase orders
with an option to modify.
- Payment Term
No is a required field that defaults from the selected
vendor. Payment terms can be modified if required, on the contract
or purchase order.
- Payment Term
Name defaults from Payment Term No and displays a description
of the payment terms.
- In the Freight
Term No field, enter the freight terms for the vendor. Some
commonly used terms are: FOB Origin, FOB Destination, and COF.
- Freight Term
Name defaults from Freight Term No and displays the name of
the freight terms.
- In the Ship
Method No
field, the user has the option of associating
a shipping method to the vendor. This field is only used for reporting
with no associated logic.
- Ship Method Name
defaults from Ship Method No and displays the required method of shipping.
- Select the Self-Billing option
if the vendor does not supply an invoice, and payment is processed
based on the receiving transaction. There is a specific purchase invoice
type that processes payments for self-billing vendors.
- Select the 1099
Vendor Flag option if this vendor is required for 1099 reporting.
- In the Federal
Tax ID
field, enter the federal tax identification code.
- In the State
Tax ID
field, enter the state tax identification mode.
- Default Price
Mode determines the default price mode for the vendor. The
price mode can be changed in the contract or purchase order if required.
Shipping Locations
The Shipping Locations tab is optionally used to enter the address details
for the multiple locations that the vendor can ship products from. The
locations can be selected on the purchase order.
- From Location
ID, select the code that corresponds to the specified
shipping location.
- Location Name
will default from the selected Location ID, and displays the name
of the location.
- In Address
1-3 fields, enter the address of the location.
- From City No,
select the city code for which the location is located.
- City Name
will default and displays the name of the city in which the selected
vendor is located.
- From County
No, select the county code for which the selected
location is located.
- County Name
displays the name of the county in which the selected location is
located.
- Enter the State
of the location.
- In the Zip field, enter
the zip code of the location.
- Select the Country
of the location.
- In the Telephone
No field, enter the main telephone number for
the customer.

Contacts
The Vendor Contacts tab is used to define internal and external contacts
for the vendor. The Primary Flag is used to identify the main contact
information for the internal and external contacts. External contacts
are typically customer contacts while internal contacts are those within
the Company, such as the purchasing agent or buyer that may deal with
the vendor.
- From Contact
Type, select whether the contact is an External or Internal
contact.
- From Title,
select the appropriate title for the contact. Examples are: Mr, Mrs,
Ms.
- Enter the First
Name of the contact.
- Enter the Last
Name of the contact.
- Enter the Job
Title of the contact.
- In the Email
field, enter the Email address of the contact (if applicable).
- Select the Primary Flag
if the contact is the first contact to call for the customer
- The Active
Flag will be selected by default.
If the contact is no longer needed, de-select the active flag.
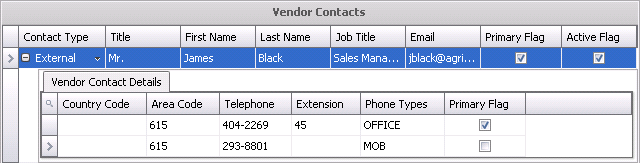
Additional Vendor Contact Details
Within the Vendor Contacts tab, there is a child grid that contains
additional information relating to the contact.
- In the Country
Code field, enter the code for the country that the vendor
is located in.
- In the Area
Code field,
enter the area code of the vendor's location.
- In the Telephone
field, enter the main telephone number for the vendor.
- Enter the Extension
of the telephone number (if applicable)
- From Phone Types,
select the type of phone number entered. Options must be predefined
in .
- Select the
Primary Flag if the contact is the first contact to call
for the vendor.

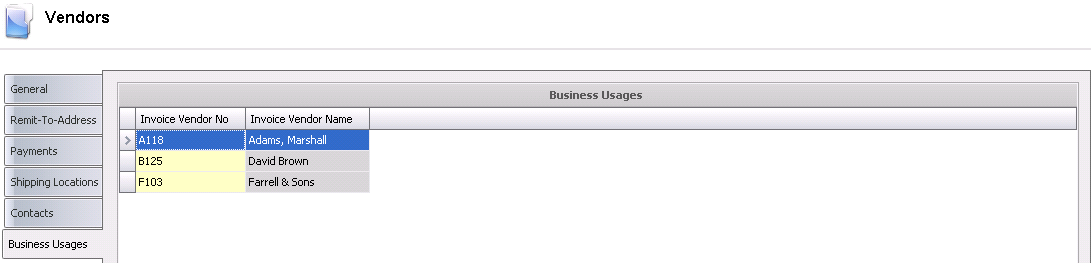
Business Usages
The Business Usages tab is only completed if the Non-Receiving Vendor
flag is selected on the General tab. The Business Usages tab defines the
invoice vendors that can be paid for product on a purchase order for the
non-receiving vendor. Complete details are outlined in .
- Select Business Usages tab
- Click to
add an Invoice Vendor No.
- Invoice Vendor
Name will default based on the selected Invoice Vendor No.