customers

A customer is a company or person that
will purchase goods or services. Customers are used throughout the sales
process. Customers reside in General>Master
Data>Customers and contain the base information required to
initiate sales transactions.
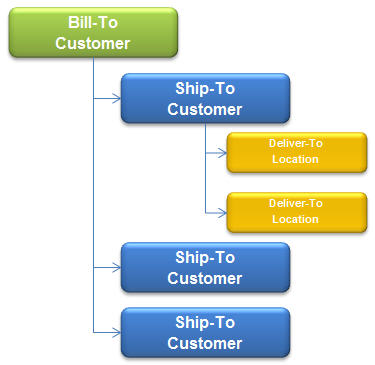
There are three different customer types
to allow flexibility in delivering products.
Bill-To
- this customer type will receive the invoice for all of the shipments
to a ship-To customers. Currency and payments terms are set as defaults
at the bill-to customer. Payment terms can be established by ship-to
location if required. The relationship between the bill-to customer
and ship-to customer are established on the
tab on the of the bill-to customer. This relationship must be established
prior to sales orders being created.
Ship-To
- the customer that will receive the product is defined as a ship-to
customer. The ship-to location establishes all of the details related
to reporting of sales such as sales regions, territories and other
reporting components. Pricing is also established by ship-to locations,
although the same pricing table can be assigned to all ship-to locations
for a specified bill-to customer. A customer can be defined as both
a bill-to and ship-to location.
Delivery Location
- the delivery location allows an optional third tier for delivery.
For example, the order is sold to Customer A, shipped to Customer
B and delivered to Farm 1. The deliver-to location are assigned to
the ship-to customers when creating the customer relationships in
the tab of the bill-to customer.
Create a Customer
Depending on the type of customer that is being created, different tabs
are required for completion.
| Bill-To Customer |
Ship-To Customer |
Delivery Location |
|
|
|
General
The General tab is used to enter the basic details for the customer.
- In General>Master
Data, select Customers.
- In the Customers
index, click
 to create a new customer record.
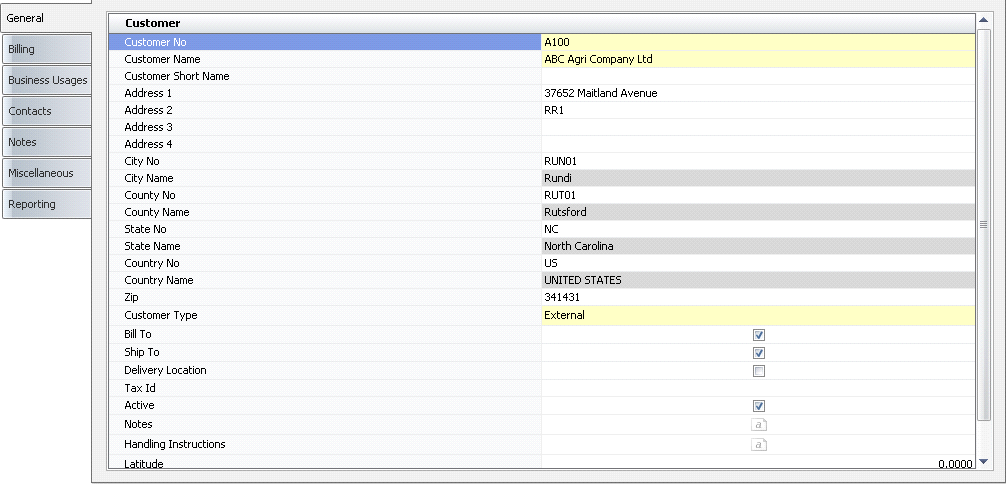
- In the Customer
No field, enter the code that is used to identify
the customer (alphanumeric, max 20 characters). For those interfacing
to a financial system, it is beneficial to use the same codes for
both systems.
- In the Customer
Name field, enter the name to identify the customer (alphanumeric,
max 50 characters).
- Customer Short
Name is an optional field to enter a short-form or common name
for the customer (alphanumeric, max 50 characters).
- In the Address
1-4 fields,
enter the address details for the customer.
- From City
No, select the city code for where the selected
customer is located. City Name
will default from City No, and displays the name of the city in which
the selected customer is located. Cities must be predefined in
- From County
No, select the county code for where the selected
customer is located. County Name
will default and displays the name of the county
in which the selected customer is located. Counties must be predefined
in .
- From State
No, select the state code for where the selected
customer is located. State Name
will default and displays the name of the state in which the selected
customer is located. States must be predefined in .
- From Country,
select the country code for where the selected customer is located.
Country Name will default
and displays the name of the country in which the selected customer
is located. Countries must be predefined in .
- In the Zip field, enter
the zip code or postal code for the customer.
- From Customer
Type, select whether the customer is an
internal or external customer.
Internal
- The customer belongs to the same organization and journal
transactions for the customer are recorded to the intercompany
sales accounts (SLSIC).
External:
The customer is external and journal transactions for the
customer are recorded to the external sales accounts (SLS).
- Select the Bill To flag if the customer
receives invoices. Customer relationships must be established on the
Business Usages tab prior to orders being created.
- Select the Ship To flag if the customer
is a ship-to location. All ship-to locations must be assigned to a
bill-to customer on the Business Usages tab, even if the customer
is a bill-to/ship-to combination.
- Select the
Delivery Location field
if the customer is a deliver-to customer. Delivery locations are assigned
to ship-to locations on the Business Usages tab of the bill-to customer.
- In the Tax
Id field,
enter the 1099 tax identification number.
- The Active
field indicates if the customer is active or inactive. If the customer
is no longer required, de-select the option.
- In the Notes
field, enter any additional notes related to the customer.
- Handling Instructions
is a text field to enter special notes on how the deliveries to the
customers are to be handled (Example: Call the customer the day prior
to the delivery).
- Latitude
and Longitude are the customers'
GPS coordinates for mapping and delivery distances.
Billing
The Billing tab is used to enter the billing
information related to the customer.
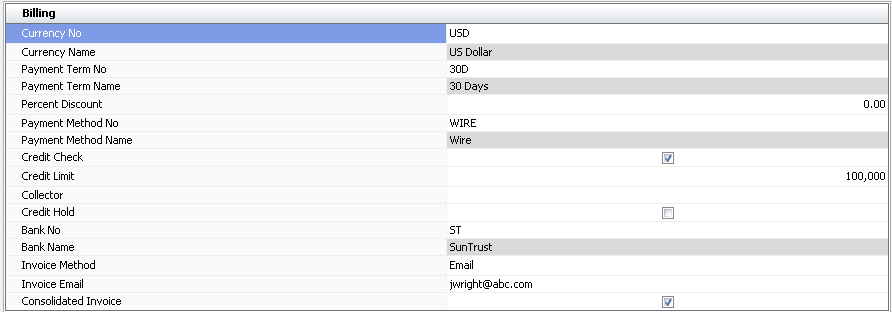
- Currency No is
a required field that indicates the default currency for the customer.
If the currency is different than the default currency of the division
invoicing, multi-currency transactions will be created. The default
currency will transfer to sales contracts and orders with an option
to modify.
- Currency Name
displays a description of the selected currency.
- In the Payment
Term No field, select the payment terms assigned to the
customer. Payment terms can be modified if required, on the
contract or sales order. .
- Payment Term
Name defaults from Payment Term No and displays a description
of the payment terms.
- Payment Method
No outlines how the payment is received. Common options are:
Check, Wire, Draft. Payment methods are predefined in: .
- Payment Method
Name displays the name of the selected payment method.
- Select the Credit
Check flag if there has been a credit check done on the customer.
- If applicable, enter a Credit
Limit for the customer. This field is for reference only.
- Enter the name of the Collector
if there is a collection firm assigned to the customer (alphanumeric,
max 50 characters).
- Select the Credit
Hold flag if the customer is on a credit hold. If the option
is selected, the system will not allow new orders to be created for
this customer.
- From Bank No,
select the customer's bank from the list of user-defined bank numbers.
Banks are predefined in: General>General>Master
Data>Banks.
- Bank Name
displays the name of the bank that is selected for the customer.
- From Invoice
Method, select the method that the customer will use to receive
their invoices. Options are: Mail, Email, or Fax.
- Invoice Email
is only required If Invoice Method is set to Email. Enter the email
address that the invoices will be sent to.
- Select the Consolidated
Invoice flag if the customer receives invoices with multiple
orders on one invoice. If this flag is not selected, the customer
will receive an invoice for every order.
Business Usages
The Business Usages tab is required if the customer is a Bill-to customer
or a Bill-to/Ship-to customer. Business Usages establishes the relationship
for the bill-to and ship-to locations. An order cannot be placed to either
a bill-to or ship-to customer that does not have the relationship defined.

- From Ship To
No, select the ship-to location. The Ship-to flag must be selected
on the General tab for the customer to be selected. If the customer
is both Bill-to/Ship-to, it must still be added to this tab to process
orders.
- Ship To Name
defaults from Ship To No displays the name of the selected Ship-to
customer.
- Payment Term
No will default from the selected bill-to customer. If required,
modify the payment terms for the selected ship-to customer. Payment
terms are created in: .
- Payment Term
Name defaults from Payment Term No and displays a description
of the payment terms.
- Select the Primary
flag if the ship-to customer is the primary location that the product
is delivered.
- From Ship Method
No, use the drop-down menu to select the appropriate shipping
method for deliveries to the customer. Values will default to sales
order with an option to modify. Available options are: Delivery, Pickup,
Courier, or Air.
- Ship Method Name
will default from Ship Method No and displays a description of the
shipping method.

- In the Freight
Term No field, enter the freight terms for the
customer. Some commonly used terms are: FOB Origin, FOB Destination,
and COF.
- Freight Term
Name defaults from Freight Term No and displays a description
of the selected freight terms.
- Interface Account
Name is used to identify the financial account that is used
when transactions are interfaced from MTech to the financial system.
If applicable, enter the name of the interface account,.
- In the Price
Master No field, enter a price list for the customer,
if applicable. Using a price list will automatically price orders
placed to this ship-to customer. The Price Master is created in .
- Price Master
Name defaults from Price Master No and displays a description
of the selected price master list.
- Consolidated
Invoice Flag determines if the ship-to location will be included
in the consolidated billing process. The option defaults from the
Bill-to customer, but can be configured by the ship-to customer. Any
ship-to customer that has the consolidated flag selected will be grouped
on the same invoices if there are multiple shipments in the same invoicing
period.
Delivery Location
Within the Ship To No tab, there is a child grid that contains delivery
information relating to the ship-to customer. This allows a third tier
to the delivery of an order if required.

- Select the
Delivery To Customer from the drop-down list. The list
will be filtered for customers with the Delivery Location flag selected.
- The Customer
Name will default from the selected Delivery To Customer.
- Address 1-3
defaults from the Delivery To Customer.
- City No
defaults from the Delivery To Customer.
- State No
defaults from the Delivery To Customer.
- The Zip field defaults
from the Delivery To Customer.
State Name
will default and displays the name of the state in which the selected
customer is located.
- Country No
will default and displays the name of the country which the selected
customer is located.
Contacts
The Contacts tab is used to define internal and external contacts for
the customer. The Primary Flag is used to identify the main contact information
for the internal and external contacts. External contacts are typically
customer contacts while internal contacts are those within the Company,
such as the sales person or buyer that may deal with the customer.

- Click to add a
new contact to the grid.
- From Contact
Type, select whether the contact is an External or Internal
contact.
- From Title,
select the appropriate title for the contact. Examples are: Mr, Mrs,
Ms.
- Enter the First
Name of the contact.
- Enter the Last
Name of the contact.
- Enter the Job
Title of the contact.
- In the Email
field, enter the Email address of the contact (if applicable).
- Select the Primary Flag
if the contact is the first contact to call for the customer
- The Active
Flag will be selected by default.
If the contact is no longer needed, de-select the active flag.
Additional Contact Details
Within the Contact, there is a child grid that contains the telephone
and fax numbers related to the contact. These details must be defined
if the contacts are to be added to the sales order.

- In the Country
Code field, enter the calling code for the country that
the customer is located in.
- In the Area
Code field,
enter the area code of the customer's location.
- In the Telephone
field, enter the main telephone number for the customer.
- Enter the Extension
of the telephone number (if applicable)
- From Phone Types,
select the type of phone number entered. Options must be predefined
in .
- Select the
Primary Flag if the contact is the first contact to call
for the customer.
Notes
The Notes tab allows the user to enter additional information relating
to specific customers.

- In the Contact
Name field, enter the name of the person that was contacted
(alphanumeric, max 50 characters).
- In the Subject
field, enter a brief description for the purpose of the call or discussion
(alphanumeric, max 50 characters).
- Enter a Priority
number for the call (alphanumeric, max 10 characters). This field
is undefined.
- In the Notes
field, enter additional information related to the customer call or
discussion. (alphanumeric, max 255 characters)
- Enter the Date
that the call or discussion with the customer took place.
Reporting
The Reporting tab cis populated when the customer is defined as a ship-to
customer. The structure of these options is completely dependent on how
the Company wishes to report sales data.
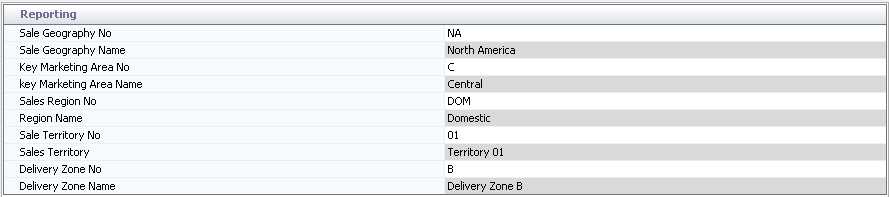
- From Sale
Geography No, use the drop-down menu to select the
geographic area of the customer. This field is user-defined and is
used for reporting purposes. Codes must be pre-defined in:
- Sale Geography
Name defaults from Sale Geography No and displays a description
of the geographic area selected.
- From Key
Marketing Area No, use the drop-down menu to select the
area of the customer. This field is user-defined and is used for reporting
purposes. Codes must be pre-defined in: .
- Key Marketing
Area Name defaults from Key Marketing Area No and displays
the name of the selected marketing area.
- From Sales
Region No, use the drop-down menu to select the region
in which the customer is located. Codes must be pre-defined
in: .
- Region Name defaults
from Sales Region No and displays a description of the region.
- From the Sales
Territory No drop-down menu, select to assign a territory
number to the list customer . This field is used for reporting services.
Codes must be pre-defined in: .
- Sales Territory
defaults from Sales Territory No and displays a description for the
selected sales territory name.
- Delivery
Zone No is used
for ship-to customers, and for planning purposes. This field is used
for reporting services. Codes must be pre-defined in: .
- Delivery Zone
Name displays the name of the selected delivery zone
that can be used for planning purposes.