Deliveries

Feed delivery transactions are used for both internal and external deliveries.
Feed mills can operate as profit centers or cost centers.
- Profit Center
– a feed mill that operates as a profit center requires that a customer
number be assigned to every feed delivery, both internal and external.
For internal deliveries, the purchase order and receiving transaction
for the internal farm will be created automatically when the feed
delivery is posted. As well, transactions will require a sales order
and shipment that is automatically created when the feed delivery
is posted. The posting of the feed deliveries creates journal transactions
to record the accrued receivable to the customer and the estimated
cost of sales for the delivery. Cost of sales is adjusted to actual
cost at global post.
- Cost Center
– sales orders will be generated for external deliveries to customers,
however, internal feed delivery transactions will be generated for
internal farm and entity deliveries. The posting of the feed delivery
for external customers records the accrued receivable to the customer
and the estimated cost of sales for the delivery. Posting of internal
deliveries records the estimated cost of the delivery to the farm
or entity. Estimated costs are adjusted to actual cost at global post.
There are several different types of feed delivery transactions:
- Delivery
– internal or external deliveries to farms, entities or customer.
- Return
– feed is returned from a farm, entity or customer to the feed mill.
This transaction returns the feed to the mill as rework.
- Haul Back
– feed is hauled back from farm, entity or customer to the feed mill.
The feed is returned to the mill as the same formula that was delivered.
- Credit
– feed transferred to another farm or entity. A credit can also be
an adjustment to the farm/entity.
- Debit
– feed received from another farm or entity. A debit can also be an
adjustment to the farm/entity.
Feed Deliveries can be automatically generated from the Feed Order Planning
screen or, alternatively, can be manually entered.
Prior to creating a Delivery record the following items should be created:
The following procedures are outlined related to creating a Feed Delivery
Transaction:
Create
a Feed Delivery Transaction
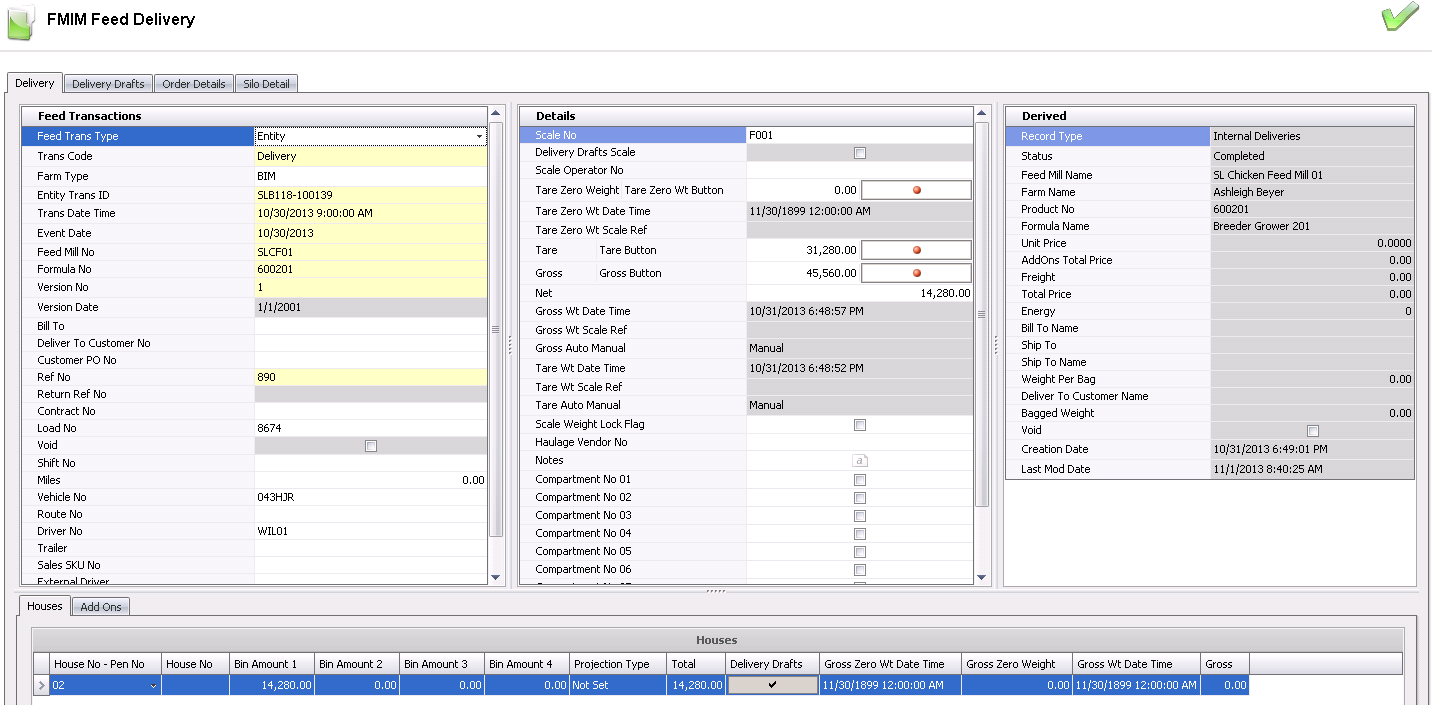
Delivery
The Delivery tab contains five different grids/tabs to be completed:
- In FMIM>Transactions>Feed
Transactions, select Deliveries.
- In the Feed Deliveries main index, select
 to create a new record.
- Click on the Delivery
tab.
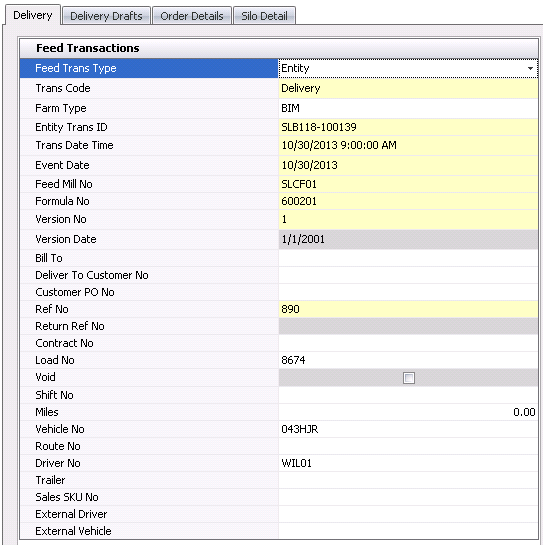
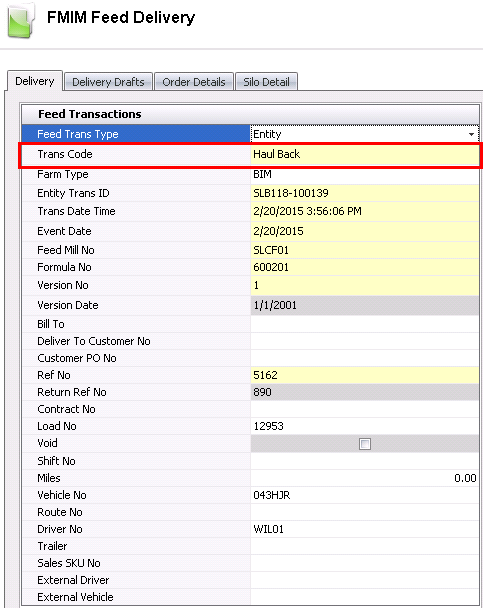
Feed Transactions
In the Feed Transactions grid, the yellow highlighted fields are required
to be filled in and all other fields are optional.
- From the Feed
Trans Type drop-down menu, select the type of the transaction
for the feed delivery. Options are: Farm, Entity or Customer.
- From the Trans
Code drop-down menu, select the type of feed transaction. Options
are: Delivery, Return, Haulback, Debit or Credit. Debit and credit
transactions do not affect feed mill inventory as they represent farm-to-farm
transfers.
- Select the Farm
Type for delivery if Farm or Entity is selected in Feed Trans
Type. This will filter the Entity Trans ID to only display farms or
entities for the selected farm type.
- In the Entity
Trans ID field, enter the destination for the feed delivery.
Depending on the selected Feed Trans Type, the entity will be sourced
from a farm, entity or customer.
- Trans Date Time
indicates the date and time that the feed transaction is delivered.
- Event Date
is usually the same as the Trans Date, however, if the transaction
is required to be reported in a different fiscal period, this date
may be different. The Event Date is used for accounting.
- In the Feed
Mill No field, enter the feed mill that is delivering the feed.
- In the Formula
No field, enter the feed formula code for the delivery. The
feed formula must be assigned to the feed mill in: FMIM>Master
Data>Versions>Feed Formula Versions.
- Select a Version
No for the formula.
- The Version Date
will default in.
- Bill To
displays the Bill-to code as derived from the ship-to location. If
the Ship-to customer is assigned to more than one Bill-to customer,
the Bill-to customer must be selected. Bill-to/Ship-to relationships
are defined in General>Master
Data>Customers, on the Business Usages tab.
- In the Deliver
To Customer No field, enter a delivery location if the feed
delivery is being delivered to a location other than the Bill-to customer.
- In the Customer
PO NO field, enter the customer's PO number.
- Ref No
is an automatically generated reference number that uniquely identifies
the transaction.
- Return Ref No
is an auto-derived field that is only populated when the transaction
has a Trans Code of Return. The field indicates the reference number
of the original delivery.
- Contract No
is an optional field for external transaction to price the delivery
based on a sales contract.
- Load No
is an auto-derived field and indicates the load number of the delivery.
If required, modify the load to an existing load.
- Selecting the Void
flag will reverses all transactions related to the delivery.
- Shift No
indicates the shift in which the feed was delivered. Enter the shift
number for the load.
- Enter the number of Miles
to the delivery location.
- Vehicle No
is an optional field to enter the vehicle that delivered the feed.
Internal vehicles are defined in: Admin>Business>General>Definitions>Vehicles.
- In the Route
No field, enter the route number for the delivery (alphanumeric,
max 20 characters).
- Driver No
is an optional field to enter the driver that delivered the feed.
Internal drivers are defined in: Admin>Business>General>Definitions>Drivers.
- Trailer No
is an optional field to enter the trailer that delivered the feed.
Internal trailers are defined in: Admin>Business>General>Definitions>Vehicles.
- The Sales
SKU for the sales order needs to be created if the feed mill
operates as a profit center, or if the feed is being delivered to
an external customer. If there is only one sales sku associated with
the formula, the sales sku will default. If there is more than one
sales sku, the user must select the required sku.
- If the load is to be delivered by an
External Driver, enter
the driver name or code (alphanumeric, max 100 characters).
Text field with no validation.
- If the load is to be delivered by an
External Vehicle, enter
the vehicle code (alphanumeric, max 100 characters). Text field
with no validation.
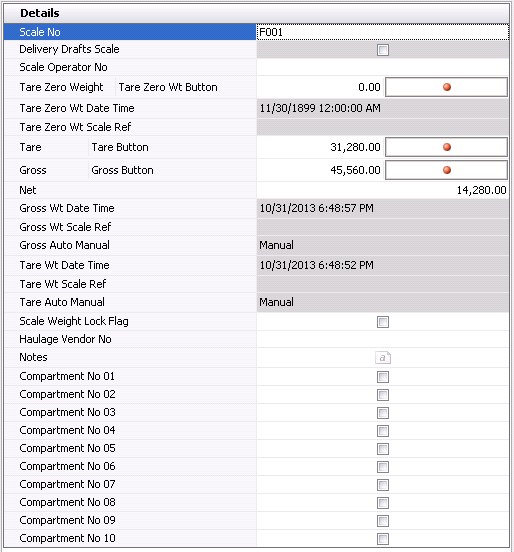
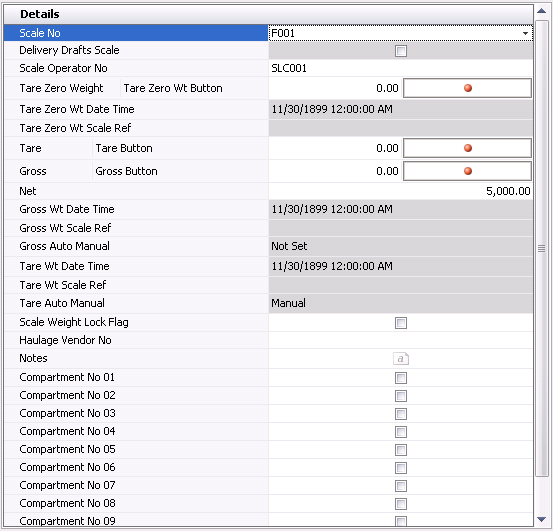
Details
- Scale No
indicates the scale that the truck was weighed. Scales are pre-defined
in the system and if applicable, configured to be automatically interfaced
to the system.
- Delivery Drafts
Scale is derived from Feed Delivery. It is used to weigh each
bin on a trailer as it is filled and can weigh up to 8 bins. Scales
must be configured in Admin >Business>General>Definitions>Weight
Scales.
Scale Operator
No indicates the scale operator that weighed the truck. Select
the scale operator for he feed delivery. Scale operators are pre-defined
in: Admin>Business>FMTS>FMIM>Scale
Operators.
Tare Zero
Weight represents the tare zero weight of the vehicle. This
field can be manually entered or interfaced from a scale.
Tare Zero
Wt Date Time displays the date and time that the tare zero
weight was recorded at the scale.
Tare Zero
Wt Scale Ref No displays the reference number for the tare
zero weight scale reading.
Tare
represents the tare weight of the vehicle. This field can be manually
entered or interfaced from a scale.
Gross
represents the gross weight of the vehicle. This field can be manually
read or interfaced from a scale.
Net
is the difference between gross and tare. This field can be manually
entered or if weights are entered, it is calculated automatically.
Gross Wt Date
Time displays the date and time that the gross weight was recorded
at the scale.
Gross Wt Scale
Ref No displays the reference number for the gross weight scale
reading.
Gross Auto
Manual indicates the Gross setting of Auto or Manual.
Tare Wt Date
Time displays the date and time that the tare weight was recorded
at the scale.
Tare Wt Scale
Ref No displays the reference number for the tare weight scale
reading.
Tare Auto
Manual indicates the tare setting of Auto or Manual.
Selecting the Scale
Weight Lock Flag locks the field so that after the scale reading
has been interfaced, the weight details cannot be modified.
From Haulage
Vendor No, select the vendor that will be delivering the product.
If the Freight Type is set to Delayed, then a default haulage vendor
must still be assigned.
Notes
is a text field to enter additional comments related to the delivery
(alphanumeric, max 255 characters).
In the Compartment
1-10 fields select the flags to indicate the compartments that
were used for the feed delivery.
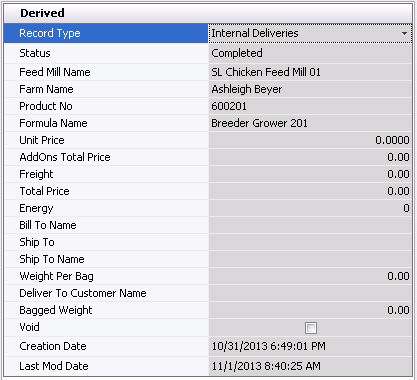
Derived
The fields in the Derived tab will default in.
- Record Type
identifies the type of record and will default to Internal Deliveries.
- Status
indicates the status of the delivery.
- Feed Mill Name
displays the name of the
feed mill that is delivering the feed.
- Farm Name
displays the name of the farm where the feed will be delivered.
- Product No
indicates the feed product being delivered.
- Formula Name
displays the name of the feed formula being delivered.
- Unit Price
indicates the price per feed unit.
- AddOns Total
Price indicates the total price of the add-ons.
- Freight
indicates the total price for freight.
- Total Price
displays the total price including add-ons and freight, if applicable.
- Energy indicates...
- Bill To Name
displays the name of the Bill-to customer.
- Ship To
identifies the ship-to customer.
- Ship To Name
displays the name of the ship-up customer.
- Weight Per Bag
indicates the weight per bag of feed.
- Deliver To Customer
Name displays the name of the deliver-to customer.
- Bagged Weight
displays the total weight of the bags.
- Selecting the Void
flag will cancel the transaction.
- Creation Date
indicates the date the transaction was cancelled.
- Last Mod Date
indicates the date the transaction was last modified.
- In the Deliver
To Customer No field, enter a delivery location if the feed
delivery is being delivered to a location other than the Bill-to customer.
- In the Customer
PO NO field, enter the customer's PO number.
- Ref No
is an automatically generated reference number that uniquely identifies
the transaction.
Houses
If the feed was delivered to an entity, the house and bin details can
be entered for the delivery. The house details must total the net weight
of the feed delivered.
Click on the Houses
tab and select  to create a new line.
If the delivery is going to a Pen, enter the
House No - Pen No where the
feed is being delivered.
If the delivery is going to a house, enter
the House No where the feed
is being delivered.
In the Bin
Amount 1-4 fields, enter the amount of feed delivered in the
appropriate bin.
Select the Projection
Type.
Total
is the combined amounts for bins 1-4.
The Delivery
Drafts flag will be selected by default.
Remaining columns are derived from the Details
Screen.

Add-Ons
If the feed formula had any additional add-on charges, such as loading
fees or delivery charges, the details are displayed on this tab. Add-ons
are defined in Feed
Formula Prices. The rate is displayed in the tab and the calculated
amount of the add-on is displayed in the derived fields in the header.
Data is derived from the Purchase Order. See Purchase
Order for more details.

Delivery Drafts
In order to use Delivery Drafts, it must first be configured in Admin>Business>General>Definitions>Weight
Scales. The Scale No must also be selected when creating Deliveries.
Delivery Drafts is a weighting system based upon the equipment at the
feed mill. The weighting system has a hopper that holds a minimal
amount of feed. The hopper is filled and weighed then feed is placed in
bin/compartment of trailer. The process is repeated until all of the bins are filled
or the load is completed.
- In the Houses tab, select the Delivery Drafts flag.
- Complex Entity
No will auto-populate based
upon data entered in Delivery tab.
- Draft No displays
the trailer or compartment number.
- Zero Weight Date
indicates the date the beginning weight was recorded.
- Zero Weight
is the beginning weight. The beginning weight has to be set to zero.
Click on the red dot in the Zero Weight Button column to begin recording,
then enter 'zero' and click the red dot again to set the amount
to zero.
- Gross Weight
Date indicates the date the gross weight was recorded.
- Gross
is the amount of feed per draft. Click on the red dot in
the Gross Button column to begin recording, then enter the Gross
feed amount and click the red dot again to set the amount..
- Net Weight Date
indicates the date the net weight was recorded.
- Net is
the total amount of feed weighted. Remaining columns are derived based
upon the system date and time of the Draft transactions.
- By clicking 'OK' in the FMIM Feed Delivery Drafts
Weights, the weights will be updated in the Houses and Details screens.

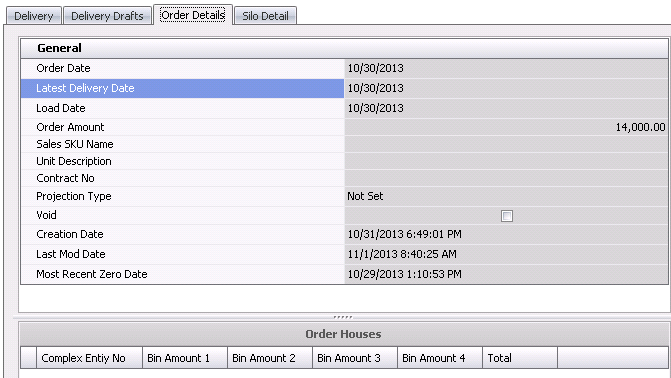
Order Details
The Order Details screen is for viewing only and cannot be modified.
Data is derived from Feed Order Planning and/or FDSA. There are two components
in the Order Details tab.
General
- Order Date
represents the date the order was placed.
- Latest Delivery
Date represents the last date the feed can be delivered for
the transaction.
- Load Date
represents the date the delivery is to be loaded.
- Order Amount
indicates the amount of feed ordered. The amount is entered
in Feed Order Planning or is transferred from FDSA feed projections.
The amount will be displayed in lbs or kgs depending on the
unit of measure utilized by the feed mills division.
- Sales SKU Name
represents the code that is used when selling the product to
the customer. This is optional and can be the same as the product
code, however, the sales sku must be unique within the Sales tab.
- Unit Description
describes the unit of measure in which the product is being sold to
the customer. Examples: Tons, lbs, tonnes, kg, drum, box, etc. (alphanumeric,
max 40 characters).
- Contract No
is an auto-assigned unique number that identifies the contract.
- Projection Type
indicates the type of projection if the load is imported from FDSA.
- If the Void
flag is selected, the transaction will be cancelled.
- Creation Date
indicates the date the transaction was cancelled.
- Last Mod Date
indicates the date the transaction was last modified.
- Most Recent Zero
Date indicates the last date a zero weight was recorded.
Order
Houses
- Complex Entity
No Identifies the entity where the feed is being delivered.
- Bin Amount 1
-4 fields identify the Bin number and amount of feed in each
bin.
- Total
is the combined amounts for bins 1 -4.
Silo Detail
- In the Formula
No field, enter the formula for the feed that is being
delivered.
- From FMIM
Silos, select the required silo if the silo needs to
be defined. The transaction will not default a silo for the
delivery. Additional lines will be required if the feed is delivered
from more than one silo.
- Silo Name
displays a description of the selected silo from which the feed
was delivered.
- In the Lot
No field, enter the lot number for the feed delivery line
(optional field). If multiple lots were shipped, additional lines
must be added.
- Bin Amount
will default from the feed delivery and displays the amount of feed.
If additional lines are required to accommodate multiple silos and
or lots, the total of the silos detail must equal the net amount
on the Delivery tab.

When the delivery transaction is completed, the record must be saved
and posted. Posting the record takes the price based on the effective
date and used that price to create the feed trans journal. Global Post
will adjust the actual amounts. *Note:
If there are any feed deliveries that do not have silo details, the transaction
cannot be saved.
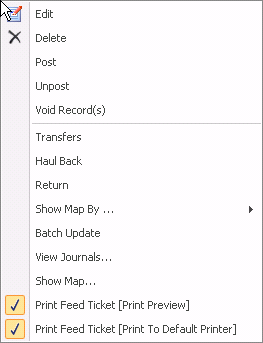
Right-Click
Options
By highlighting a record and right clicking, more options are available:
- Edit is
the option to make changes to the record before it is posted.
- Delete
is the option to remove the record completely from the system. Records
must be in 'UnPosted' status in order to do this.
- Post locks
the records, and record becomes read-only.
- Unpost
unlocks the records so the record can be edited.
Void Record(s)
leaves the record in the system in voided status and also voids the
journal transaction so it is not included in the data. This is used
when an audit trail is needed.
View Journals
lets the user view all applicable journals for the transaction.
Show Map
will load the Feed Deliveries map and displays the farm and feed mill
locations. Feed Mills are shown in green and Farms are shown in blue.
Print Feed Ticket prints the default
system Feed ticket as long as the report is mapped in: Admin>System>Screen Report Mappings
Print Feed
Delivery Ticket prints the default system Feed Delivery ticket
as long as the report is mapped in: Admin>System>Screen Report Mappings
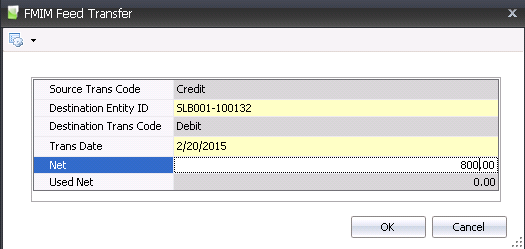
Transfers
Transfers creates a dialog box that transfers feed internally between
entities. This can only transfer feed from 'Posted' records.
Right-click on the required transaction and
select Transfers.
In the FMIM Feed Transfer dialog box, the Source Trans Code will default in.
Select the Destination
Entity ID to identify where feed is to be delivered.
Destination
Trans Code will default in.
In the Trans
Date field, enter the date that the transactions occurs.
In the Net
field, enter the amount of feed transferred.
Used Net
will default in.
Click the OK button.
Haul Back
Haul Back refers to when feed is hauled back from a farm, entity or
customer to the feed mill. The feed is returned to the mill as the same
formula that was delivered.
Right-click on the required transaction and
select Haul Back.
In the Date
Time dialog box, enter the date and time of the haul back.
The Feed Delivery screen will appear and the
fields in the Feed Transactions
grid will default in.
Trans Code
will be set to `Haul Back`.
The Details
grid will require certain fields to be entered.
Scale No
is optional and is used to identify the scale that measured the weights.
- Select the Scale
Operator No, which identifies the person running
the scales.
- In the Gross
field, enter the gross weight of the vehicle. This field can be manually
read or interfaced from a scale.
- Tare is
the tare weight of the vehicle. This field can be manually entered
or interfaced from a scale.
Net
is the difference between gross and tare. This field can be manually
entered or if weights are entered, it is calculated automatically.
Return
Return refers to feed that is returned from a farm, entity or customer
to the feed mill. This transaction returns the feed to the mill as rework.
Journal transactions are created during this process. Returns are created
from 'Posted' records only.
Right-click on the required transaction and
select Return.
The Feed Delivery screen will appear and the
fields in the Feed Transactions
grid will default in.
- Trans Code will be set to 'Return'.
- The Details
grid will require certain fields to be entered.
Select the Scale
No used to identify the scale that measured the weights.
In the Gross
field, enter the gross weight of the vehicle. This field can be manually
read or interfaced from a scale.
Tare
is the tare weight of the vehicle. This field can be manually entered
or interfaced from a scale.
Net
is the difference between gross and tare. This field can be manually
entered or if weights are entered, it is calculated automatically.
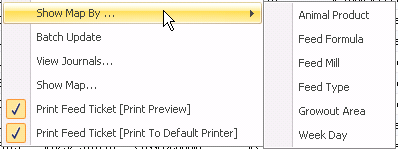
Show Map By
Highlight one or more records, right-click
and select Show Map By. There
are options to view farm and feed mill locations by Animal Product,
Feed Formula, Feed Mill, Feed Type, Growout Area and Week Day. Depending
upon the group by the function that is selected, the location
points will be grouped by the same colors.
The map will appear according to selection.
The farm and feed mill locations appear on the map. Feed
Mills are shown in green and Farms are shown in blue.
Batch Update
- Highlight the required records, right-click and
select Batch Update.
- The Batch Update screen will appear with
fields to be edited. *Note: Clicking the Options
 button in the Batch Update
screen will also provide an option to `Group By Ref No`.
button in the Batch Update
screen will also provide an option to `Group By Ref No`.
- Load No,
Ref No, Complex
Entity No and Formula No
are read-only fields and cannot be edited.
- In the Trans
Date Time field, enter the transaction date and time.
- Enter the new bin amounts in the Bin
Amount 1-4
fields.
- The Vehicle No
will default in if already populated in Feed Deliveries, but can be
modified if required.
- The Driver No
will default in if already populated in Feed Deliveries, but can be
modified if required.
- The Scale Operator
No will default in if already populated in Feed Deliveries,
but can be modified if required.
- Enter any additional Notes
and save and close the screen.

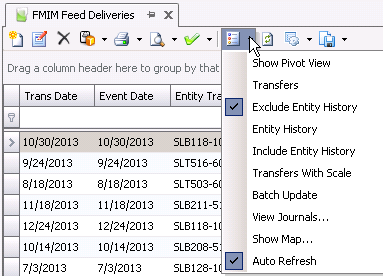
Menu Options
- Transfers
creates a dialog box that transfers feed internally between entities.
This can only transfer feed from Posted records.
- By clicking Exclude Entity History, this does
not include transactions that were created from entity transfers.
The index will only display feed delivery transactions.
- By clicking on Entity
History, this includes transactions that were
created from entity transfers only and will not display actual feed
deliveries.
- By clicking on Include
Entity History, this includes transactions that
were created from entity transfers. The index will display feed delivery
transactions and transactions created from entity transfers.
- Transfers with
Scale creates a new Feed Delivery screen in order to enter
scale weights.
- Batch Update
allows for multiple records to be updated at once.
- View Journals
displays all journal transactions for the selected records.
- By highlighting one or many records and
selecting Show Map,
the farm and feed mill locations appear on the map. Feed Mills are
shown in green and Farms are shown in Blue.
- if Auto
Refresh is selected, it will automatically update the
screen. If this option is not selected, the screens will not update
until the refresh button
 is
selected.
is
selected.