Feed formulas are first created at the global level and are then assigned to the feed mill in Feed Formula Versions. There are several different types of feed formulas as outlined below. The different versions of feed formulas are maintained in FMIM>Master Data>Versions>Feed Formula Versions.
Other features related to Feed Formulas.
Prior to creating a Feed Formula, the following items should be created.
The Feed Formula screen has several tabs that must be completed in the creation process.
The General tab contains the basic information related to the feed formula.
In General>Products>Feed, select Feed Formula.
In the Feed
Formula index, click  to create a new feed product.
Click on the General tab.
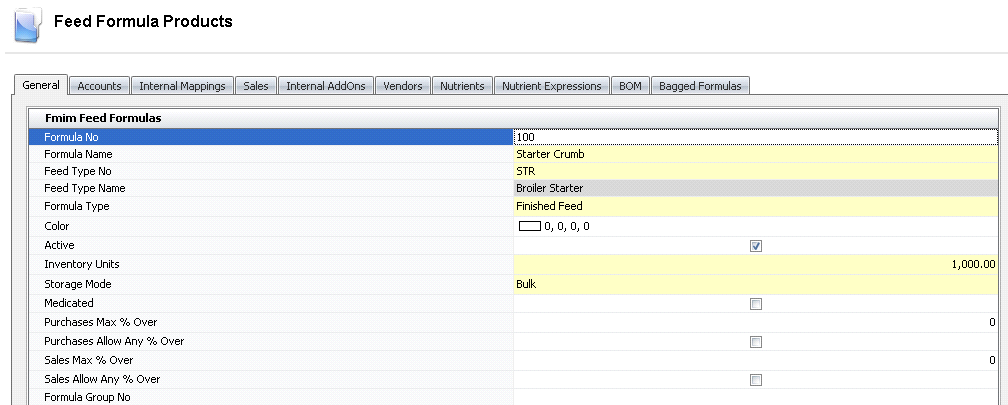
Enter the Formula No to identify the product within the system (alphanumeric, max 50 characters).
Enter the Formula Name as a description for the product (alphanumeric, max 250 characters).
In the Feed Type No field, select the required feed type. The feed formula is assigned to a feed type. The Feed Type No must be predefined in Admin>Business>FMTS>FMIM>Feed Types.
Enter the required Formula Type. Options are:
Finished Feed - base feed formula that is produced based on a formulation of ingredients. It is important to note that if bagged feeds are used, a separate feed formula must be created for the bulk and the bagged feed. One formula must be created for each size of bag produced and delivered.
Formulas can be Color coded for easy view for planning purposes. If desired, choose the color from the planning grid.
The Active flag will be selected by default. If the product is no longer utilized, the active flag is required to be unchecked.
Inventory Units indicates the base unit for the physical inventory to be entered. For example: If the physical inventory for feed formula is to be entered in lbs (Imperial) or kgs (Metric), enter '1''. If the physical inventory is recorded in tonnes, enter 2,000 (Imperial) or 1,000 (Metric) tons. If the feed formula is a bagged feed, the weight per bag is entered in this field.
In the Storage Mode field select whether the formula is a bagged or bulk product.
Click to select if the formula is a Medicated feed. If this flag is checked, a valid prescription must be available in order to ship the product.
Purchases Max % Over is used when the product has a tolerance percentage for the receiving transaction. (Example: The purchase order has 100 units. Max % Over is defined as 5%, which means the receiving transaction will allow up to an including 5 additional units).
Purchases Allow Any % Over can be selected if there is no limit and the purchaser can receive any quantity over the specified product units.
Sales Max % Over is used when the product has a tolerance sales amount for the receiving transaction. (Example: The sale order has 100 units and the Sales Max % Order is defined as 10%, which means the shipment transaction will allow for an additional 10 units to be shipped).
Sales Allow Any % Over is selected when there is no limit of shipping product units over what the customer has ordered.
Formula Group No is used for Feed Formulation Assistant (FFA) to provide the ability to apply formulation changes to a group of formulas.
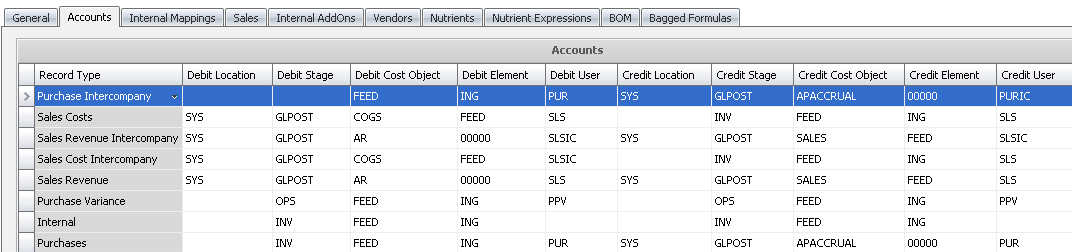
The default accounts established for the feed formulas are defined on the accounts tab. It is recommended that the default accounts are used as there is logic throughout the system which utilizes the cost segments.
Internal mappings are not currently used in feed formulas.
If the feed formula is sold to external sources, a sales sku must be created prior to creating a sales order. Need screen shot and more information.

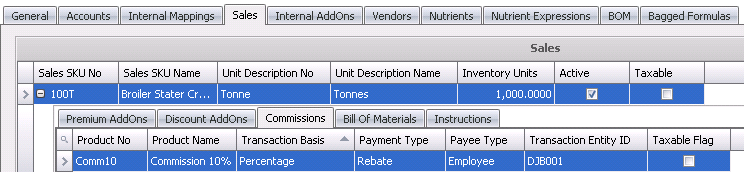
In the Sales SKU No field, enter a unique code that will be used in creating sales contracts, orders, and price lists (alphanumeric, max 50 characters). This is optional and can be the same as the product code, however the sales sku must be unique within the Sales tab.
In the Sales SKU Name field, enter a description for the sales SKU. This will normally print on orders and invoices (alphanumeric, max 100 characters).
In the Unit Description No field, select the required unit of measure in which the product will be shipped. The Unit Description No must be predefined in Admin>Business>General>Definitions>Units of Measure prior to being selected on the Sales tab.
The Unit Description Name will default based on the selected Unit Description No.
Inventory Units indicates the number of units that will be removed from inventory when the sales sku is shipped. (Example: If a box of 20 units is shipped, the user will enter 1 box and the inventory will be decreased by 20 units). This value defaults based on the selected Unit Description No.
New sales skus' will default as Active. If the sales sku is no longer required, de-select the Active flag.
If the product is Taxable, the flag must be checked in order for taxes to calculate on the product. Tax codes must be entered on the price list, sales code, sales contract, or sales order for the taxes to be calculated.
When the Cull Sales box is selected, order shipments will not deplete source head inventory.
In the child grid within the sales sku, there is the option to define additional sales details such as added charges, discounts or commissions on the product.
The add-ons must be pre-defined before adding to the sales sku. The
add-ons can be configured to be included in the revenue of the product
or alternatively, be coded to an entirely different account which is not
included in the product revenue. There are two types of add-ons:
Premium add-ons add to the price of the product.
Discount add-ons reduce the price of the product.

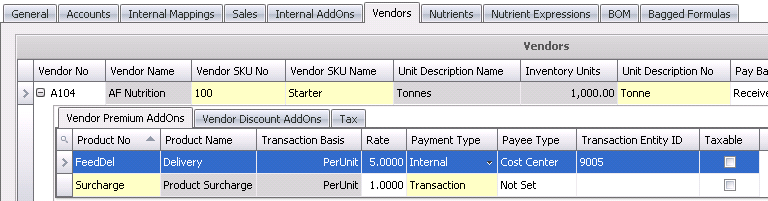
In the Product No field, select from a list of previously defined premium add-on codes. Add-ons must be selected on the sales sku before being transferred to a contract, price list, or order. Add-ons must be predefined in General>Products>AddOns.
Product Name displays the description of the selected add-on as defined.
The Transaction Basis is a read-only field that defaults from the selected add-on and determines how the add-on is calculated. Options are: Per Unit, Percentage, Flat Rate, or Free Percentage. Free percentage is currently only used for poultry products.
Payment Type determines when the add-on amount is calculated and invoiced. Options available are:
Transaction: Processed at time of shipment and will be included on the customer invoice.
Rebate: Will record accrual amount at time of shipping but will not transfer to the invoice. Payment/invoice will be processed at a later date.
Internal: An internal transaction that is not invoiced to an external source (Example: There is an internal haulage department that gets a credit for hauling products).
The Payee Type field is optional. If the add-on is to be processed by an alternative sources, select the source type for the add-on. Options are: Customer, Vendor, Employee, or Cost Center. If the field is left blank, it assumes the product customer for the add-ons.
Transaction Entity ID is a required field if a different Payee Type is selected. Select the appropriate customer or cost center.
Taxable Flag identifies if the item is taxable or non-taxable when the item is purchased. Tax codes must be assigned to the sales order for the taxes to be calculated.
Select Print on Invoice if the add-on is to be printed on the default system invoice. If the add-on is not to be printed on the invoice, the option should not be selected. This option can be further defined in price lists.
In the Product No field, select from a list of previously defined premium add-on codes. Add-ons must be selected on the sales sku before being transferred to a contract, price list, or order. Add-ons must be predefined in General>Products>AddOns.
Product Name displays the description of the selected add-on as defined.
The Transaction Basis is a read-only field that defaults from the selected add-on and determines how the add-on is calculated. Options are: Per Unit, Percentage, Flat Rate.
Payment Type determines when the add-on payment is made. Options available are:
Transaction: Expense will be processed at time of receiving and will create a separate commission payment.
Rebate: Will record accrual amount at time of receiving but will not transfer to the invoice. Payment/invoice will be processed at a later date.
Internal: And internal transaction that is not invoiced to an external source (Example: There is an internal department that gets a credit for selling products).
The Payee Type field is optional. If the add-on is to be processed by an alternative source, select the source type for the add-on. Options are: Customer, Vendor, Employee, or Cost Center. If the field is left blank, it assumes the customer for the add-ons.
Transaction Entity ID is a required field if a different Payee Type is selected. Select the appropriate employee, customer or cost center.
Taxable Flag identifies if the item is taxable or non-taxable when the item is purchased. Tax codes must be assigned to the sales order for the taxes to be calculated.
The Bill of Materials tab is used to determine the products that must be used to ship the product. Based on the products that are entered in this tab, the system will create automatic usage transactions for the products required to ship the product. Product must be predefined before selecting on the Bill of Materials tab. Note that if the feed formula is a bagged feed, the field products required to bag the feed in the repack transaction will be defined on the BOM tab. The products defined on the Sales>Bill of Material tab are only additional products required to ship a specific sales SKU.
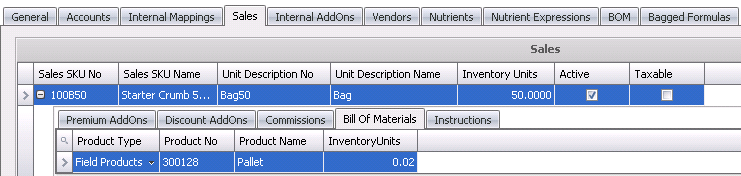
Product Type determines the type of product that will be used in the Bill of Materials. Any inventory product type can be selected.
Based on the selected product type, a list of available products will be available. Select the Product No that is required for the product to be shipped.
Product Name will default based on the selected product.
Inventory Units determines how many product units are required for each Bill of Material product. For example, if there are 50 bags on a pallet, then 1 pallet/50 bags = 0.02. The usage will then calculate based on the number of bags shipped. If there are 100 bags shipped, a usage transaction will be created for 2 pallets.
Instructions are default comments that are applicable to the product. These instructions are predefined in Admin>Business>General>Definitions>Instructions. Instructions are generally used to print on specific documents such as sales confirmations, invoices and hatchery work orders.
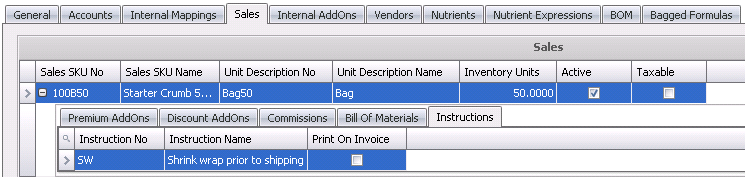
From Instruction No, selects the instruction for the product that is predefined in Admin>Business>General>Definitions>Instructions.
Instruction Name displays the description of the selected Instruction No. The Instruction Name will be the text that prints on the various forms or reports.
If the instruction is to print on the default system invoice, select the Print On Invoice option. If the instruction is not required to print on the default invoice, the option is not selected. These options can also be used in custom reports.
Internal add-ons are used when delivering feed to internal farms, to charge farms and entities additional costs in excess of the actual feed cost.

From Add-On Type, select whether the internal add-on is a premium or discount add-on. Premium will increase the cost to the destination cost center while the discount will reduce the cost to the destination cost center.
In the Product No field, click the box to select from a list of previously defined premium or discounts add-ons.
Product Name displays the description of the selected add-on as defined.
The Transaction Basis is a read-only field that defaults from the selected add-on and determines how the add-on is calculated. Options are: Per Unit, Percentage, Flat Rate, or Free Percentage.
Payment Type determines when the add-on cost is recorded. Options available are:
Transaction: Processed at time of transfer and will be included in the transfer journal.
Internal: Used when another department is required to be credited or debited for the add-on (Example: There is an internal haulage department that gets a credit for hauling products).
The Payee Type field is only required if the Payment Type is set to Internal. If this is the case, then the Payee Type should be set to Cost Center.
Transaction Entity ID is a required field if a Cost Center is selected as the Payee Type. Select the cost center that will receive the debit or credit for the add-on amount..
If the Rate is standard for all transactions, enter the rate in this field. If the rate is defined by cost center, then rates must be applied in Internal Pricing.
Accrual is selected if the amount of the add-on is reversed at period end with the internal price of the product. There is a separate period end task that will reverse any add-ons with the accrual option selected. If the option is not selected, the cost of the add-on will not be reversed at period end.
From Cost Center No, select the cost center (s) for which the product will be required. If the cost center is left blank, the transaction will assume the source cost center of the transaction. For example, if Feed Mill A is transferring feed to Feed Mill B, Feed Mill A will receive the credit for the add-on as it is the source cost center.
If the Rate is standard for all transactions, enter the rate in this field. If the rate is defined by the cost center, then rates must be applied in Internal Pricing.
Accrual is selected if the amount of the add-on is reversed at period end with the internal price of the product. There is a separate period end task that will reverse any add-ons with the accrual option selected. If the option is not selected, the cost of the add-on will not be reversed at period end.
Before a formula can be purchased, the vendor/product relationship must be established. This option allows the user to define the unit of measure and any additional costs or discounts associated with the product. If the formula is purchased from the same vendor in different units, a vendor sku must be created for each unit.

Vendor No contains a list of previously defined vendors. Select the vendor where the formula is purchased from.
Vendor Name displays the name of the selected vendor.
In the Vendor SKU No field, enter the code that is used when ordering the formula from the vendor (alphanumeric, max 50 characters). This is optional and can be the same as the Product No; however the vendor SKU must be unique to the vendor.
In the Vendor SKU Name field, enter a description of the formula that is being purchased. The field will be displayed on purchase orders (alphanumeric, max 100 characters).
In the Unit Description No field, select the required unit of measure in which the formula will be purchased. The Unit Description No must be predefined in Admin>Business>General>Definitions>Units of Measure prior to being selected on the Vendors tab.
The Unit Description Name will default based on the selected Unit Description No.
Inventory Units indicates the number of units that will be added to inventory when the vendor unit is received. (Example: If a formula is purchased in tonnes, for every 1 tonne received, the inventory will be increased by 1000 kgs ). This value defaults based on the selected Unit Description No.
Pay Basis determines if the vendor is paid based on received units or shipped units. The default is set to Received, but it can be modified.

The system will default the vendor SKU as Active. If the formula is no longer purchased from the vendor, de-select the option.
If the formula is Taxable, the flag must be checked to calculate taxes on the product. The tax code can be optionally added to the Vendor SKU, but must be added to the purchase order for taxes to be calculated.
Sales SKU No must be inputted if the formula is used for intercompany sales and purchases. Select the sales SKU that corresponds to the vendor SKU.
In the Attachment section, any type of file can be attached (Example: Word document, picture, music or video clip).
Payment Term No displays the payment terms and defaults from the vendor, with an option to select by product.
Currency No defaults from the vendor and displays the code for the currency, with an option to modify by product.
HS Code represents Harmonized System Code, which is used for international shipments. Enter the code based on the international defined code.
Product Specification is a text field to enter details related to the product vendor SKU.
Product Remarks is a text field to enter any other details specific to the vendor sku.
In the child grid within the Vendor No, there is the option to define the add-ons related to the product. The add-ons must be pre-defined in General>Products>AddOns prior to adding to the vendor sku. Depending on how the add-ons are configured, the cost of the add-on can be included or excluded from inventory cost of the product. The add-ons can be configured to be included in the cost of the product or alternatively, be coded to an entirely different account which is not included in the product cost.
There are two types of add-ons:
Premium add-ons add to the cost of the product.
Discount add-ons reduce the cost
of the product.
In the Product No field, select from a list of previously defined add-ons codes. The add-ons will transfer to purchase orders created for the vendor SKU. Add-ons can be found in: General>Products>AddOns
Product Name is a read-only field that displays the description of the add-on product type.
Transaction Basis is a read-only field that defaults from the selected add-on and determines how the add-on is calculated. Options are: Per Unit, Percentage, Flat Rate, or Free Percentage. Free Percentage is currently only used for poultry products.
Payment Type determines when the add-on payment is made. Options available are:
The Payee Type field is optional. If the add-on is to be processed by an alternative sources, select the source type for the add-on. Options are: Customer, Vendor, Employee, or Cost Center. If the field is left blank, it assumes the product vendor for the payment of the add-ons.
Transaction Entity ID is a required field if a different Payee Type is selected. Select the appropriate vendor or cost center.
Taxable identifies if the add-on is taxable or non-taxable when the item is purchased. Tax codes must be assigned to the purchase order for the taxes to be calculated.
Rate is an optional field to enter a default rate for the add-on. The rate will default to contracts and purchase orders for the vendor, and can be modified as required.
If the product and/or add-ons are taxable, the tax codes can optionally be defined at the vendor sku. It is recommended that the tax codes are only entered on the vendor sku if that vendor only delivers within the same state or province, as different tax rate can be applied depending on the destination. Tax codes must be previously defined. Rates will default to the purchase order based on the rate that is in effect on the purchase order date.
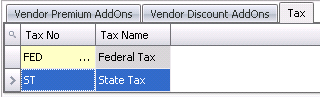
Tax No is selected from the predefined in Admin>Business>General>Definitions>Tax Codes. The tax code will default to purchase contracts and purchase orders for the vendor sku.
Tax Name defaults from the selected Tax No.
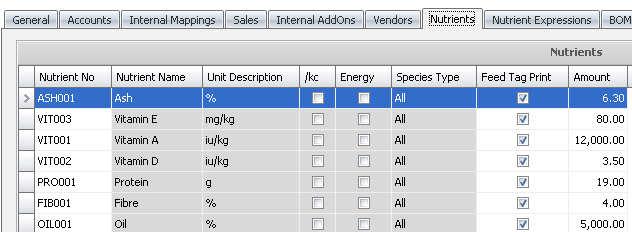
Nutrients must be established in Admin>Business>>FMTS>FMIM>Nutrients prior to being selected on the formula. The Amount is entered on a per inventory unit basis, in either lbs or kgs.
to
add a nutrient to the feed formula. Nutrients must be predefined in
Admin>Business>>FMTS>FMIM>Nutrients
prior to selection.
Options |
Calculation |
|
Net Amount x Nutrient Amount |
|
Net Amount x Nutrient Amount |
|
(Net Amount x Nutrient) /1000 |
Nutrient Expression is used in feed formulation. Nutrient Expressions are defined in: FMTS>FFA>Master Data>Nutrient Expressions.
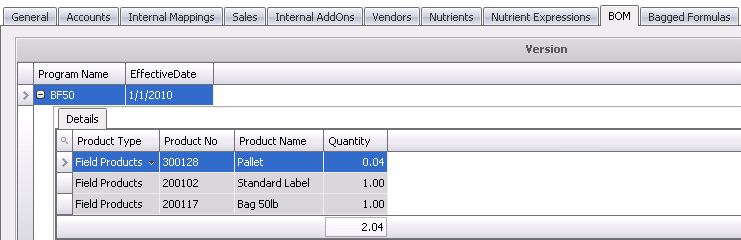
The BOM is generally not used for bulk formulas and is not required for bagged formulas, but can be optionally assigned if the usage of the packaging products is required at repack from bulk to bagged. The products must be in inventory for the feed mill that is repacking the bulk formula prior to the repack transaction being created.

Click
to
add a BOM Package to the product.
In the Select Packages prompt, check the packages that are required for the product.
The details from the predefined BOM package will default. All columns are read-only.
Program Name identifies the BOM Package that is assigned to the product.
The Effective Date indicates the first date that the package becomes available. Any flocks placed on or after this date will assume the package based on the defined effective date. New effective dates can be entered in: General>Products>Feed>BOM Packages.
The Bagged Formulas tab is only required is the bulk feed is repacked into bagged feed. This tab can only be populated if the Storage Mode = Bulk. When populated, there is a relationship created where the bulk feed can only be repacked to the assigned bagged formulas.
to add a bagged formula.


