entities - BIM


Entities identify the product that is being managed at the farm. Entities must be created before any field or journal transactions can be entered. Entities can be created manually or by posting from BPA movement’s schedule.  


The following items must be created prior to creating an Entity:


The following procedures are outlined in the Entity document:

Create an Entity

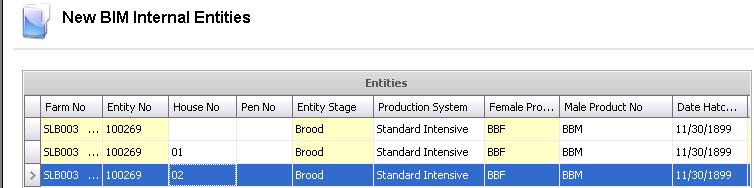
The 'Add' Entities option is initially used to add the entity to the system. If entities are going in multiple houses, the first line with the farm level must be created. From there, house numbers can be entered to outline the multiple houses. Each following line will duplicate when creating a line from the same screen.


  1. In BMTS>BIM>Master Data, select Entities.
  2. In the Entities main index, click to create a new entity.
  3. The New BIM Internal Entities dialog box will appear to add a new entity.


  1. From the Farm No drop-down menu, select the farm where the entity resides.
  2. In the Entity No field, enter the code that identifies the entity. Entity no will default only if the Entity No Prefix is entered and the registry is set to one of the options discussed during the Entity No Prefix question. If the Entity No is set to manual, then the Entity No is manually entered.

  3. House No is used If the granularity is defined in Houses. If so, a house number can be assigned to the entity from a predefined list of houses for the farm. The house can only be assigned after the top level entity is created.

  4. Pen No is used if the granularity is defined at the pen level. If so, a pen can be assigned to the entity. The pen can only be assigned after the top level entity is created.

  5. Entity Stage represents the stage of the entity when it is being added to the system. The stage will default based on the stage of the selected farm. Available options are: Brood or Lay, or, for a multiple stage operation, Brood, Grow or Lay.

  6. Production System defines the house set-up of how the bird will be grown. Options are Caged, Enhanced Intensive, Floor, Free Range, Not Set, Open Sided, Organic, RSPCA (Welfare), Standard Intensive.

  7. From Female Product No, select the female product for the entity.

  8. Male Product No, select the male product for the entity.

  9. From Progeny Product No, select the product that the parent will produce.

  10. Amortization No is used for lay entities, and assigns the amortization schedule to the entity for depreciation calculations.

  11. Amortization Name defaults from Amortization No and displays the name of the amortization, if applicable.

  12. Default Hatching Egg Product No defines the primary hatch egg category, and must be previously set up in: General>General>Products>Eggs. Select the required number from the list.

  13. Formula Assignment No is used if FDSA is being utilized, and assigns the feed formulas to the entity. Formula assignment numbers must be set up previously in: General>General> Products>Feed>Feed Formulas. If applicable, select the formula number from the pre-defined list.

  14. Breed No is an optional field to enter the breed code, if breed tracking is utilized.

  15. From Progeny Breed No, select the parent breed.

  16. From Male Breed No, select the male breed.

  17. From Generation Code, select the generation of the entity. Available options available are: GGGP (Great-great grandparent), GGP (Great grandparent), GP (Grandparent), Parent or Pedigree.

  18. Standard No assigns the standard to the entity for reporting. Standard details can be viewed in the Master Data folder for the specific farm type. If applicable, select the standard.

  19. Alt Standard No allows the assignment of an additional standard to the entity for reporting.

  20. Select the ReMate flag if the new entity is a result from a re-mated entity. A re-mate entity is one where the males are removed from the source entity and replaced with males of a new breed. Details related to re-mate entities can be located in Transfers and BPA Entity History.

  21. Select the Molted flag if the entity has been molted. Details related to molt entities can be viewed in Transfers and BPA Entity History.

  22. If the entity is molted, Molt Date indicates the date that the entity was moved to the molting process.

  23. Status indicates if the entity is active or inactive, and will default to Active. If the entity is no longer active, de-select the flag.

    1. Active - entity is currently in production. Transactions can be entered.
    2. Inactive - entity has been transferred or sold. Transactions can be entered but will affect the entity inventory and forcing it out of balance. The processing or transfer transactions with the final pickup flag will need to be unposted and posted to bring the entity back into balance. Costs can be entered to the entity while the entity is in this status.
    3. Closed - field or journal transactions cannot be posted to the entity.
  24. From Tech Advisor No, select the technical advisor for the entity. Tech advisors must be set up previously in: Admin> Business> General> Definitions> Tech Advisors.

  25. From Tech Supervisor No, select the technical supervisor for the entity. Tech supervisors must be set up previously in: Admin> Business> General> Definitions> Tech Supervisors.

  26. POL Date represents Point of Lay Date and indicates the date that the entity started to lay.

  27. Select the BPA Exclude Profile Flag if the BPA option is being used and the entity is to be excluded from projections.

  28. Female Salvage is the rate used to calculate the female salvage value used to calculate depreciation basis. The value depends on the Salvage Value Basis, defined in Admin> System> Registry> Poultry Registry> Poultry> Broiler Breeder> Depreciation and must be manually entered.

    1. Head: Enter the value per head processed to calculate salvage value.

    2. Percent of Capitalized: Enter the percentage of the capitalized value that is used to calculate the salvage value.

    3. Weight: Enter the value per pound or kilo process to calculate the salvage value.

  29. Male Salvage is the rate used to calculate the male salvage value used to calculate depreciation basis. The value depends on the Salvage Value Basis, defined in Admin> System> Registry> Poultry Registry> Poultry> Broiler Breeder> Depreciation and must be manually entered.

    1. Head: Enter the value per head processed to calculate salvage value.

    2. Percent of Capitalized: Enter the percentage of the capitalized value that is used to calculate the salvage value.

    3. Weight: Enter the value per pound or kilo process to calculate the salvage value.

  30. Female Salvage Weight is populated if the Salvage Value Basis = Weight. Enter the estimated female processing weight in pounds (lbs) or kilos (kgs) depending on the unit of measure assigned to the Division.

  31. Male Salvage Weight is populated if the Salvage Value Basis = Weight. Enter the estimated male processing weight in pounds or kilos depending on the unit of measure assigned to the Division.

  32. In the Female Livability field,  enter the percentage of females living at the end of the farm stage.

  33. In the Male Livability field,  enter the percentage of males living at the end of the farm stage.

  34. Amort Weeks specifies the number of weeks from capitalization to the final date that amortization will be calculated for each entity.  This value overrides the number of weeks in the Amortization Schedule for the Percentage Method.

  35. Amort Basis is used in the HE/HH method only and specifies the expected Accumulated HE per HH at the end of the flock.

  36. In the Attachment field, any type of file can be attached. (Example: Word document, picture, music or video clip).

  37. Attributes default from the house or farm with the option to modify when creating a new entity. Attributes can be created in: Admin>Business>General>Definitions>Attributes>Attribute Definitions. They can be assigned to the Farms and in Houses in the required tabs.   Examples of attributes include:

View the Entity Master

Once the entity has been created and saved, it can be viewed in the Entity Master. The fields in the Entity Master are read-only and cannot be modified, except when a new entity is being created. After the entities are created, the screen is read only. Entities can be created manually using the 'New' button or by posting from a BPA Movement Schedule. The data in the tabs are derived from other areas of the system. When changes are made in these areas below, it will update the Entities screen for each entity.


There are numerous tabs in the Entity Master.


General

The General tab contains the basic details for the entity. If a flock is manually created, the date fields in the General tab can be entered manually or modified.


  1. In the Entities main index, select the entity to be viewed and double-click to open and view the entity. Alternatively, click the button, or right-click and select 'Edit'.
  2. Click on the General tab.


  1. Breed No displays the breed code, if breed tracking is utilized.
  2. Progeny Breed No identifies the parent breed.
  3. Male Breed No identifies the male breed.
  4. Standard No displays the entity's standard number, which is used for reporting.  
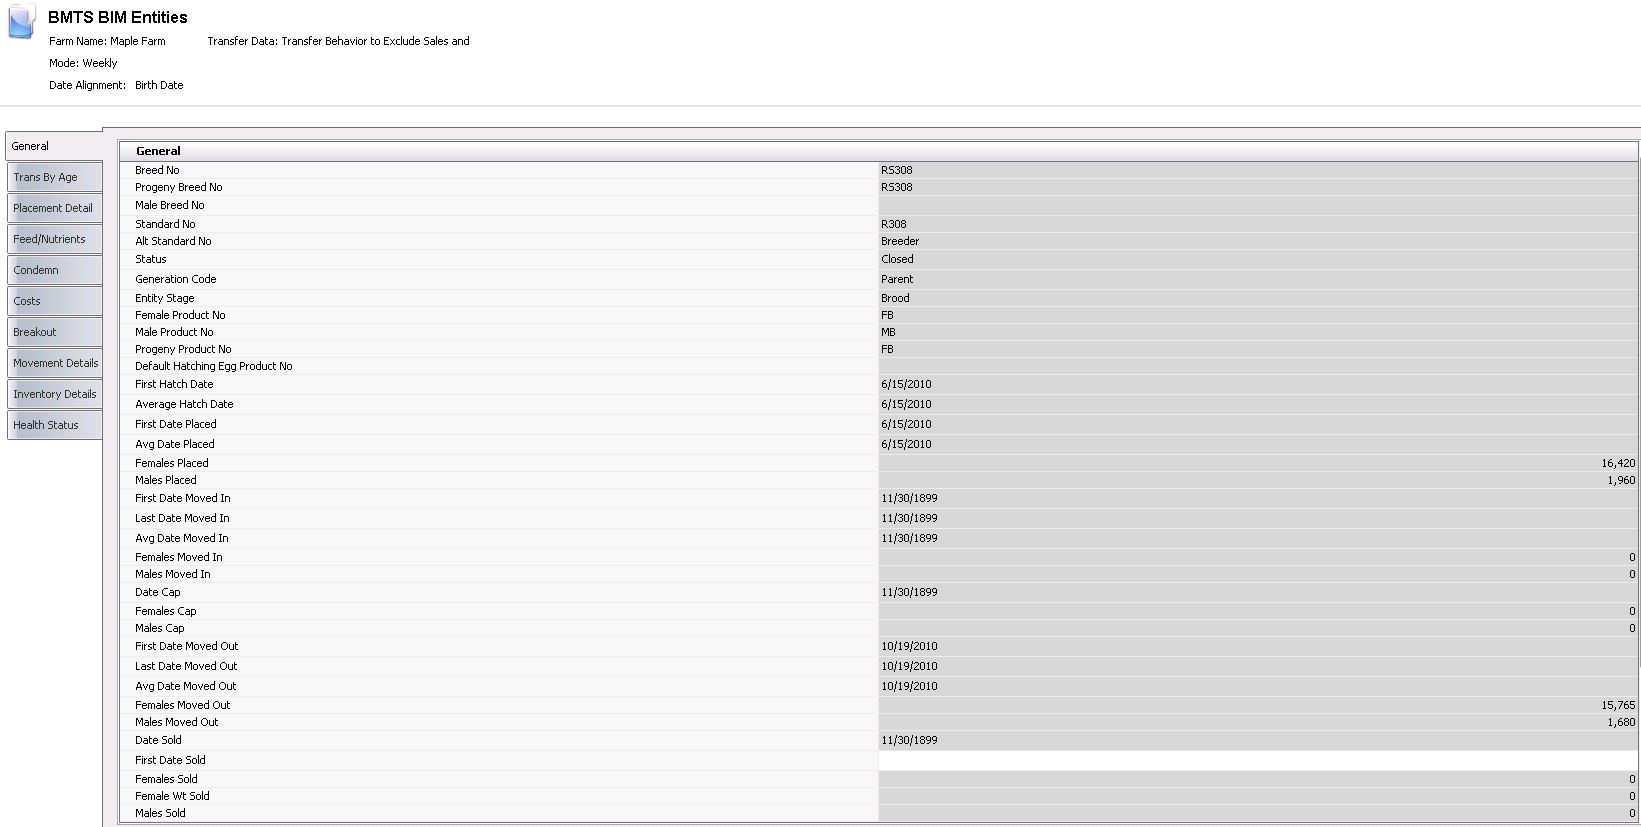
  5. Alt Standard No displays an additional standard, if applicable.

  6. Status will default and indicates the status of the entity.

    1. Active - entity is currently in production. Transactions can be entered.
    2. Inactive - entity has been transferred or sold. Transactions can be entered but will affect the entity inventory and forcing it out of balance. The processing or transfer transactions with the final pickup flag will need to be unposted and posted to bring the entity back into balance. Costs can be entered to the entity while the entity is in this status.
    3. Closed - field or journal transactions cannot be posted to the entity.
  7. Generation Code displays the generation of the entity. Available options available are: GGGP (Great-great grandparent), GGP (Great grandparent), GP (Grandparent), Parent or Pedigree.

  8. Entity Stage represents the stage of the entity when it is being added to the system. Available options are: Brood or Lay, or, for a multiple stage operation, Brood, Grow, or Lay.

  9. Female Product No displays the number of the female product that is assigned to the entity.

  10. Male Product No displays the number of the male product that is assigned to the entity.

  11. Progeny Product No displays the number of the progeny product that is assigned to the entity.

  12. Default Hatching Egg Product No displays the primary hatch egg category.

  13. First Hatch Date indicates the hatch date of the entity as defined on the initial placement transaction.

  14. If a flock has multiple hatch dates, Average Hatch Date will calculate all of the hatch dates and display the average date. The field will be populated when a flock is received via Chick Receivings or internal placements using HIM Breed Placements or Broiler Placements

  15. If a flock has multiple dates placed, First Date Placed will display the first date the flock was placed. The field will be populated when a flock is received via Chick Receivings or in HIM Breed Placements or Broiler Placements.

  16. If a flock has multiple dates placed, Average Date Placed will calculate all of the placement dates and display the average date. The field will be populated when a flock is received via Chick Receivings or in HIM Breed Placements or Broiler Placements.

  17. Females Placed displays the number of females placed from the placement transaction.

  18. Males Placed displays the number of males placed from the placement transaction.

  19. First Date Moved In indicates the first date in which the entity was moved.

  20. Last Date Moved In indicates the last date in which the entity was moved.

  21. Avg Date Moved In indicates the average date in which the entity was moved.

  22. Females Moved In represents the number of hens transferred in from the previous stage.

  23. Males Moved In represents the number of males transferred in from the previous stage.

  24. Date Cap indicates the date of depreciation of the entity, and coincides with the time the flock begins to lay eggs. The cap date is setup in the Registry by entering an age in Growouts>BIM/LIM Growout>Point of Lay>Point of Lay Threshold.  If posting an entity from BPA, the Date Cap is auto-calculated based on the age at Point of Lay that is set in Breed Targets.  Breed Targets and the Registry setting POL should be the same. Cap date can be manually changed if needed.

  25. Females Cap represents the number of females that were capitalized for the entity.

  26. Males Cap represents the number of males that were capitalized for the entity.

  27. First Date Moved Out indicates the first date the birds were moved out of the house. If posted from BPA, the date moved out is calculated based upon the Transfer Age in Breed Target. If the flock is created manually, the date will be derived from the Transfer Transaction at the time of transfer. If the entity is 'Brood' stage, at 24 weeks, the entity will be moved or transferred to the lay house. If the flock is 'Lay' stage, the moved date will represent the date the birds were sold.

  28. Last Date Moved Out indicates the last date the birds were moved out of the house. If posted from BPA, the date moved out is calculated based upon the Transfer Age in Breed Target. If the flock is created manually, the date will be derived from the Transfer Transaction at the time of transfer. If the entity is 'Brood' stage, at 24 weeks, the entity will be moved or transferred to the lay house. If the flock is 'Lay' stage, the moved date will represent the date the birds were sold.

  29. Avg Date Moved Out indicates the average date the birds were moved out of the house. If posted from BPA, the date moved out is calculated based upon the Transfer Age in Breed Target. If the flock is created manually, the date will be derived from the Transfer Transaction at the time of transfer. If the entity is 'Brood' stage, at 24 weeks, the entity will be moved or transferred to the lay house. If the flock is 'Lay' stage, the moved date will represent the date the birds were sold.

  30. Females Moved Out represents the number of hens transferred out to the next stage.

  31. Males Moved Out represents the number of males transferred out to the next stage.

  32. Date Sold indicates the sold date for the entity. The date will represent the processing transaction where the final pickup flag is selected.

  33. First Date Sold indicates the first date the entity was sold.

  34. Females Sold indicates the number of hens sold. The data is sourced from processing transactions.

  35. Female Weight Sold indicates the average weight of females sold. The data is sourced from processing transactions, and the weight will be in lbs or kgs depending on the unit of measure utilized by the division.

  36. Males Sold indicates the number of males sold. The data is sourced from processing transactions.

  37. Male Weight Sold indicates the average weight of males sold. The data is sourced from processing transactions, and the weight will be in lbs or kgs depending on the unit of measure utilized by the division.

  38. Tech Advisor No identifies the technical advisor for the entity.

  39. Tech Advisor Name displays the name of the technical advisor.

  40. Tech Supervisor No identifies the technical supervisor for the entity.

  41. Tech Supervisor Name displays the name of the technical supervisor.

  42. The External flag should be selected if the entity is defined as an external flock.

  43. Amortization No is used for lay entities, and assigns the amortization schedule to the entity for depreciation calculations.

  44. Amortization Name displays the name of the amortization, if applicable.

  45. Female Salvage displays the female salvage rate.

  46. Female Salvage Weight displays and estimated female processing weight.

  47. Male Salvage displays the male salvage rate.

  48. Male Salvage Weight displays and estimated male processing weight.

  49. Female Livability displays the percentage of females living at the end of the farm stage.

  50. Male Livability displays the percentage of males living at the end of the farm stage.

  51. Amort Weeks specifies the number of weeks from capitalization to the final date that amortization will be calculated for each entity.  

  52. Amort Basis is used in the HE/HH method only and specifies the expected Accumulated HE per HH at the end of the flock.

  53. The BPA Exclude Profile Flag will be selected if the BPA option is being used and the entity is to be excluded from projections.

  54. The ReMate flag will be selected if the new entity is a result from a re-mated entity.

  55. In the Attachment field, any type of file can be attached. (Example: Word document, picture, music or video clip).

  56. In the Notes field, enter any additional information related to the basic details of the entity.


Trans By Age

The Trans By Age tab is used to view all of the BIM transactions related to the entity. The data is derived from the Field Transaction.


  1. Trans By Age Date displays the date of the transaction.
  2. Entity Stage displays the stage of the entity depending on the flock stage. Available options are: Brood, Grow, Lay, or Mixed.
  3. Age indicates the age of the entity.
  4. Female Inventory displays the number of female birds in inventory.
  5. Female Mortality displays the total mortality rate for the female sex. The mortality number can be entered by category and totalled in this field, or manually entered without categories, depending on the setup switch. There is a mortality number for each sex.
  6. Female Mortality % indicates the percentage of female birds that died.
  7. Females Culled displays the total culls for the female sex. The cull number can be entered by category and totaled in this field, or manually entered without categories, depending on the setup switch. There is a cull column for each sex.
  8. Females Culled % indicates the percentage of female birds that were culled.
  9. Females Added displays the number of females added to the entity to adjust inventory. There is an added column for each sex.
  10. Male Inventory displays the number of male birds in inventory.
  11. Male Mortality displays the total mortality rate for the male sex. The mortality number can be entered by category and totalled in this field, or manually entered without categories, depending on the setup switch.
  12. Male Mortality % indicates the percentage of male birds that died.
  13. Males Culled displays the total culls for the male sex. The cull number can be entered by category and totaled in this field, or manually entered without categories, depending on the setup switch.
  14. Males Culled % indicates the percentage of male birds that were culled.
  15. Males Added displays the number of males added to the entity to adjust inventory.
  16. Female Weight displays the total weight for the female birds.
  17. Male Weight displays the total weight for the male birds.
  18. Female Feed Cons indicates the amount of female feed consumed, in lbs or kg.
  1. Female Feed Del indicates the amount of female feed delivered, in lbs or kg.
  2. Female Feed Inv indicates the amount of female feed in inventory, in lbs or kg.
  3. Female Feed Days displays the number of days that the females birds were fed.
  4. Feed/Fml/Day displays the amount of feed that the female birds consumed per day.
  5. Female Feed Type indicates the type of feed used for the female birds.
  6. Female Bird CV Uniformity indicates the coefficient variable for the female weight samples. A CV uniformity column is available for each sex.
  7. Female Bird Uniformity indicates the weight consistency of the female birds. A uniformity column is available for each sex.
  8. Female Wt Sold indicates the total weight of female birds that were sold.
  9. Male Feed Cons indicates the amount of male feed consumed, in lbs or kg.
  10. Male Feed Del indicates the amount of male feed delivered, in lbs or kg.
  11. Male Feed Inv indicates the amount of male feed in inventory, in lbs or kg.
  12. Male Feed Days displays the number of days that the males birds were fed.
  13. Feed/Ml/Day displays the amount of feed that the male birds consumed per day.
  14. Male Feed Type indicates the type of feed used for the male birds.
  15. Male Bird CV Uniformity indicates the coefficient variable for the male weight samples.
  16. Male Bird Uniformity indicates the weight consistency of the male birds.
  17. Male Wt Sold indicates the total weight of male birds that were sold.
  1. Feed Days represents the total feed days for males and females combined.
  2. Feed/Day displays the amount of feed consumed per day.
  3. HE Del Farm displays the number of hatch eggs (HE) delivered to the farm.
  4. CE Del Farm displays the number of cull eggs (CE) delivered to the farm.
  5. TE Del Farm displays the total number of eggs delivered to the farm. Total Eggs (TE) = HE + CE.
  6. The Egg Sales Included flag will be selected if there are egg sales included in the weekly detail, or if chicks hatch sales are greater than zero.

Graphs

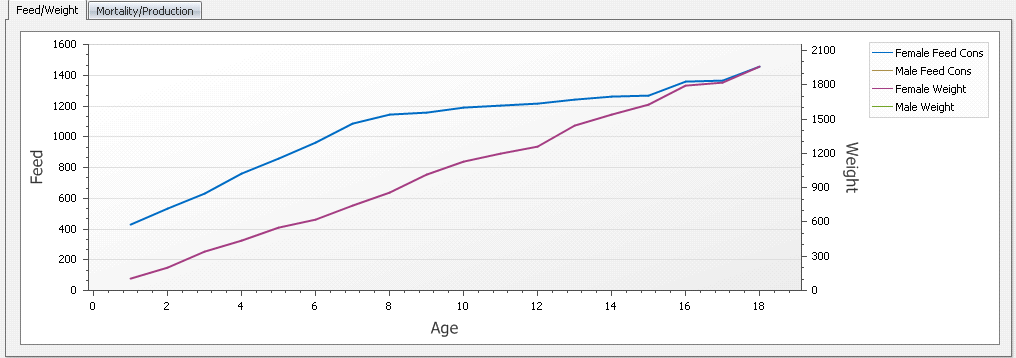
The Graphs section contains two tabs:

Feed/Weight

The Feed/Weight chart is a comparison for bird growth, comparing the feed consumed to the weight of the birds in order to show feed conversion.


Mortality/Production

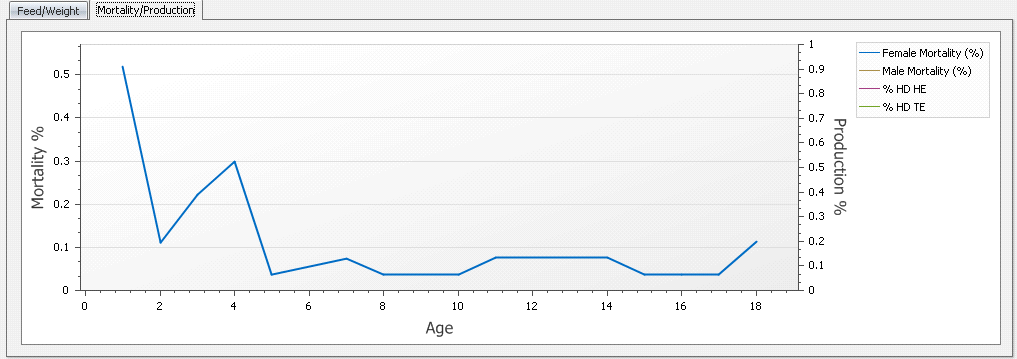
The Mortality/Production chart is a comparison for egg production against mortality, showing how the mortality affects the egg production


Placement Detail

The Placement Detail tab contains the details of the number of chicks placed from each donor source or parent, and is derived from the purchase order (if defined) or internal placements (HIM Breeder/Broiler Placements).


  1. Date Placed indicates the date that chicks were placed at the house.
  2. Hatchery No indicates the hatchery where the chicks were placed.
  3. Hatchery Name displays the name of the hatchery.
  4. Hatcher No is an optional field and defines the hatcher number.
  5. Settler No is an optional field and defines the settler number.
  6. House No displays the number of the house assigned to the entity, if applicable.
  7. Pen No displays the pen code, if applicable.
  8. Breed No displays the breed code, if applicable.
  9. Breed Name displays the name of the breed.
  10. Parent Flock No displays the number of the parent flock.
  11. Head Placed indicates the number of birds placed at the house.
  12. Product No displays the number of the product to which the birds are assigned, and is used for identification purposes. Products are defined in: General>Products>Animals>Poultry.
  13. Product Name displays the name of the product.
  14. Sex indicates whether s the product will be female, male, or a by-product , and will be defined in the setup of the product.

Placements By Parent Flocks

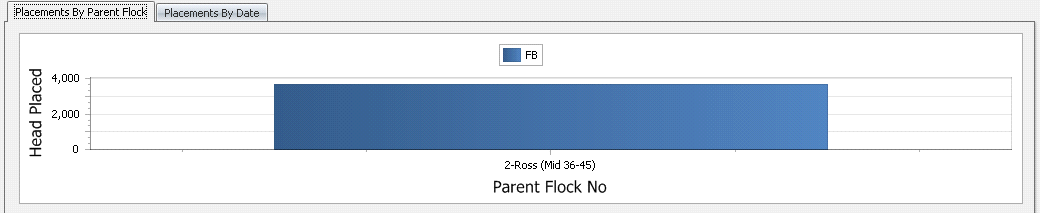
The Placements By Parent Flock tab contains a chart with information outlining how many chicks were placed from a particular parent or donor source.


Placements By Date

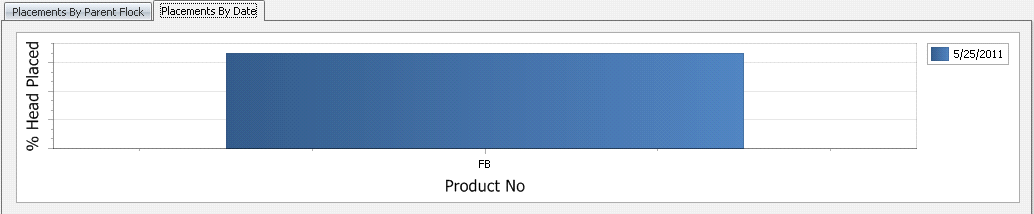
The Placements By Date tab contains a chart with information outlining how many birds were placed by date if the flock had multiple hatch or placement dates.


Feed/Nutrients

The information in the Feed/Nutrients tab is derived from General>General>Products>Feed>Feed Formulas if FMIM is not being used. Otherwise, the data is derived from FMIM>Feed Formulas


  1. Name displays the name of the feed or nutrient.
  2. Feed Record Type describes the type of feed record of the transaction. Each time a transaction occurs regarding feed and is posted to the journal transactions, it  is represented here.
  3. The Week fields indicate the week ending date that represents the transactions that occur during this time period.
  4. Total Amount is the accumulated totals for all of the weeks.

Hatchery Detail

The information in the Hatchery Detail tab is derived from HIM Eggs Set and Chicks Hatched transactions, and is only used for Lay Entities.


  1. Hatch Date indicates the date the eggs hatched.
  2. Eggs Set displays the number of eggs set.
  3. Saleable Females displays the total number of saleable females hatched.
  4. Saleable Males displays the total number of saleable males hatched.
  5. Saleable Chicks displays the total number of chicks hatched.
  6. Percent Salable indicates the percentage of chicks that were saleable.
  7. Cull Females indicates the total number of females culled.
  8. Cull Males indicates the total number of males culled.
  9. Cull Chicks indicates the total number of chicks culled.
  10. Percent Cull indicates the percentage of chicks that were culled.
  11. ByProduct Females indicates the number of byproduct females.
  12. ByProduct Males indicates the number of byproduct males.
  13. By Products indicates the total number of byproducts.
  14. Percent By Prod indicates the total percentage of byproducts.
  15. Chicks Hatched displays the total number of chicks hatched.
  16. Percent Hatch indicates the percentage of eggs that hatched.
  17. Chick Weight displays an average of the chick weight.
  18. The Egg Sales Included flag will be selected if there are eggs sales from the entity.

Condemn

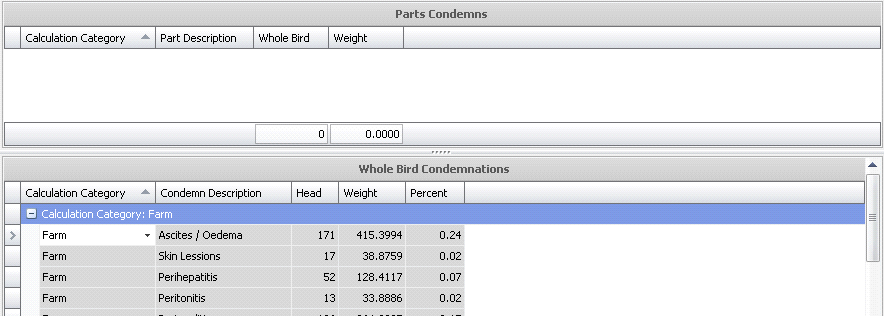
The information in the Condemn tab is derived from: Transactions>Condemnations. When a flock has been sent to the processing plant, it records the bird parts and weights. BIM (Primary Breeders) is used to capture data for reproduction proposes and BRIM (Broiler Breeders) is used to capture data for birds that will be sent to processing plants. These condemn categories will need to be set up before entering condemnations, in: Admin>Business>Poultry>Definitions>Condemnation.


Parts Condemns

  1. Calculation Category displays the parts condemnations counts at the farm or at the plant.
  2. Part Description displays a description of the part being processed (Example: Breast, thigh, wing).
  3. Whole Bird displays the condemnation category. Whole bird condemn categories can be set up in: Admin>Business>Poultry>Definitions>Condemnation>Whole Bird Categories. The values entered in those fields in the condemn transactions will transfer to the entity master.
  4. Weight displays the weight of each part condemnation.

Whole Birds Condemnations

  1. Calculation Category displays the whole bird condemnations counts at the farm or at the plant.
  2. Condemn Description displays the type of cull (Example: Contaminated, Jaundice, Joint Lesions).
  3. Head displays the number of birds being processed through the plant on a single load or shipment.
  4. Weight displays the weight of each whole bird condemnation.
  5. Percent displays the percentage of the description of the total weight.


Costs

The Costs tab represents all of the costs associated with the flock and is broken down by the accounts set-up in the Chart of Accounts Master. Costs are derived from the journal transactions.


  1. Account Name displays the name of the account holder.
  2. Complex Account No displays the complex account number.
  3. Location Group No displays the number of the location group.
  4. Stage No displays the stage number and is derived from the entity stage of the flock.
  5. Cost Object No displays the cost object number.
  6. Cost Element No displays the cost element number.
  7. User Account No displays the number of the user account.
  8. The Week fields are derived from the journal transactions as the week ending on the date the transactions took place.
  1. Total Cost is a calculated field for the total cost for the entity.
  2. Total Cost Per Bird displays the total cost of each bird.
  3. Total Cost Per HE is a calculated field representing the total cost per hatch egg, and is generally the result of the total cost divided by the total HE.
  4. Total Cost Per TE is a calculated field representing the total cost per total egg, and is generally the result of the total cost divided by the total TE.

Breakout

The information in the Breakout tab is derived from the HIM>Breakout>Transactions. The fertility percentages posts back to the flock, age and production date of the eggs in this screen.


  1. Trans Date displays the date the transaction took place.
  2. Bo Type displays the Breakout Type.
  3. Age displays the age of the flock when the transaction occurred.
  4. Fertility % is a calculated field that determines the fertility of a flock.
  5. Total Fertility % is a calculated field that determines the hatch of fertile of a flock.

Movement Details

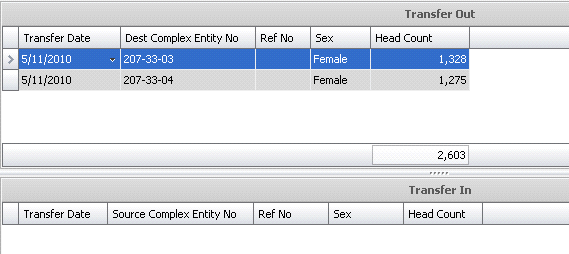
The information in the Movement Details tab is derived from Movements>Transfers and defines the source placement and the destination where it was moved.


  1. Transfer Date displays the date that the transfer took place.
  2. Dest/Source Complex Entity No displays the destination or source complex entity number and is used to define the destination entity – the farm/house receiving the birds, or the source entity - where the birds were shipped from.
  3. Ref No displays a unique reference number used to identify the transfer.
  4. Sex displays the sex of the birds.
  5. Head Count displays the number of birds that were moved in the destination entity and the number of birds moved out of the source entity.

Inventory Details

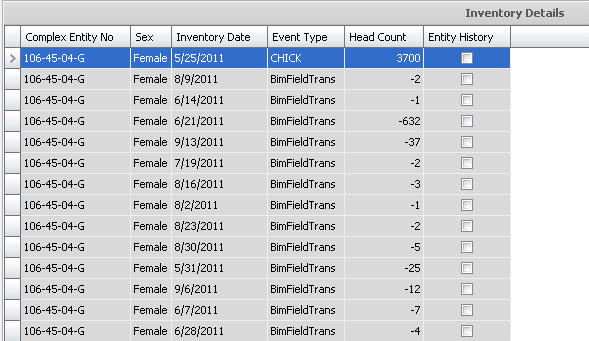
The Inventory Details tab displays the inventory and the transactions associated with the inventory. The information in the Inventory tab is derived from Field Transactions.


  1. Complex Entity No displays the number of the entity.
  2. Sex displays the sex of the birds.
  3. Inventory Date indicates the date that is the week's ending date.
  4. Event Type displays where the transaction originated from.
  5. Head Count displays the number of birds involved in a particular transaction. For example, in a Field Transaction for Mortality, 10 birds died, so the 10 birds will be the "head count". These numbers will include mortality and culls, birds placed, birds moved, etc. Anything that will add or subtract from the beginning inventory needs to be included in the head count.
  6. The Entity History flag will be selected if the transfer was set to include the entity history in the transfer transaction. All costs will then be passed along to the destination entity.


Health Status

The Health Status tab represents the most recent health status transactions based on the Lab Test transaction and/Entity Status transaction. The Entity Status transaction will always override the lab test transaction for the same test code. The variables of the health status are user defined in Lab Test Codes.

*Note: The Health Status tab is only used in version 7.26 and up.


  1. Complex Entity No identifies the entity for the health status transaction.
  2. Record Type identifies the type of record.
  3. Health Status displays a description of the animals` health and will be either Positive or Negative.
  4. Trans Date displays the date of the health status transaction.
  5. Ref No is a unique reference number used to identify the health status transaction.
  6. Analysis No identifies the analysis code for the lab test.
  7. Analysis Name displays a description of the analysis.
  8. Placement Control Status is a read-only field that represents the placement status of the poults.
  9. Transfer Control Status is a read-only field that represents the transfer status of the poults. This will default to `Not Tracked`.  Available options are:
    1. Tracked - will have no impact on the transfer, but will be displayed in Health Status views.
    2. Transfer to Same Status - source entities can be transferred to a destination entity with the same status for the lab test code.
    3. No Transfer - entities cannot be transferred.
    4. Not Tracked - health status is not tracked in the Health Status view. All entities can be transferred.
  10. Processing Control Status is a read-only field that represents the processing status of the poults. This will default to `Not Tracked`. Available options are:
    1. Tracked - will have no impact on process planning, but will be displayed in Health Status views.
    2. End of Day - BRPA/TPA/SPA/GPA will schedule the entities to be killed at the end of the day. LHS will schedule picks ups at the end of the scheduled processing day.  
    3. End of Week - BRPA/TPA/SPA/GPA will schedule the entities to be killed at the end of the week. LHS will schedule picks ups at the end of the scheduled processing day.
    4. Not Tracked - will not be displayed in Health Status views and will have no impact on processing planning.
  11. The Comments field contains any additional information related to the transaction.
  12. Close and save the entity record.

Create an External Entity

An external entity is created when the entity is no company-owned, but rather is owned by someone else outside of the company. This is generally done when the company is purchasing eggs or birds from the external entity. The external farm must be created prior to the entity being added. The farm must have Grower Type defined as 'External'.


  1. In BMTS>BIM>Master Data, select Entities.
  2. In the Entities main index, click the drop-down menu.


  3. Click 'External Entities' to create a new external entity.
  4. The New BIM Internal Entities dialog box will appear to add new entities.
  5. The data will then be entered as defined in Create New Entity.
  6. Enter the required details and save the entity.
  7. Once the entity has been saved, it can be viewed in the Entity Master.

Options

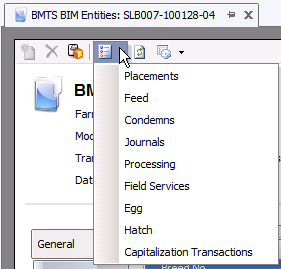
There are several options available from the menu bar in the index as well as in the transaction screen.


Menu Options

Add/Change Entities

This option is used to add a new house/pen or modify an existing entity.

  1. Select any record for the entity that is to be added or modified
  2. Right-click and select Add/Change Entities or select Options>Add/Change Entities
  3. Click to add a new house record or select the line that is to be edited.
  4. The details will default from the previous record for new houses.
  5. The Farm No cannot be modified in this screen. Use the Complex Entity Number Change option to modify the Farm No.
  6. The Entity No cannot be modified in this screen. Use the Complex Entity Number Change option to modify the Entity No.
  7. If the granularity if defined as FFH or FFHP, enter the House No and/or Pen No for new records. Existing records cannot be modified. Use the Complex Entity Number Change option to modify the Entity No.
  8. Modify all other fields as required. Details are outlined in Create New Entity

Complex Entity Number Change

  1. Select the FF record for the entity to be modified.
  2. Select Options>Complex Entity Number Change.
  3. Select the Farm No.
  4. Enter the Entity No. Note that all houses and pens must exist in the source and destination farm for the option to be used.
  5. Click OK to modify the complex entity number.

Transfer Cost Mode

This option determines what costs are included where displaying the data in Entities>Costs. The options available are indicated below. The selection will save to the user profile until the option is modified again.

  1. Exclude Sales and Processing - the costs will not be included for any transactions that are recorded for sales and processing
  2. Exclude Transfers Out - will not display costs for birds transferred out to another farm or entity
  3. Exclude Transfers - excludes all costs for both transfers into the entity and transfers out of the entity
  4. Exclude Transfers In - will not display costs for birds transferred into the entity
  5. All Transactions - displays all cost transactions including sales, processing and transfers.

Data Mode

The Data Mode determines the data that is displayed for the entity. The options available are indicated below. The selection will save to the user profile until the option is modified again.

  1. Actual - represent the data for the current stage of the entity
  2. Life of Entity - represents the data for all stages of the entity

Date Granularity

This option indicates the date parameters on how the data is displayed in the tabs. The options available are indicated below. The selection will save to the user profile until the option is modified again. Options are:

  1. Daily
  2. Weekly
  3. Fiscal Period

Week Ending Date Alignment

If the option in Date Granularity is set to Weekly, the data will be displayed with the week ending date as one of the following options. The options available are indicated below. The selection will save to the user profile until the option is modified again.

  1. Birth Date
  2. WE Date (as specified in Registry>System>General>Week Ending Day)

Split Cap Week Mode

This option determines how the data is displayed in the capitalization week.

  1. Ignore - all data for the week that the entity was capitalized will be displayed based on the Week Ending Date Alignment
  2. Split - the data will be displayed for the week split by the capitalization date. For example, if the entity was capitalized on Tuesday, the week would be split Sun-Tue and Wed-Sat.

Entity Inventory Builder

This option is only used when initially creating the entity in a new implementation. The process defines the base data for the entity for the required stages. Brood entities will only require brood data. Grow entities are only used in multi-stage operations and must have brood and grow data defined. Lay entities must have brood data defined as well as grow for multi-stage operations. The entities must be created prior to being selected in the Entity Inventory Builder.

Brood
  1. Select Options>Entity Inventory Builder.
  2. Select the Hatchery No for the hatchery that the entity was hatched.
  3. Select the Brood Entity No.
  4. Select the Sex. Options available are Female, Male or Straight Run.
  5. Enter the Date Placed.
  6. Enter the Head Placed.
Grow
  1. Select Options>Entity Inventory Builder.
  2. Select the Hatchery No for the hatchery that the entity was hatched.
  3. Select the Brood Entity No.
  4. Select the Sex. Options available are Female, Male or Straight Run.
  5. Enter the Date Placed.
  6. Enter the Head Placed.
  7. In the Grow Date Moved, enter the date that the entity was moved from Brood to Grow.
  8. Select the Grow Entity No.
  9. Enter the number of birds moved from brood to grow in Grow Head Moved.
Lay
  1. Select Options>Entity Inventory Builder.
  2. Select the Hatchery No for the hatchery that the entity was hatched.
  3. Select the Brood Entity No.
  4. Select the Sex. Options available are Female, Male or Straight Run.
  5. Enter the Date Placed.
  6. Enter the Head Placed.
  7. In the Grow Date Moved, enter the date that the entity was moved from Brood to Grow. (multi-stage only)
  8. Select the Grow Entity No. (multi-stage only)
  9. Enter the number of birds moved from brood to grow in Grow Head Moved. (multi-stage only)
  10. Enter the date that the entity was moved from brood/grow to lay in Lay Date Moved.
  11. Select the Lay Entity No.
  12. Enter the number of birds moved from brood/grow to lay in Lay Head Moved.
  13. Click OK to create the entity data.

Print Barcodes

This option will print the barcodes for the entities filtered in the selection dialog. The custom barcode report must be created prior to using this option.


  1. Select Options>Print Barcodes
  2. Select the Custom Report Layout.
  3. If printing the codes for specific entities, click the drop-down in Complex Entity No and select the required entities.
  4. If printing barcodes for all entities, select the Farm Type of the barcodes to be printed.
  5. Select the Granularity for the barcodes. Options will be Entity, House or Pen.
  6. Click OK to print the barcodes based on the specified filters.

Entity Rebuild Inventory

This option should be used when the bird inventory does not appear to be correct. This generally happens with converted data but can also be from data issues where the transactions are entered out of order.


  1. Filter the data for the entities that need to be rebuilt.
  2. Select all of the entities.
  3. Select Options>Entity Rebuild Inventory.
  4. Click OK to continue the rebuild or Cancel to stop the process.
  5. When the rebuild is complete, verify that the entity data is correct.

Change House No

The Change House No option is used to move the birds from one house to another house within the same entity.


  1. Select the FFH record to have the house number changed.
  2. The user will be prompted to confirm that the change will modify all FFH and FFHP records for the selected house. Click Yes to continue or No to cancel.
  3. In the dialog, select the New House No.
  4. Click OK to change the house number for the selected entity.

Change Status

The Change Status option allows the user to change the status of the entity without having to used the Add/Change Entities option. Note that all granularity levels must be changed. Changing the FF to a different status does not modify FFH or FFHP to the same status.


  1. Select the entities that are to have the status changed.
  2. Right-click and select Change Status.
  3. Select the required option:
  1. Active - entity is currently in production. Transactions can be entered.
  2. Inactive - entity has been transferred or sold. Transactions can be entered but will affect the entity inventory and forcing it out of balance. The processing or transfer transactions with the final pickup flag will need to be unposted and posted to bring the entity back into balance. Costs can be entered to the entity while the entity is in this status.
  3. Closed - field or journal transactions cannot be posted to the entity.


Transaction Options

  1. Placements - loads HIM Breeder Placements
  2. Feed - loads BIM Feed Deliveries related to the Entity
  3. Condemns - loads Entity Condemnations
  4. Journals - loads all journals related to the Entity
  5. Processing - loads the Processing transaction
  6. Field Services - loads Field transactions related to the Entity
  7. Egg - loads Egg Room Farm Receivings related to the Entity
  8. Hatch - loads HIM Chicks Hatched
  9. Capitalization Transactions -  loads Capitalizations related to the Entity