transfers

Movement Transfers are used when transferring entities. When birds are
transferred, the period end process will calculate the costs and move
the costs with the birds. Transfer occur when the birds reach a certain
age, typically around 20 weeks.
The
following is the validation that will occur at post for all animal transfers.
The validation only occurs if the Validate Transfer Health Status option
is selected in the registry for poultry: Admin>System>Registry>Poultry
Registry>Poultry>Broiler
Breeder>General>Validate
Transfer Health Status.
All posting validation is done based on a lab test code.
a. Posting will first look to farm
status. If there is no farm status defined, it will look to entity status.
b. If the lab test code has a Transfer
Control Status = Not Tracked, no validation will be performed on the transfer.
c. If the lab test code has a Transfer
Control Status = Tracked, no validation will be performed on the transfer.
d. If the lab test code has a Transfer
Control Status = Transfer to Same Status, entities can only be transferred
to farms or entities with the same status
e. If
the lab test code has a Transfer Control Status = No Transfer, entities
cannot be transferred.
There are various types of transfer transactions:
- Brood to
Brood: Transfers from one brood entity to one or more brood
entities.
- Brood to
Grow: Transfers from brood entity to one or more grow entities.
Only used in three stage breeder operations.
- Brood to
Lay: Transfers from brood entity to one or more lay entities.
- Grow to
Grow: Transfers from one grow entity to one or more grow entities.
- Grow to
Lay: Transfers from grow entity to one or more lay entities.
Only used in three stage breeder operations.
- Lay to
Lay: Transfers from lay entity to one or more lay entities.
Once birds reach a designated age cap (often around 25 weeks when birds
begin to lay eggs), capitalization will begin on the entity, and a Capitalization transaction
can be created.
The following items must first be created before a Movement Transfer
can be created:
The following components are outlined related to creating a Movement
Transfer transaction:
Create a Transfer
General
The General tab contains the general information related to the transfer.
This section consists of two components:

General
- In BMTS>BIM>Movements,
select Transfers.
- In the Transfers main index, select
 to create a new transfer.
- Click on the General
tab.
- From the Movement
Type drop-down menu, select the source and destination stages
for the transfer. Available options are: Brood Brood, Brood Grow,
Brood Lay, Grow Grow, Grow Lay or Lay Lay.
- In the Trans
Date Time field, enter the date that the transfer occurred.
This date will be used for all inventory and accounting transactions.
- Event Date
defaults to the same date as the transaction date, and can be modified
if required. This date does not affect inventory or accounting.
- Ref No
is an automatically-generated unique number that identifies the transfer
transaction.
- Load No
is an optional field to assign a number to the load.
- From Ship To
Customer No, select the customer to whom the product will be
shipped.
- Bill To Customer
No defaults in from the Ship To customer.
- From Deliver
To Customer No, select the deliver-to customer.
- Driver No
is an optional field to identify the internal driver used for the
transfer. Drivers must be set up prior in: Admin>Business>General>Definitions>Drivers.
- Vehicle No
is an optional field to identify the internal vehicle used for the
transfer. Vehicles must be set up prior in: Admin>Business>General>Definitions>Vehicles.
- In the Start
Time field, enter the time that the animals will begin loading.
- In the End Time
field, enter the time that the animals will be finished loading.
- Select the Truck
Wash flag to indicate if the truck was washed at exit.
- Select the Health
Papers flag if health papers were complete and sent with the
transfer.
- Selecting the Void
flag will void the transaction and exclude it from the entity's statistic.
- Gross
is an optional field to enter the gross weight of the load in lbs
or kgs.
- Tare is
an optional field to enter the tare weight of the vehicle in lbs or
kgs.
- Net is
an optional field to enter the net weight of the vehicle in lbs or
kgs.
- In the Comments
field, enter any additional information relating to the transfer.
- The Transfer
History flag should be selected to create entity history records
for the source and destination entities. The flag will be selected
by default but can be de-selected if required.
- From Population
Mode, select the type of transfer that is being completed.
Available options are:
Molting
- is used on Lay to Lay transfers for entities that will be
Molted – the destination lay entity is set to “Pre-Cap” entity
stage Brood, the unamortized dollars from the source entity
become the pre-cap inventory value of the destination entity.
If the entity is checked as a molt the BPA recognizes
that and looks for a corresponding MOLT Standard. Click here to view the process related
to molting an entity.
Population
- Moves bird inventory and cost based
on the transfer percent to the destination entity.
Spiking
- If the source entity is a male only entity, costs will be
transferred. If the source entity is a mixed entity, no costs
will be transferred.
- Customer PO No
identifies the customer purchase order number.
Derived
The fields in the Derived tab default in from the information entered
in the Sources and Destinations tabs. The information in these fields
is read-only and cannot be modified.
- Head Shipped
indicates the number of animals transferred out from the source entity.
- Head Received
indicates the number of animals that were received at the destination
entity. This field will be populated after the destination data is
entered.
- Head Variance
is a calculated field that indicates the variance in the amount of
animals shipped and the amount of animals received, if applicable.
Head Variance = Head Shipped - Head Received.
- Ship To Customer
Name identifies the ship-to customer.
- Bill To Customer
Name identifies the bill-to customer.
- Delivery To Customer
Name identifies the deliver-to customer.
- Vendor Name
displays the name of the vendor.
- Driver Name
displays the name of the driver.
- Vehicle Name
displays a description of the vehicle.
- Order No
displays the order number, if applicable.
- Purchase Order
No displays the purchase order used.
- Creation Date
displays the date the transaction was created.
- Last Mod Date
indicates the date the transaction was last modified.
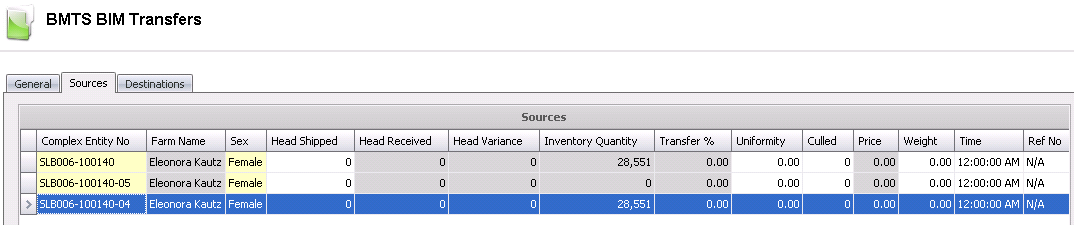
Sources
The Source tab defines the entities from where the animals are being
transferred. Sources can be added one at a time, or multiple source entities
from one farm can be added at one time.
- In the Sources tab, click
to add a new source line.

- From Complex
Entity No, select or enter the farm where the birds were transferred
from.
- Farm Name
defaults from Complex Entity No and displays the name of the farm
where the birds were transferred from.
Select the Sex
of the birds being transferred.
In the Head
Shipped field, enter the number of birds that were shipped
from the source entity.
Head Received
indicates the number of birds received. This will default in from
the Destinations tab.
Head Variance
displays the variance in the number of birds shipped versus the number
of birds received, if applicable.
Inventory
Quantity displays the total number of birds in the transferring
entity`s inventory.
Transfer %
calculates the transfer percentage of turkeys transferred to the bird
inventory, if all of the birds are not transferred.
The Uniformity
field represents the consistency of the weight of the birds. If applicable,
enter the uniformity number.
Enter the number of birds Culled
in the transfer process.
The unit Price
will default in if internal pricing is used.
Enter the average Weight
of the birds that were transferred.
Enter the Time
that the transfer was completed.
Ref No
displays an automatically-generated unique reference number for the
transaction.
Select the Final
Transfer flag if the final transfer has been made from the
house. This clears the house inventory and moves the dollars
at period end.
Select the Final
Farm Transfer flag if the final transfer from the farm has
been made. This clears the farm inventory and moves the dollars
at period end.
Employee No
is an optional field to identify the employee who performed the transfer.
Sales SKU
No identifies the sales SKU invoice product.
Sales SKU
Name displays a description of the product.
Add Multiple Source
Entities
There is also an option to select multiple source entities from one
single farm. *Note: This option
is only available in version 7.26 and up.
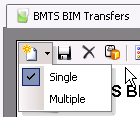
- In the Sources tab, click thedrop-down
menu and select `Multiple`.
- The Select Entities dialog box will appear with
all available source entities.
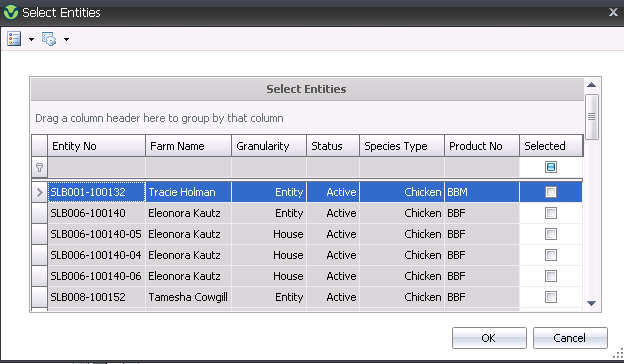
- Select all the source entities required by clicking
the Selected flag. *Note:
Only entities from one single farm can be selected at a time.
- Click the OK button and all selected entity lines
will appear.
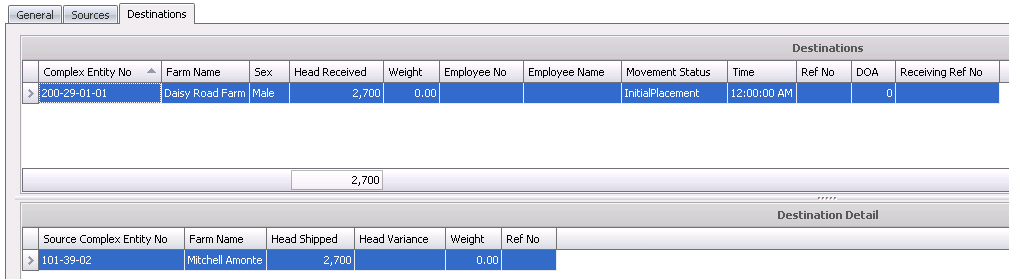
Destinations
The Destinations tab identifies the entities that the animals are being
transferred to. This section consists of two components:
Destinations
The Destinations should be entered to the house/pen to which the
entity is transferred. If the source is transferred from one house on
the source to four pens on the destination, a line will need to be entered
for each of the four pens.
In the Destinations tab, clickto add a new destination
line.
- From Complex
Entity No, select or enter the entity that the birds were transferred
to.
- Farm Name
defaults from Complex Entity No and displays the name of the farm
where the birds were transferred to.
- Enter the Sex
of the birds that were transferred to the destination entity.
- In the Head Count
field, enter the number of birds that were received at the destination
entities.
- Enter the total Weight
of the birds received. The weight is entered in lbs or kgs depending
on the unit of measure.
- Employee No
is an optional field to identify the employee who received the transfer.
- Employee Name
will default from Employee No and displays the name of the employee
who received the transfer.
- Movement Status
indicates the status of the movement and will default in.
- Enter the Time
that the transfer was completed.
- Ref No
displays a unique reference number used to identify the transfer.
This can be manually or automatically entered.
- In the DOA
field, enter the number of birds that were dead on arrival (DOA).
- Receiving Ref
No indicates the reference number for the receiving transaction.
Destination Detail
The Destination Detail section displays the sources for the selected
destination. For example, if there were four source houses that supplied
one destination house, the details defines how many birds were received
from the individual sources. The total number in Destinations must match
the Destination details. Some of the fields in the Destination Detail
section default in from the information entered in the Sources and Destination
tabs. The other fields will need to be entered to represent information
for each house if the entity has multiple houses.
- Source Complex
Entity No displays the entity where the birds were transferred
from.
- Farm Name
displays the name of the farm where the birds were transferred from.
- In the Head Count
field, enter the number of birds that were received at the destination
entity/house.
- Head Variance
displays the variance in the number of birds shipped versus the number
of birds received, if applicable.
- Enter the total Weight
of the birds received at the entity or house. The weight can be entered
in lbs or kgs.
- Ref No
displays the automatically-generated reference number for the transfer.
Post a Transfer
Once the Movement Transfer as been created and saved, the transfer needs
to be posted. The posting process locks the transfer to prevent edits.
, and creates a record or capitalization transfer to record the liability.
The UnPost option unlocks the transfer and reverses the record. A journal
transaction will not be created in the posting process unless there is
an internal price associated with the product that is being transferred.
At period end, the journal created from the internal price will be reversed
and the actual journals entered. If there is no internal price, there
are no journals until period end where the costs are transferred from
one entity to another
- In the Transfers main index, select the required
transfer and right-click to select 'Post'. Alternatively, click the
green check mark
 in the
top menu bar and select 'Post'.
in the
top menu bar and select 'Post'.
- To un-post a transfer record, select the required
transfer and right-click to select 'Unpost'. This process will
set the record status to 'Reversed' status, which allows the record
to be edited.
Molting Transfer
Molt entities are producing lay entities that stop production for a
period of time and then restart producing eggs after the molt process.
Costs incurred in the molt process are capitalized to the molt entity
and then depreciated while the molt entity is producing eggs.
- Create a Lay-to-Lay movement as outlined in Creating a Transfer.
- The transfer should occur on the date of molt
to accurately account for molt cost and performance.
- On the General tab, set the Population
Mode to Molting. Selecting this option will move the non-amortized
amount of the source entity to the destination molt entity. This transferred
amount will establish the beginning balance of the molt entity. Entities
are not re-aged in v7, however there is an option in order shipments
to enter an alternate entity number and entity age for reporting purposes
to the customer.
- The molt entity will be created was a Farm Stage
= Lay and Entity Stage = Brood.
- All costs recorded to the entity while the Entity
Stage = Brood will be included in the capitalization cost along with
the un-depreciated amount transferred from the source entity.
- The molt entity will have a new POL date to facilitate
the tracking of KPI's specific to molted entities.
- When the molt entity comes back into lay, a Capitalization transaction
will be created to establish a new POL date. The capitalization transaction
will capitalize the un-depreciated amount of the source entity and
any costs incurred during the molt process to establish a capital
cost of the molt entity
- The molted entity will depreciate based on the
assigned amortization table.
- There are further details related to molted entities
in BPA
Entity History.
Re-Mate Transfer
A re-mate entity is one where the males are removed from the source
entity and replaced with males of a new breed. This will require a new
progeny product for the entity. The process related to creating a re-mate
transfer is outlined below.
- Create a Lay-to-Lay movement as outlined in Creating a Transfer.
- The transfer should occur on the date of re-mate
to accurately account for cost and performance statistics.
- On the General tab, uncheck the Transfer
History option.
- As well, on the General tab, set the Population
Mode to Population.
- On the Sources tab, ensure that the Final
Transfer flag is selected. This will close the source entity.
- The costs will be transferred with the entity
but the history remains with the source entity.
- There are further details related to re-mated
entities in BPA
Entity History.