entities - BRIM

Entities identify the product that is being managed at the farm. Entities
must be created before any field or journal transactions can be entered.
Entities can be created manually or by posting from BRPA movement’s schedule.
The following
items must be created prior to creating an Entity:
The following procedures are outlined in the Entity document:
Create an Entity
The 'Add' Entities option is initially used to add the entity to the
system. If entities are going in multiple houses, the first line with
the farm level must be created. From there, house numbers can be entered
to outline the multiple houses. Each following line will duplicate when
creating a line from the same screen.
- In BMTS>BRIM>Master
Data, select Entities.
- In the Entities
main index, click
 to create a new entity.
- The New BRIM Internal Entities dialog box will
appear to add a new entity.
- From the Farm
No drop-down menu, select the farm where the entity resides.
In the Entity
No field, enter the code that identifies the entity. Entity
no will default only if the Entity No Prefix is entered and the registry
is set to one of the options discussed during the Entity No Prefix
question. If the Entity No is set to manual, then the Entity No is
manually entered.
House No
is used If the registry granularity is defined as House. The house
number is assigned to the entity from a predefined list of houses
for the farm. The house can only be assigned after the top level entity
is created.
Pen No
is used if the registry granularity is defined as Pen. If so, a pen
can be assigned to the entity. The pen can only be assigned after
the top level entity is created.
Stage
represents the stage of the entity when it is being added to the system.
The stage will default based on the stage of the selected farm. Available
options are: Brood or Lay, or, for a multiple stage operation, Brood,
Grow, or Lay.
Production
System defines the house set-up of how the bird will be grown.
The number will be automatically generated.
From Product
No, select the product that is assigned to the entity.
Formula Assignment
No is used if FDSA is being utilized, and assigns the feed
formulas to the entity. Formula assignment numbers must be set up
previously in: General>General>Products>Feed>Feed
Formulas. If applicable, select the formula number from
the pre-defined list.
Breed No
is an optional field to enter the breed code if breed tracking
is utilized.
Standard No
assigns the standard to the entity for reporting. Standard details
can be viewed in the Master Data folder for the specific farm type.
If applicable, select the standard.
From Tech
Advisor No, select the technical advisor for the entity. Tech
advisors must be set up previously in: Admin>Business>General>Definitions>Tech
Advisors.
From Tech
Supervisor No, select the technical supervisor for the entity.
Tech supervisors must be set up previously in: Admin>Business>General>Definitions>Tech
Supervisors.
Status
indicates if the entity is active or inactive, and will default to
Active. If the entity is no longer active, de-select the flag.
- Active
- entity is currently in production. Transactions can be entered.
- Inactive
- entity has been transferred or sold. Transactions can be entered
but will affect the entity inventory and forcing it out of balance.
The processing or transfer transactions with the final pickup flag
will need to be unposted and posted to bring the entity back into
balance. Costs can be entered to the entity while the entity is in
this status.
- Closed
- field or journal transactions cannot be posted to the entity.
Select the BRPA
Exclude Profile Flag if the BRPA option is being used and the
entity is to be excluded from projections.
In the Attachment
field, any type of file can be attached. (Example: Word document,
picture, music or video clip).
Attributes
default from the house or farm with the option to modify when creating
a new entity. Attributes can be created in: Admin>Business>General>Definitions>Attributes>Attribute
Definitions. They can be assigned to the Farms
and in Houses
in the required tabs. Examples of attributes include:
Brooding Equipment/Brooding
Equipment Description
Roof/Roof Description
Drinkers/Drinkers
Description
Farm/Farm Size
Floor/Floor
Description
Feeders/Feeders
Description
Lighting/Lighting
Description
Cooling/Cooling
Description
Litters/Litters Description
Ventilation/Ventilation Description
Walls/Walls Descriptions
View
the Entity Master
Once the entity has been created and saved, it can be viewed in the
Entity Master. The fields in the Entity Master are read-only and cannot
be modified, except when a new entity is being created. After the entities
are created, the screen is read only. Entities can be created manually
using the 'New' button or by posting from a BRPA Movement Schedule. The
data in the tabs are derived from other areas of the system. When changes
are made in these areas below, it will update the Entities screen for
each entity.
There are numerous tabs in the Entity Master.
General
The General tab contains the basic details for the entity. If a flock
is manually created, the date fields in the General tab can be entered
manually or modified.
- In the Entities
main index, select the entity to be viewed and double-click
to open and view the entity. Alternatively, click the
 button, or right-click
and select 'Edit'.
button, or right-click
and select 'Edit'.
- Click on the General
tab.
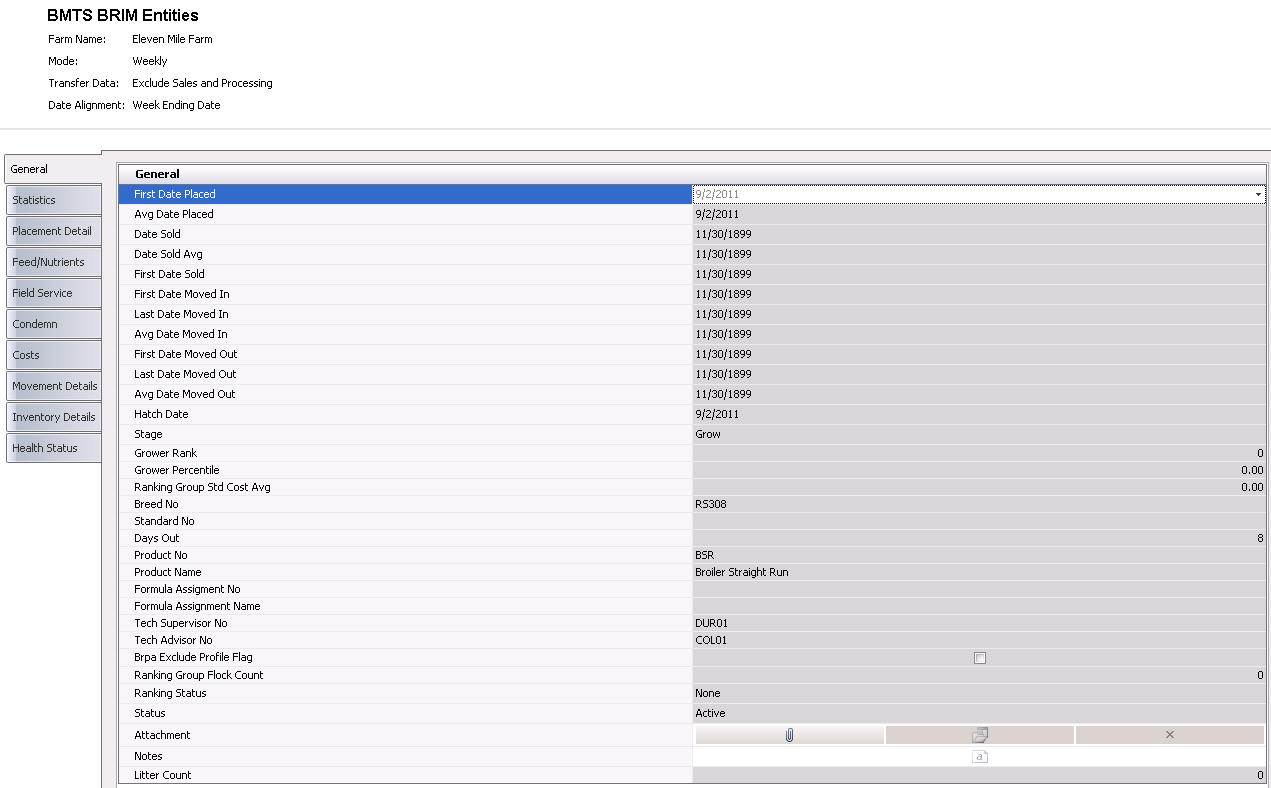
- Depending on the Date Placed Mode established
in the PMTS registry, First Date
Placed will either represent the weighted average date placed
or the first date placed from the placement transaction.
If a flock has multiple dates placed, Average Date Placed will calculate
all of the placement dates and display the average date. The field
will be populated when a flock is received via Chick Receivings or
in HIM Breed Placements or Broiler Placements.
Date Sold
indicates the sold date for the entity. The date will represent the
processing transaction where the final pickup flag is selected.
If a flock has multiple sold dates, Date
Sold Avg will calculate all of the sold dates and display the
average date. The field will be populated when a flock is sold via
a Processing Transaction.
First Date
Sold indicates the first date that the entity was sold.
First Date
Moved In indicates the first date in which the entity was moved
in.
Last Date
Moved In indicates the last date in which the entity was moved
in.
Avg Date Moved
In indicates the average date in which the entity was moved
in.
First Date
Moved Out indicates the first date the birds were moved out
of the house. The date is established based on the date of the first
transfer out.
Last Date
Moved Out indicates the last date the birds were moved
out of the house. The date is established based on the date of the
first transfer out.
Avg Date Moved
Out indicates the average date the birds were moved out of
the house. The date is established based on the date of the first
transfer out.
Hatch Date
indicates the hatch date of the entity as defined on the initial placement
transaction.
Stage
indicates the stage of the flock. Chicken entities will only have
a Grow stage. Turkey entities will have a Brood or Grow stage.
Grower Rank
represents the grower's performance as compared to other growers that
were processed during the same time frame.
Grower Percentile
represents the grower's standing for this flock among all other flocks
that were processed during the same time period.
Ranking Group
Std Cost Avg represents the average total cost to produce a
flock based on a group of flocks that were processed during the same
time period.
Product No
identifies the product within the system (alphanumeric, max 20 characters).
Product Name
displays the name of the product.
Breed No
displays the breed code assigned to the entity at placement, if breed
tracking is utilized.
Standard No
displays the entity's standard number, which is used for reporting.
Days Out
displays the number of days between the First Date Placed and the
Last Date Sold of the previous flock.
Formula Assignment
No is used if FDSA is being utilized, and assigns the feed
formulas to the entity. Formula assignment numbers must be set up
previously in: General>Products>Feed>Feed
Formulas. If applicable, select the formula number from the
pre-defined list.
Formula Assignment
Name defaults and displays the name of the formula assignment.
Tech Supervisor
No identifies the technical supervisor for the entity.
Tech Advisor
No identifies the technical advisor for the entity.
The BRPA Exclude
Profile Flag will be selected if the BRPA option is being used
and the entity is to be excluded from projections.
Ranking Group
Flock Count displays the number of flocks included in the group
where the flock ranking is determined. For example, if the number
was 100 and the flock ranking is 35, the flock is ranked 35 in the
group of 100.
Ranking Status
indicates if the entity will be included in ranking statistics. .Available
options are: In-Ranking (included in statics) or Out-Raking (excluded
from statistics). Settlements does the ranking and posts the
information back to the Ranking fields.
Status
indicates if the entity is Active, In-active, or Closed.
- Active
- entity is currently in production. Transactions can be entered.
- Inactive
- entity has been transferred or sold. Transactions can be entered
but will affect the entity inventory and forcing it out of balance.
The processing or transfer transactions with the final pickup flag
will need to be unposted and posted to bring the entity back into
balance. Costs can be entered to the entity while the entity is in
this status.
- Closed
- field or journal transactions cannot be posted to the entity.
In the Attachment
field, any type of file can be attached. (Example: Word document,
picture, music or video clip).
Statistics
The Statistics tab represents the data entered to the entity. Data will
be accumulated based on the sold date for the entity.
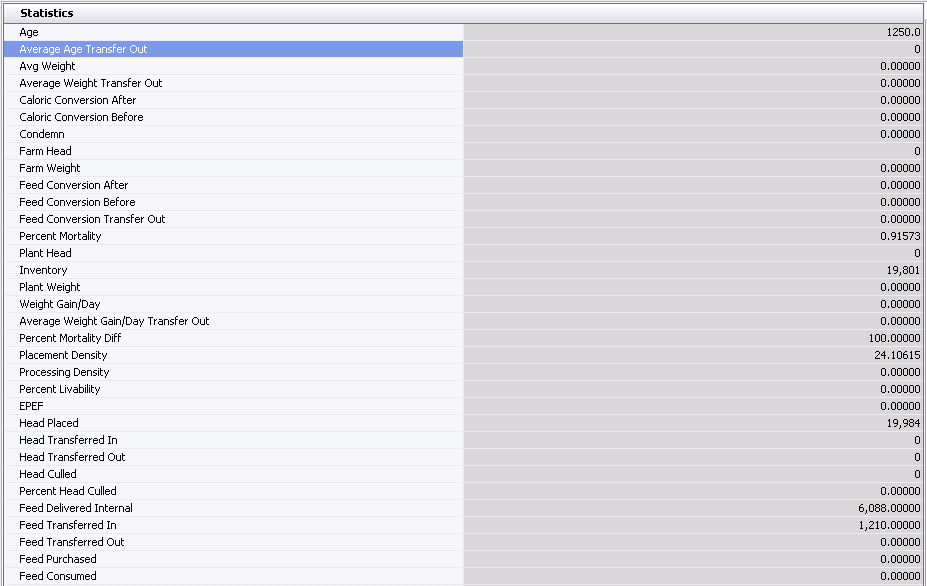
- Age indicates
the age of the entity.
- Average Age Transfer
Out indicates the average age at the time of transfer.
- Avg Weight
indicates the average weight of a single bird at the farm.
- Average Weight
Transfer Out indicates the
average weight of a single bird at the time of transfer.
- Caloric Conversion
After is a calculated field representing: Nutrient Energy/Weight
After Condemn.
- Caloric Conversion
Before is a calculated field representing: Nutrient Energy/Weight
Before Condemn.
- Condemn
is a calculated field using condemnation weight or head, and is based
on the registry switch 'Percent Condemn Mode'.
- Farm Head
displays the number of birds being transferred from the farm.
- Farm Weight
displays the total weight of birds being transferred from the farm.
- Feed Conversion
After is a calculated field representing: Feed Consumed/Weight
After Condemn.
- Feed Conversion
Before is a calculated field representing: Feed Consumed/Weight
Before Condemn.
- Feed Conversion
Transfer Out is a calculated field representing:
Feed Consumed/Average Weight Transfer Out.
- Percent Mortality
is a calculated field representing: (Mortality/Head Placed) *100
- Plant Head
displays the number of birds that arrived at the plant.
- Inventory
displays the number of birds in inventory.
- Plant Weight
displays the total weight of birds being that arrived at the farm.
- Weight Gain/Day
is a calculated field representing: Avg Weight/Avg Age.
- Average Weight
Gain/Day Transfer Out is a calculated field representing: Avg
Weight/Average Age Transfer Out.
- Percent Mortality
Diff is a calculated field representing: ((Head Placed - Head
Sold) / Head Placed) *100
- Placement Density
is a calculated field representing: Head Placed / Area.
- Processing Density
is a calculated field representing the Processed Weight / Area.
- Percent Livability
is a calculated field representing: Basis Head Count / Head Placed.
- EPEF is
a calculated field representing: ((Avg Weight * % Livability) / FCR
Before * Avg Age)) * 100.
- Head Placed
indicates the number of birds placed from the hatchery.
- Head Transferred
In indicates the number of birds transferred in from other
entities.
- Head Transferred
Out indicates the number of birds transferred out to other
entities.
- Head Culled
indicates the number of birds culled.
- Percent Head
Culled displays the percentage of birds culled.
- Feed Delivered
Internal represents the amount of feed delivered internally.
- Feed Transferred
In displays the amount of feed transferred in.
- Feed Transferred
Out displays the amount of feed transferred out.
- Feed Purchased
indicates the amount of feed purchased.
- Feed Consumed
displays the amount of feed consumed by the birds.
- Farm Condemnation
Head indicates the number of birds that were condemned
at the farm.
- Farm Condemnation
Weight indicates the weight of the birds that were condemned
at the farm.
- Plant Condemnation
Head indicates the number of birds that were condemned at the
plant.
- Plant Condemnation
Weight indicates the weight of the birds that were condemned
at the plant.
- DOA Head
displays the amount of head that were dead on arrival (DOA).
- DOA Weight
displays the weight of the birds that were dead on arrival.
- DOA Percent
displays the percentage of birds that were dead on arrival.
Placement
Detail
The Placement Detail tab contains the details of the number of chicks
placed from each donor source or parent, and is derived from the purchase
order (if defined) or internal placements (HIM Breeder/Broiler Placements).

- Date Placed
indicates the date that chicks were placed at the house.
- Hatchery No
indicates the hatchery where the chicks were placed.
- Hatchery Name
displays the name of the hatchery.
- Hatcher No
is an optional field and defines the hatcher number.
- Settler No
is an optional field and defines the settler number.
- House No
displays the number of the house assigned to the entity, if
applicable.
- Pen No
displays the pen code, if applicable.
- Breed No
displays the breed code, if applicable.
- Breed Name
displays the name of the breed.
- Parent Flock
No displays the number of the parent flock.
- Head Placed
indicates the number of birds placed at the house.
- Product No
displays the number of the product to which the birds are assigned,
and is used for identification purposes. Products are defined in:
General>General>Products>Animals>Poultry.
- Product Name
displays the name of the product.
- Sex indicates
the sex of the product. In BRIM, birds are not sex separated, so the
field will default in with 'Straight Run'.
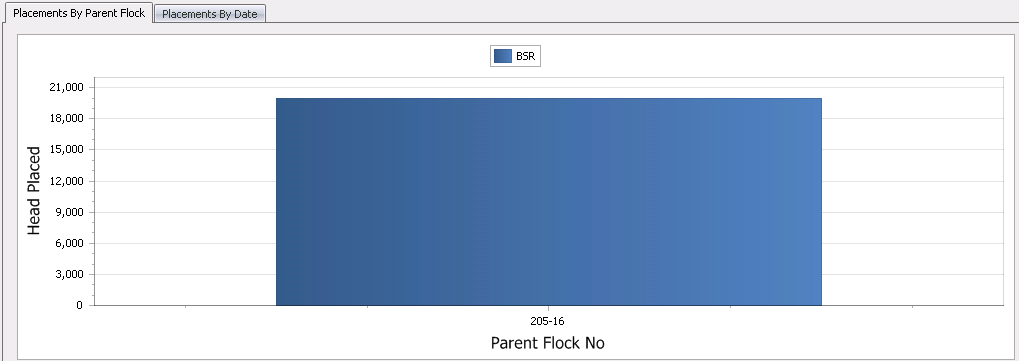
Placements
By Parent Flocks
The Placements By Parent Flock tab contains a chart with information
outlining how many chicks were placed from a particular parent or donor
source.
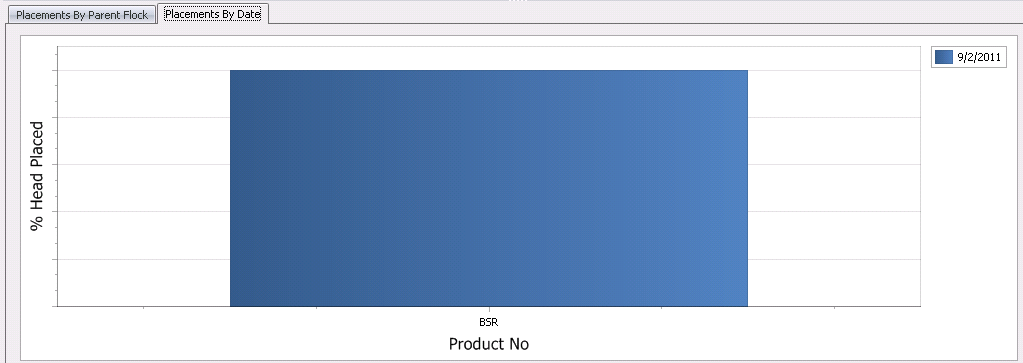
Placements
By Date
The Placements By Date tab contains a chart with information outlining
how many birds were placed by date if the flock had multiple hatch or
placement dates.
Feed/Nutrients
The information in the Feed/Nutrients tab is derived from General>General>Products>Feed>Feed
Formulas if FMIM is not being used. Otherwise, the data is
derived from FMIM>Feed Formulas

- Name displays
the name of the feed or nutrient.
- Feed Record Type
describes the type of feed record of the transaction. Each time a
transaction occurs regarding feed and is posted to the journal transactions,
it is represented here.
- The Week
fields indicates the week ending date that represents the transactions
that occur during this time period.
- Total Amount
is the accumulated totals for all of the weeks.
Field
Service
The Field Service tab is used to view all of the BRIM transactions related
to the entity. The data is derived from the Field Transaction.

- End Date
displays the week ending date.
- Age indicates
the age of the entity.
- Culls
displays the number of birds that were culled.
- Feed Consumed
indicates the amount of feed consumed.
- Head Inventory
displays the number of birds in inventory.
- Mortality
displays the total mortality rate for the birds.
- Mortality %
indicates the percentage of birds that died.
- Weight
displays the total weight of the birds.
- Uniformity
indicates the weight consistency of the birds.
- Placement Mortality
represents the chick mortality at placement.
- Cull %
displays the percentage of birds that were culled.
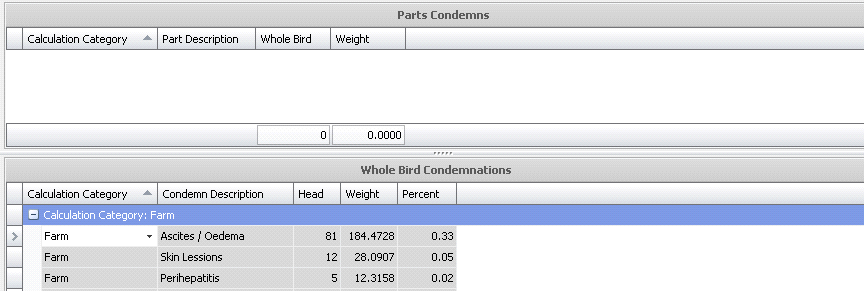
Condemn
The information in the Condemn tab is derived from Transactions>Condemnations.
When a flock has been sent to the processing plant, it records the bird
parts and weights. BIM (Primary Breeders) is used to capture data for
reproduction proposes and BRIM (Broiler Breeders) is used to capture data
for birds that will be sent to processing plants. These condemn categories
will need to be set up before entering condemnations, in: Admin>Business>Poultry>Definitions>Condemnation.
- Parts Condemns
- Relates to the processing of the birds and refers to when the bird
is processed in parts (Example: Breast, thighs, wings, etc.).
- Whole Bird Condemnations
- Relates to the processing of the birds and refers to when the whole
bird is processed as one.
Parts
Condemns
- Calculation Category
displays the parts condemnations counts at the farm or at the plant.
- Part Description
displays a description of the part being processed (Example: Breast,
thigh, wing).
- Whole Bird
displays the condemnation category. Whole bird condemn categories
can be set up in: Admin>Business>Poultry>Definitions>Condemnation>Whole
Bird Categories. The values entered in those
fields in the condemn transactions will transfer to the entity master.
- Weight
displays the weight of each part condemnation.
Whole Birds
Condemnations
- Calculation Category
displays the whole bird condemnations counts at the farm or at the
plant.
- Condemn Description
displays the type of cull (Example: Contaminated, Jaundice, Joint
Lesions).
- Head displays
the number of birds being processed through the plant on a single
load or shipment.
- Weight
displays the weight of each whole bird condemnation.
- Percent
displays the percentage of the description of the total weight.
Costs
The Costs tab represents all of the costs associated with the flock
and is broken down by the accounts set-up in the Chart of Accounts Master.
Costs are derived from the journal transactions.

- Account Name
displays the name of the account holder.
- Complex Account
No displays the complex account number.
- Location Group
No displays the number of the location group.
- Stage No
displays the stage number and is derived from the entity stage of
the flock.
- Cost Object No
displays the cost object number.
- Cost Element
No displays the cost element number.
- User Account
No displays the number of the user account.
- The Week
fields are derived from the journal transactions as the
week ending on the date the transactions took place.
- Total Cost
is a calculated field for the total cost for the entity.
- Total Cost Per
Unit displays the total cost of each unit.
Movement
Details
The information in the Movement Details tab is derived from Movements>Transfers
and defines the source placement and the destination where it was moved.
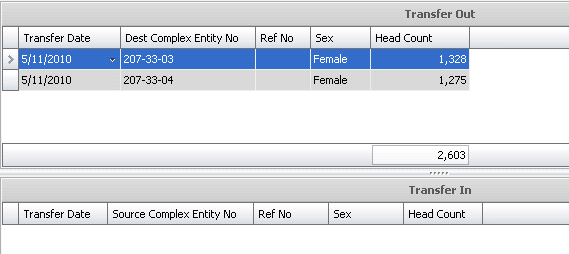
- Transfer Date
displays the date that the transfer took place.
- Dest Complex
Entity No displays the destination complex entity number and
is used to define the destination entity – the farm/house receiving
the birds.
- Dest Farm Name
displays the name of the farm where the birds were received.
- Ref No
displays a unique reference number used to identify the transfer.
- Sex displays
the sex of the birds.
- Head Count
displays the number of birds that were moved in the destination entity
and the number of birds moved out of the source entity.
Inventory
Details
The Inventory Details tab displays the inventory and the transactions
associated with the inventory. The information in the Inventory tab is
derived from Field Transactions.

- Complex Entity
No displays the number of the entity.
- Event Type
indicates where the transaction originated from.
- Sex displays
the sex of the birds.
- Head Count
displays the number of birds involved in a particular transaction.
For example, in a Field Transaction for Mortality, 10 birds died,
so the 10 birds will be the "head count". These numbers
will include mortality and culls, birds placed, birds moved, etc.
Anything that will add or subtract from the beginning inventory needs
to be included in the head count.
- Inventory Date
displays the date that is the week's ending date.
- The Entity History
flag will be selected if the transfer was set to include the entity
history in the transfer transaction. All costs will then be passed
along to the destination entity.
Health Status
The Health Status tab represents the most recent health status transactions
based on the Lab Test transaction and/Entity
Status transaction. The Entity Status transaction will always override
the lab test transaction for the same test code.
*Note:
The Health Status tab is only used in version 7.26 and up.

- Complex Entity
No identifies the entity for the health status transaction.
- Record Type
identifies the type of record.
- Health Status
displays a description of the animals` health and will be either
Positive or Negative.
- Trans Date
displays the date of the health status transaction.
- Ref No
is a unique reference number used to identify the health status transaction.
- Analysis No
identifies the analysis code for the lab test.
- Analysis Name
displays a description of the analysis.
- Placement Control
Status is a read-only field that represents the placement status
of the poults.
- Transfer Control
Status is a read-only field that represents the transfer status
of the poults. This will default to `Not Tracked`. Available
options are:
- Tracked
- will have no impact on the transfer, but will be displayed in Health
Status views.
- Transfer to
Same Status - source entities can be transferred to a destination
entity with the same status for the lab test code.
- No Transfer
- entities cannot be transferred.
- Not Tracked
- health status is not tracked in the Health Status view. All
entities can be transferred.
- Processing Control
Status is a read-only field that represents the processing
status of the poults. This will default to `Not Tracked`. Available
options are:
- Tracked
- will have no impact on process planning, but will be displayed in
Health Status views.
- End of Day
- BRPA/TPA/SPA/GPA
will schedule the entities to be killed at the end of the day. LHS
will schedule picks ups at the end of the scheduled processing day.
- End
of Week - BRPA/TPA/SPA/GPA will
schedule the entities to be killed at the end of the week. LHS will
schedule picks ups at the end of the scheduled processing day.
- Not
Tracked - will not be displayed
in Health Status views and will have no impact on processing planning.
- The Comments
field contains any additional information related to the transaction.
- Close and save the entity record.
Options
There are several options available from the menu bar in the index as
well as in the main transaction screen.
Menu Options
Add/Change Entities
This option is used to add a new house/pen or modify an existing entity.
- Select any record for the entity that is to be
added or modified
- Right-click and select Add/Change Entities or
select Options>Add/Change Entities
- Click to
add a new house record or select the line that is to be edited.
- The details will default from the previous record
for new houses.
- The Farm No
cannot be modified in this screen. Use the Complex
Entity Number Change option to modify the Farm No.
- The Entity No
cannot be modified in this screen. Use the Complex
Entity Number Change option to modify the Entity No.
- If the granularity if defined as FFH or FFHP,
enter the House No and/or
Pen No for new records. Existing
records cannot be modified. Use the Complex
Entity Number Change option to modify the Entity No.
- Modify all other fields as required. Details are
outlined in Create New Entity
Complex Entity Number Change
- Select the FF record for the entity to be modified.
- Select Options>Complex Entity Number Change.
- Select the Farm
No.
- Enter the Entity
No. Note that all houses and pens must exist in the source
and destination farm for the option to be used.
- Click OK to modify the complex entity number.
Transfer Cost Mode
This option determines what costs are included where displaying the
data in Entities>Costs. The options available
are indicated below. The selection will save to the user profile until
the option is modified again.
- Exclude Sales
and Processing - the costs will not be included for any transactions
that are recorded for sales and processing
- Exclude Transfers
Out - will not display costs for birds transferred out to another
farm or entity
- Exclude Transfers
- excludes all costs for both transfers into the entity and transfers
out of the entity
- Exclude Transfers
In - will not display costs for birds transferred into the entity
- All Transactions
- displays all cost transactions including sales, processing and transfers.
Data Mode
The Data Mode determines the data that is displayed for the entity.
The options available are indicated below. The selection will save to
the user profile until the option is modified again.
- Actual
- represent the data for the current stage of the entity
- Life of Entity
- represents the data for all stages of the entity
Date Granularity
This option indicates the date parameters on how the data is displayed
in the tabs. The options available are indicated below. The selection
will save to the user profile until the option is modified again. Options
are:
- Daily
- Weekly
- Fiscal Period
Week Ending Date Alignment
If the option in Date Granularity is set to Weekly, the data will be
displayed with the week ending date as one of the following options. The
options available are indicated below. The selection will save to the
user profile until the option is modified again.
- Birth Date
- WE Date (as specified in Registry>System>General>Week
Ending Day)
Entity Inventory Builder
This option is only used when initially creating the entity in a new
implementation. The process defines the base data for the entity for the
required stages. Brood entities will only require brood data. Grow entities
are only used in multi-stage operations and must have brood and grow data
defined. The entities must be created prior to being selected in the Entity
Inventory Builder.
Brood (multi-stage only)
- Select Options>Entity Inventory Builder.
- Select the Hatchery
No for the hatchery that the entity was hatched.
- Select the Brood
Entity No.
- Select the Sex.
Options available are Female, Male or Straight Run.
- Enter the Date
Placed.
- Enter the Head
Placed.
Grow
- Select Options>Entity Inventory Builder.
- Select the Hatchery
No for the hatchery that the entity was hatched.
- Select the Brood
Entity No.
- Select the Sex.
Options available are Female, Male or Straight Run.
- Enter the Date
Placed.
- Enter the Head
Placed.
- In the Grow Date
Moved, enter the date that the entity was moved from Brood
to Grow.
- Select the Grow
Entity No.
- Enter the number of birds moved from brood to
grow in Grow Head Moved.
Print Barcodes
This option will print the barcodes for the entities filtered in the
selection dialog. The custom barcode report must be created prior to using
this option.
- Select Options>Print Barcodes
- Select the Custom
Report Layout.
- If printing the codes for specific entities, click
the drop-down in Complex Entity No
and select the required entities.
- If printing barcodes for all entities, select
the Farm Type of the barcodes
to be printed.
- Select the Granularity
for the barcodes. Options will be Entity, House or Pen.
- Click OK to print the barcodes based on the specified
filters.
Entity Rebuild Inventory
This option should be used when the bird inventory does not appear to
be correct. This generally happens with converted data but can also be
from data issues where the transactions are entered out of order.
- Filter the data for the entities that need to
be rebuilt.
- Select all of the entities.
- Select Options>Entity Rebuild Inventory.
- Click OK to continue the rebuild or Cancel to
stop the process.
- When the rebuild is complete, verify that the
entity data is correct.
Change House No
The Change House No option is used to move the birds from one house
to another house within the same entity.
- Select the FFH record to have the house number
changed.
- The user will be prompted to confirm that the
change will modify all FFH and FFHP records for the selected house.
Click Yes to continue or No to cancel.
- In the dialog, select the New
House No.
- Click OK to change the house number for the selected
entity.
Change Status
The Change Status option allows the user to change the status of the
entity without having to used the Add/Change Entities option. Note that
all granularity levels must be changed. Changing the FF to a different
status does not modify FFH or FFHP to the same status.
- Select the entities that are to have the status
changed.
- Right-click and select Change Status.
- Select the required option:
- Active
- entity is currently in production. Transactions can be entered.
- Inactive
- entity has been transferred or sold. Transactions can be entered
but will affect the entity inventory and forcing it out of balance.
The processing or transfer transactions with the final pickup flag
will need to be unposted and posted to bring the entity back into
balance. Costs can be entered to the entity while the entity is in
this status.
- Closed
- field or journal transactions cannot be posted to the entity.
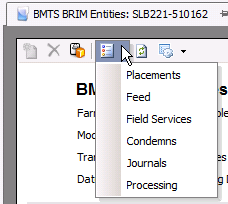
Transaction Options
- Placements - loads HIM
Breeder Placements
- Feed - loads BRIM Feed Deliveries related to the
Entity
- Field Services - loads Field
transactions related to the Entity
- Condemns - loads Entity
Condemnations
- Journals - loads all journals related to the Entity
- Processing - loads the Processing
transaction