![]()
The Chart of Accounts are defined to record journal transactions throughout the period and for the period end process. The Chart of Accounts is comprised of five pre-defined segments.
Table Name: ProteinChartOfAccounts
The Chart of Accounts consists of system accounts which are system defined for the base transactions that are handled in the system. There are also user-defined accounts that the customer can create as required. These accounts are generally required for farm and facility overheads or any custom programming that requires journals.
User-defined accounts can be created based on the customer requirements, however it is highly recommended that the same reporting structure as the system accounts with the Cost Object being the main reporting segment and the Cost Element as the secondary reporting segment. This will make financial reporting consistent and flexible. A few examples are below of the major account segments are below. All accounts will need to be created with the IN/OUT User Elements as a minimum to transfer products.
Location |
Stage |
Cost Object |
Cost Element |
BRDR |
LAY |
LABOR |
HOURLY |
BRDR |
LAY |
LABOR |
SALARY |
BRDR |
LAY |
REPAIRS |
BUILDING |
BRDR |
LAY |
REPAIRS |
EQUIPMENT |
BRDR |
LAY |
REPAIRS |
VEHICLES |
BRDR |
LAY |
UTILITIES |
ELECTRICITY |
BRDR |
LAY |
UTILITIES |
WATER |
In Admin>Business>General>Chart of Accounts Definition, select Chart of Accounts Master.
Select  to
create a new record.
Select the Location Group that indicates the physical location type for the account.
Select the Cost Stage to identify where the production process of the account belongs.
Select the Cost Object to determine how the costs are grouped together.
Select the Cost Element to relate the account segment in the financial chart of accounts.
Select the User Account to identify the allocation in or out.
System Complex Account No is system defined. ** NOTE** If the default system Objects, Elements, or User codes have been modified, the system account displays the original codes.
Account Name allows the user to enter a description for new user-defined accounts. The user can also modify the description of system accounts without affecting the original description for the account as defined in the system file. New accounts will require a description for the account. Alphanumeric, max 255 characters.
Select the Suite ID to determine which suite uses the account. The account can be filtered for all suites or specific to a single suite. This field is used for filtering accounts. Options available are All, BMTS, LMTS, Protein, SMTS or TMTS. Admin, Feed Mill, Plant and SYS accounts should be set to All.
Select the Prog ID to identify the program that uses the account. The account can be filtered for all programs or specific to a single program.

Complex Account No displays the account as it will appear in journal transactions and reports. If the default system objects, elements or user codes have been modified, the complex account will display the modified code.
The Active check box defaults to active. If the account is no longer required, remove the active flag to prevent transactions from being posted to unwanted accounts.
Select the Farm Stage that indicates the stage that an account is available for journal transactions based on the stage assigned to the farm. Available accounts will be filtered based on the farm stage. Any accounts that do not relate to a farm should be established as All.

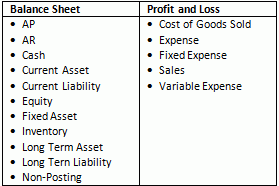
Select Account Type to determine the grouping of the account. This can be used for reporting purposes if creating reports with accounts grouped by account type. The account types are typical to a financial reporting account type.

Select Balance Type to indicate whether the account is typically a debit or credit account. This does not have any effect on how the transactions are entered. Interfaces may use this field to determine the relative amount for the field. The options available are Debit or Credit.
Select Allocation Type determines how the costs are allocated to the field product allocations and farm to entity costs at period end.
Select the Allocation Mode to determine whether the expense is carried over to the next entity placed or allocated to all entities in the period. **Note: All accounts with the same Cost Object must have the same Allocation Mode.
Select Financial Report Type to assign account to a specific report type based on the account. This option is only used for filtering data in reports.

Checked Entity Final Distribution allows an expense to be allocated to an entity after the completion of an entities movements. The amount should be applied equally on a per bird moved basis to all movements for the entity, including movements from prior periods. An example of such expense would be a grower bonus payment that the user wants to see transferred through inventory to all destination entities and/or plants
Enter a User Description to describe what the account is used for. Alphanumeric, max 255 characters.
System default System Description to describe what the account is used for. This field is not available for edit.
System Account Name is the system defined description for the account. This field is not available for edit, however this description will default to the Account Name field with an option for the user to change as required.
System Flag if selected the account is a system account. System accounts cannot be deleted.
Save and Close the record.
