inseminations

Insemination transactions
are recorded daily by farm and entity. Business logic determines a gilt or sow`s
ability to be inseminated by referencing her current stage. For example,
a sow that is in farrowing or pre-weaning cannot be inseminated until
she is open.
Before creating an Insemination transaction, the following
must be created:
The following procedures are outlined in the Inseminations document:
Create an Insemination
Transaction
- In SMTS>SIM>Transactions>Events,
select Inseminations.
- In the Inseminations
main index, click
 to create a new insemination
transaction.
to create a new insemination
transaction.
- In the New Record dialog box, from the Farm
No drop-down menu, select the farm where the gilt or sow is
located.
- Enter the transaction Date.
- In the Insemination screen, the details are entered
for each transaction line by clicking
to add a new transaction line.
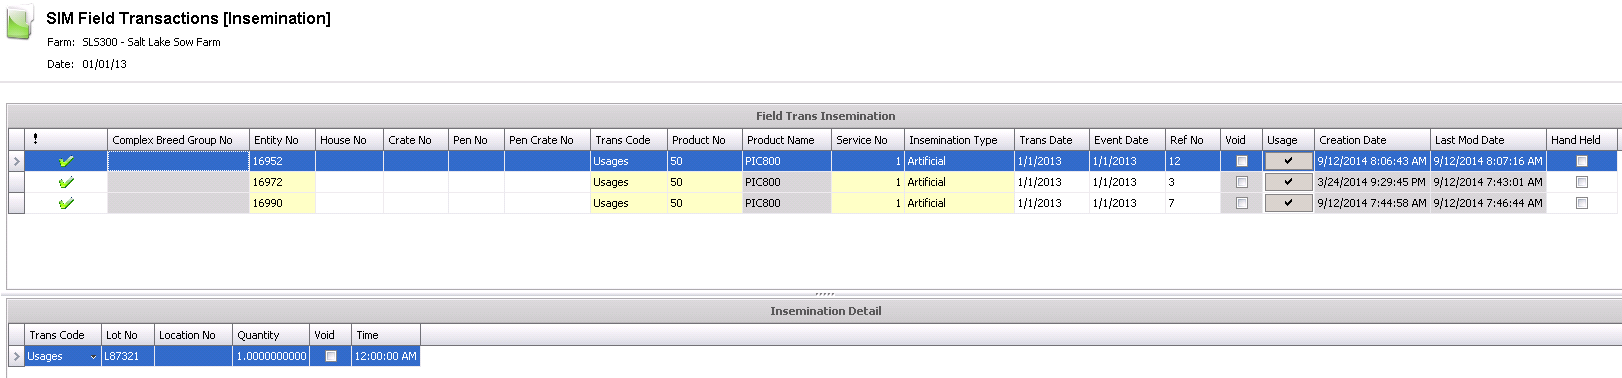
Field Trans Insemination
The first section in the insemination transaction outlines the main
details related to the insemination.
- The Complex Breed
Group No will default in to identify the breed group of the
sow.
- Select the Entity
No where the sow being inseminated is located.
- The House No
can be selected to identify the house where the sow is located.
- The Crate No
can be selected to identify the crate where the sow is kept.
- The Pen No
can be selected to identify the pen where the sow is kept.
- The Pen Crate
No can also be selected.
- From Trans Code,
select an option to identify the type of insemination transaction.
Non Inventory Debit is used if semen inventory is not maintained on
the farm, and all costs are expenses immediately. Usages are used
when inventory is kept on a farm, and relieves the inventory.
- From Product
No, select the semen product being used for the insemination.
- Product Name
will default in and displays a description of the semen product.
- Service No
records the number of inseminations within the current cycle.
- From Insemination
Type, select an option to indicate whether the insemination
was Natural or Artificial.
- In the Trans
Date field, enter the date the insemination will occur.
- Event Date
is usually the same as the Trans Date but can be changed if required
and used to record a date
in a closed period in order to capture late inseminations occurring
in a closed period.
- Ref
No is a unique number
to identify the transaction, and can be auto created if required.
- Selecting the Void
flag will cancel the transaction.
- Clicking on the Usage
flag will bring up Product Inventory view dialog box.
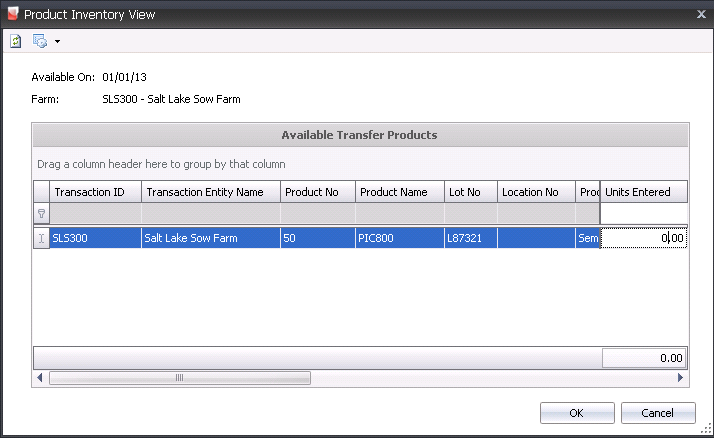
- Select the required Transaction ID and in the
Units Entered field, enter
the number of units required. Click the OK button and the details
will default in the Insemination Detail section.
- Creation Date
indicates the date the transaction was created.
- Last Mod Date
indicates the date the transaction was last modified.
- Select
the Hand Held flag if...
Insemination Details
The Insemination Details section is used for tracking an actual semen
inventory against the inseminations. In order to use the Details section,
semen must first be received/purchased into the farm inventory (products)
prior to creating the insemination transaction. This section is required
if the trans code is a Usage.
- Trans Code
will default in to identify the type of transaction.
- Lot No
indicates the lot where the semen is located.
- Location No
indicates the location where the semen is located.
- Quantity
displays the total quantity of semen products being transferred and
will default in. The Quantity field can be edited, if required.
- Selecting the Void
flag will cancel the transaction.
- Enter the Time
the insemination occurred.
Post an Insemination
Transaction
The posting process locks the
transaction to prevent edits, and creates the journal transaction to record
the liability. The UnPost option unlocks the transaction and reverses
the journal transactions. All events
are posted in the All Events index.
- In SMTS>SIM>Transactions>Events,
select All Events.
- In the All Events main index, select the required
transaction and right-click to select 'Post'. Alternatively, click
the green check mark
 in the top menu bar and select 'Post'.
- To un-post an insemination transaction, select
the required transaction and right-click to select 'Unpost'. This
process will set the record status to 'Reversed' status, which allows
the record to be edited.