order shipments

Order
Shipments are sourced from existing sales orders and remove the product
from inventory.
A Sales
Order must be created prior to creating an order shipment.
The following procedures are
outlined in the Order Shipment document:
Create
an Order Shipment
General
The General tab contains the following components:
Order
Shipment Header
The order shipment header
contains the base data to outline the shipment. The header is divided
into three sections to group the data. Most of the information defaults
in and is derived from the associated sales order.
- In
TMTS>BIM>Transactions,
select Order Shipments.
- In
the Order Shipment
main index, click the
 button to create a new order shipment
- Click
on the General tab.
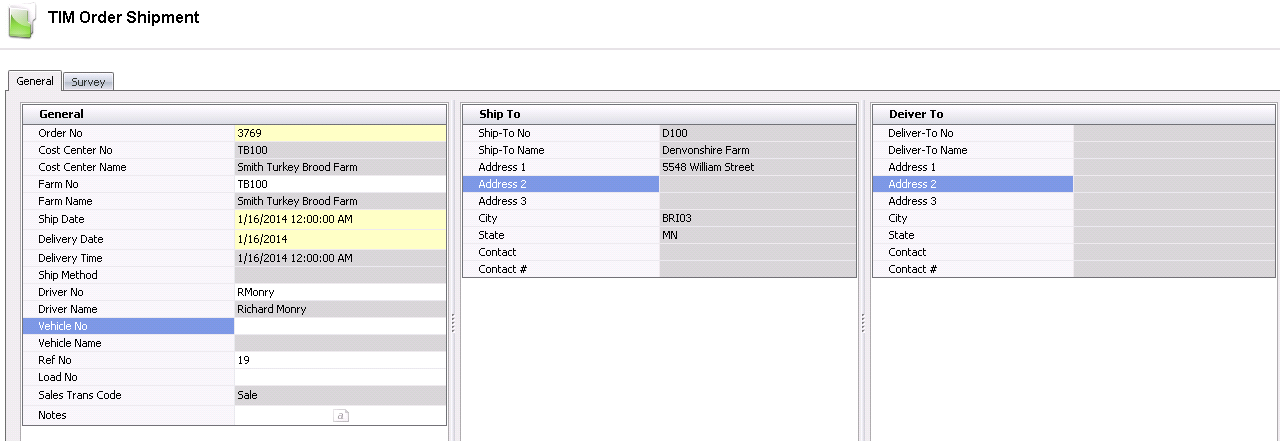
General
- From
the Order No drop-down
menu, select the sales order to be shipped. Order No is an auto-assigned
unique number that was assigned to the order when it was initially
created.
- Cost Center No will default
in and identifies the cost center from where the product will be shipped.
- Cost Center Name will default
in and displays the name of the cost center.
- From
Farm No, select the
farm from where the product will be shipped.
- Farm Name will default in
and displays the name of the farm.
- Enter
the Ship Date to
indicate the date that the product will be shipped.
- Enter
the Delivery Date to
indicate the date the product will be delivered.
- Delivery Time will default
in with no option to modify.
- Ship Method will default in
if applicable, with no option to modify.
Driver No is an optional field to
identify the driver who will be transferring the product. Drivers
must be set up prior in: Admin>Business>General>Definitions>Drivers.
- Driver Name
will default from Driver No and displays the name of the driver.
Vehicle
No is an optional field to identify the vehicle used to transfer
the product. Vehicles must be set up prior in: Admin>Business>General>Definitions>Vehicles.
Vehicle Name will default from Vehicle
No and displays the name of the vehicle.
Ref No is a unique reference number
that identifies the order shipment transaction. This can be manually
or automatically entered.
Load No is an optional field to
enter the load number of the shipment.
Sale Trans Code identifies the type
of transaction and will default to Sales.
In
the Notes field, enter any
additional information relating to the order shipment.
Ship
To
The Ship-To tab contains the
base data for the ship-to customer. The details in the tab will default
in from the sales order with no option to modify.
- Ship-To No displays the code
that is used to identify the ship-to customer.
- Ship-To Name displays the
name of the ship-to customer.
- Address 1-3 fields display
the address details of the ship-to customer.
- City displays the city in
which the selected ship-to customer is located.
- State displays the state in
which the selected customer is located.
- Contact defaults from the
primary contact defined on the Ship-To customer.
- Contact # defaults from the
Ship-To customer and displays the main contact telephone number, if
applicable.
Deliver
To
The Deliver-To tab contains
the base data for the deliver-to customer. This tab will be populated
if the deliver-to customer is set up in the Business Usages tab of Customers.
The details in the tab will default in from the sales order with no option
to modify.
- Deliver-To No displays the
code that is used to identify the deliver-to customer.
- Deliver-To Name displays the
name of the deliver-to customer.
- Address 1-3 fields will default
in and display the address details of the deliver-to customer.
- City displays the city in
which the selected deliver-to customer is located.
- State displays the state in
which the selected customer is located.
- Contact defaults from the
primary contact defined on the Deliver-To customer.
- Contact # defaults from the
Deliver-To customer and displays the main contact telephone number,
if applicable.
Order
Shipment Details
The Detail lines and fields
in the Details tab will default from the selected sales order.

- Line Index identifies the
line number of the order.
- Sales SKU No identifies the
product that is being shipped.
- Sales SKU Name displays a
description of the product being shipped.
- Complex Entity No displays
the entity number of the farm.
- Cost Center No indicates the
cost center where the product is being shipped from.
Cost Center Name defaults from Cost
Center No and displays the name of the cost center.
- Quantity Ordered displays
the number of units ordered that are requested to be shipped.
- Quantity Shipped displays
the quantity of units that were actually shipped. This field will
be populated when the product inventory is selected.
- Variance will be automatically
calculated and displays the difference in unit amounts between Quantity
Ordered and Quantity Shipped, if applicable.
- The
Complete flag is selected
if the order shipment is complete and shipping has been completed.
- If
the order was not completely shipped, but the remaining quantity will
be shipped on another shipment, select the Back
Order flag. For example, if 1000 units were ordered,
but only 750 are available to be shipped today, and the remaining
250 will ship tomorrow, then the back order flag should be selected.
On the other hand, if only 750 units are available to be shipped and
the remaining 250 units will never be shipped, the back order flag
should be left de-selected.
- Allow Any % Over
defaults as a read-only field from the product and lets the
user know if additional quantities from the order quantity can be
shipped. If this flag is selected, there
is no limit on the product amount and the customer can be shipped
any quantity over the specified product units.
- Max % Over defaults
as a read-only field from the product and is
used when the product has a tolerance percentage for the order shipment.
(Example: The order shipment has 100 units. Max % Over is defined
as 5%, which means the receiving transaction will allow up to an including
5 additional units).
Additional
Details
Within the Details tab, there
is a child grid to add additional details relating to the order shipment.
The child grid section is
comprised of three tabs:
- Click
 on the Line Index tab to display the child grid.
- Click
to add a new item line.
- The
Select Entities for Shipment dialog box will appear with all available
entities.
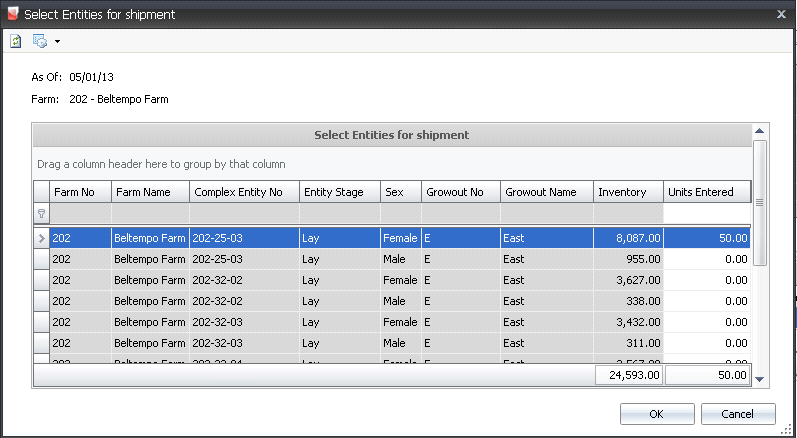
- Select
the required Complex Entity No and in the Units
Entered field, enter the number of units to be shipped.
- Click 'OK'.

- Complex Entity No displays
the entity where the product is shipped from.
- Quantity displays the number
of units shipped.
- Select
the Final Farm Pickup
flag if the final pick-up from the farm has been completed.
- Select
the Final Pickup flag
if this is the last pick-up of the product at the farm.
Field
products can be added when selling a field product, such as medication,
vaccination, or miscellaneous supplies.
- Click
to add a new line item.
- In
the pop-up dialog box, select the required field product and in the
Units Entered field,
enter the number of units to be shipped.
- Click
'OK'.

- Lot No is a unique identification
number for the field product, and is optional.
- Quantity displays the amount
of field product units that are being shipped.
- Product No displays the code
for the field product.
- Product Name defaults from
Product No and displays a description of the product.
The fields in the Bill of
Materials tab will default in from the sales order.

- Product Type displays the
type of product ordered.
- Product No identifies the
product.
- Lot No indicates the lot number
of the product, if applicable.
- Location No identifies the
location of the product, if applicable.
- Quantity displays the total
amount.
- Inventory Units displays the
total number of units of the product.
- Shipped Units displays the
total number of shipped units.
- Order Units displays the total
number of units in the order.
- Select
the Override
flag to cancel the order.
Survey
Survey Codes are set up in:
Admin>Business>General>Order
Management>Survey Codes The codes are then displayed on
the Order Shipment tab, where the user enters a value from 1 (lowest)
to 10 (highest). The system will calculate an average score for the shipment.

Post
an Order Shipment
Once the order shipment has
been created and saved, the shipment needs to be posted. The posting process
locks the order shipment to prevent edits, and creates the journal transaction
to record the receivable and revenue accrual. If internal pricing is used,
the credit to inventory and debit to cost of sales will be recorded using
the internal price and adjusted to actual at period end. The UnPost option
unlocks the order shipment transaction and reverses the journal transactions.
- In the
Order Shipments main index, select the required order shipment transaction
and right-click to select 'Post'. Alternatively, click the green check
mark
 in the top menu bar and select 'Post Record(s).
- To un-post
an order shipment, select the required order shipment and right-click
to select 'UnPost'. This process will set the transaction status
to 'Reversed' status, which allows the transaction to be edited.
Journal
Transaction
The posting process creates
the journal transaction. The journal will accrue the sales revenue and
accounts receivable based on the values that are defined in the sales
order. The posting process will also credit the inventory for the cost
of the product and debit the cost of sales based on the internal price
defined. The period end process
reverses the internal price and records the actual cost of the product.