![]()
Sales orders can be manually created or, depending on the transaction type, the sales order can be automatically created.
Feed Deliveries – Sales orders are generated automatically from feed orders based on the following scenarios:
External Customer: The feed is delivered to an external customer.
Internal Customer: If the feed mill is a separate company, the sales order will be automatically generated for any farm or facility that belongs to another company or division. These transactions will be defined as intercompany sales. The feed mill must be associated with a vendor and the farm or facility must be assigned to a customer.
Processing Transactions - Sales orders are generated automatically from processing transactions based on the following scenarios:
External Customer: The birds are processed at an external plant.
Internal Customer: If the plant is a separate company, the sales order will be automatically generated from any farm that belongs to another company or division. These transactions will be defined as intercompany sales. The plant must be associated with a customer and the farms must be assigned to a vendor.
Placement Transactions - Sales orders are generated automatically from processing transactions based on the following scenarios:
External Customer: The birds are placed at an external customer.
Internal Customer: If the placement farm is assigned to separate company, the sales order will be automatically generated from any hatchery that belongs to another company. These transactions will be defined as intercompany sales. The hatchery must be assigned to a vendor and the farms must be associated to a customer.
Transfer Transactions - Sales orders are generated automatically from processing transactions based on the following scenarios:
Internal Customer: If the source and destination facilities belong to different companies, the sales order will be automatically generated. These transactions will be defined as intercompany sales. The source facility needs to be associated with a vendor and the destination facility needs to be assigned to a customer.
Prior to creating a Sales Order, the following items should be created:
Price Master (optional)
Sales Contract (optional)
The following procedures are outlined in the Sales Order document:
In General>Sales, select Orders.
In the Sales
Orders index, click  to create a new sales order.
Click on the Bill-To tab.
The sales order header contains the base data to outline the sales order. The header is divided into three sections to group the data.
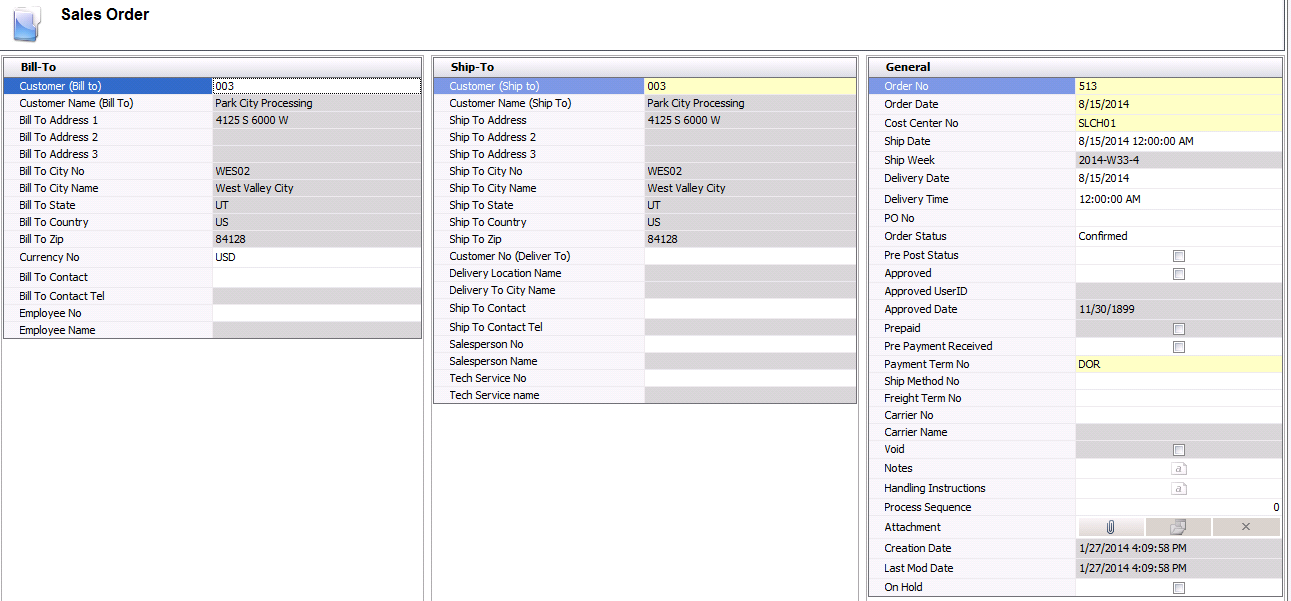
The Bill-To tab contains the base data for the bill-to customer.
The Ship-To tab contains the base data for the ship-to customer, and can only be selected based on the relationships defined on the Business Usages tab on the Bill-To Customer.
The General grid contains the base data for the sales order.
Select the Order Date from the drop-down calendar to identify the date the order was initiated.
From Cost Center No, select the cost center where the product will be shipped, and where revenue will be recorded. In the Line Items grid, there is an option to select if the order needs to be shipped from a different cost center.
In the Shipped Date field, enter the date that the product will be shipped to the customer. The ship date field will be used to select the required pricing for sales contracts, price master and tax rates.
Ship Week is an optional field to enter the calendar week that the order is to be shipped.
In the Delivery Date field, enter the date that the product will be delivered to the customer.
In the Delivery Time field, enter the requested time for the product to be delivered to the customer.
PO No is an optional field to enter the purchase order number that the customer provides for the order.
Order Status determines the status of the order and is set to Confirmed by default. Options are: Tentative or Confirmed. The planning module allows the user to view only confirmed orders or a combination of confirmed and tentative orders so they can see their net position.
Tentative - the order is planned for the date, but dates, quantities and prices possibly need to be verified.
Confirmed - dates and quantities are confirmed with the customer.
Once the order has been entered, the Pre Post Status flag can be selected. Selecting this flag will lock the quantity on the order so it cannot be modified, and the make the order available for shipment. Once the product has shipped, the flag cannot be de-selected.
Selecting the Approved flag will lock the pricing and make the order available for invoice after the product has been shipped. Once a shipped order has been invoiced, the Approved flag cannot be unchecked. Security can be assigned to this field so that only the required users can approve orders.
Approved UserID indicates the user that approved the order.
Approved Date indicates the date that the order was approved.
The Prepaid flag will be selected if the payment term for the order is a prepaid term. The purpose of this flag is to notify the user that a prepayment is required. The flag will also prevent the order from being shipped until the Pre Payment Received flag is selected.
The Pre Payment Received flag must be selected before a prepaid order can be shipped. Security can be added to this field so that only the required users have access to the flag. Generally, only the finance department only has access to modify this flag.
Payment Term No indicates the default payment term that is assigned to the ship-to customer in the Business Usages tab of the Bill-To customer. Permissions can be set so that this field will always be entered by default, or users can have the option to modify.
Ship Method No will default from the selected Ship-To customer. The method is defined on the Business Usages tab of the Ship-To/Bill-To relationship.
Freight Terms will default from the selected Ship-To customer and identifies the freight terms for the sales order based on a company-defined list. These terms are defined on the Business Usages tab of the Ship-To/Bill-To relationship.. Examples are FOB, CIF.
Selecting the Void flag will cancel the order, but will leave the order in the system for audit purposes.
In the Text field, enter any additional comments related to the order.
Handling Instructions defaults from the Ship-to customer with any details related to processing the order. Optionally, details that are specific to the order can also be added.
Process Sequence determines where in the planning process that the order will be addressed.
In the Attachment field, any type of file can be attached (Example: Word document, picture, music or video clip).
Creation Date indicates the date the transaction was created.
Last Mod Date
indicates the date the transaction was last modified.
After completing the header of the order, there are several tabs in
the Line Items grid that also must be completed in the creation process.
to
create a new purchase order detail line.

Unit Description indicates the unit of measure in which the product is being shipped (Example: Each, Box, Ton, etc.). The Unit Description will default from the selected sales sku.
Units Per represents the number of inventory units per each sales unit being sold. The value defaults from the selected sales sku.
Product No derives the product number that is associated with the sales SKU. Product Name defaults from Product No and displays a description of the product.
Product Type displays a description of the type of product being purchased (Example: Medication, Chicks, Eggs, etc).
The Cull Sales flag will default from the selected sales sku and determines if the head will be deducted from entity inventory for animal sales.
The Cull Inventory Deduction flag will be selected if any inventory have been deducted due to culling.
In the Order Units field, enter the number of sales units being sold. Quantity is based on the unit type. For example, if the product is being sold in boxes, enter the number of boxes.
Unit Price indicates the defaulted unit price from the contract or price master. If Price Mode defaults to Order, the price can be modified. Otherwise, the price is read-only. The Override Price flag can be used if the price is incorrect.
Order Free Units indicates the number of units that are to be shipped free of charge. This field is calculated based on a premium add-on where the user enters the percentage of free units. Free units are only used for shipping chicks and poults.
Order Total Units is a calculated field indicating the total quantity order. Total Units = Order Units + Order Free Units.
Amount is a calculated field representing the selling amount of the product before add-ons and taxes. Amount = Order Units x Unit Price.
Total Premium is a calculated field based on the order units and the premium add-ons assigned to the sales SKU in the order.
Total Tax indicates the tax amount for the product and any associated add-ons. If the product and/or add-ons are taxable, taxes will be calculated based on the tax rates that are assigned to the order. The Taxable flag must be selected on each taxable item, and the tax codes added to the Taxes tab.

Cost Center No indicates the cost center where the product is being shipped from. The Cost Center No from the General tab in the Header will default to the line item. If the product is to be shipped from a different cost center, select the required cost center code.
Cost Center Name defaults from Cost Center No and displays the name of the cost center.
In the Notes field, enter any additional comments related to the order.
Taxable defaults from the selected sales SKU if the product is taxable. If the flag is selected, a tax code must be added to the child grid before the order can be approved.
Once the sales order as been Shipped, the process will mark the line item as 'Shipped'. An order is assumed shipped when the order shipment has the Complete flag marked and there are no outstanding back orders.
The Closed flag can be selected after posting, if the sales order has been closed.
Reason Code Change No is an optional field to select the reason for closing.
Farm No is only used when selling field products from the farm. Farm No identifies the farm that will receive credit for selling the product.
By selecting the Override Zero Price flag, the order can be approved for invoice at a zero price. If the Unit Price is set to '0', the order cannot be approved for invoicing unless the flag is selected. Permissions are usually assigned to this field so that all users do not have access.
By selecting the Override Price flag, the unit price can be changed from the default if the Price Mode is Contract or Price Master. Permissions are usually assigned to this field so that all users do not have access.
Shipped Units indicates the number of shipped units excluding free units.
Shipped Free Units displays the number of units that have been shipped free of charge. This amount is based on the free percentage quantity defined in Premium Add-Ons.
Shipped Total Units is a calculated field that indicates the total amount of units shipped to the customer. Shipped Total Units = Shipped Units + Shipped Free Units.
Contract Price Mode defaults if the sales order is priced by contract, and displays the price mode of the contract - where in the sales process the price can be modified.
Contract Sales SKU No defaults if the sales order is priced by contract, and indicates the product being sold.
Contract Sales SKU Name defaults if the sales order is priced by contract, and displays a description of the product being sold.

Contract Unit Description defaults if the sales order is priced by contract, and displays a description of the contract unit.
Contract Units Per defaults if the sales order is priced by contract, and indicates the number of units per order (Example: Per box or carton).
Contract Product No defaults if the sales order is priced by contract, and indicates the contract product.
Contract Product Name defaults if the sales order is priced by contract, and displays a description of the contract product.
2nd Unit Measurement No can be used to selected an alternative unit of measurement for the product.
2nd Unit Description will default in.
Product Info indicates that details have been entered for the product.
Within the Line Item No tab, there is a child grid with additional tabs that must be created. The details in the child grid will default from the contract or price master if the order is priced from either of those two options. If the order is manually priced, they will default from the sales sku and prices can be entered where required. All add-ons must be defined on the sales sku and cannot be manually added to the sales order.
If the product and/or add-ons are taxable,
the tax code must be assigned on the Taxes tab. The tax amount will then
be calculated based on the taxable order amounts.
Click ![]() to display the child grid for the Line
Item No.
to display the child grid for the Line
Item No.
Select the Taxes tab.
Tax codes will
default from the contract, price master, or sales sku as defined.
If not previously defined, click to add tax codes.
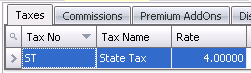
Tax No identifies the tax code to be applied to the product and add-ons for the selected line item. The Taxable flag must be selected in the product and add-ons for taxes to calculate.
Tax Name describes the selected tax code.
The Rate
will display the tax rate percentage that is in effect on the date
that the purchase order is created. The receiving transaction will
be recorded based on the tax rate that is in effect on the receiving
date. The calculated amounts will be displayed on the product detail
line to display a total value of the product being purchased.
The Commissions tab allows the user to define a commission rate that is payable to an employee or other party. Commissions must be defined on the sales contract, price master or sales sku prior to the sales order being created. The commission will be accrued at invoice. The commission must be assigned to the sales sku for the product prior to being defined on a price master list.

Product Name will default from Product No and displays a description of the add-on.
Transaction Basis is a read-only field that defaults from the selected add-on and determines how the add-on is calculated on orders. Options are: Per Unit, Percentage, Flat Rate, or Free Percentage.
Payment Type is a read-only field that derives from the sales sku and determines when the add-on payment is made.
The Payee Type field is optional. If the add-on is to be processed by an alternative source, select the source type for the add-on. Options are: Customer, Vendor, Employee, or Cost Center. If the field is left blank, it assumes the sales sku for the payment of the add-ons.
Transaction Entity ID is a required field if a different Payee Type is selected. Select the appropriate customer or cost center.
Taxable identifies if the item is taxable or non-taxable when the item is purchased. Tax codes must be assigned to the purchase order for the taxes to be calculated. Select the flag if the item is taxable.
The
Rate will default as defined
on the sales sku. Modify the rate as required. The calculated amounts
will be displayed on the product detail line to display a total value
of the product being purchased.
In the child grid, there is the option to define the add-ons related to the product. The add-ons must be pre-defined in General>Products>AddOns prior to adding to the sales sku. Add-ons must be defined on the sales SKU and then the corresponding contracts and price masters before defaulting to the order.

Product Name will default from Product No and displays a description of the add-on.
Transaction Basis is a read-only field that defaults from the selected add-on and determines how the add-on is calculated on orders. Options are: Per Unit, Percentage, Flat Rate, or Free Percentage.
Payment Type is a read-only field that derives from the sales sku and determines when the add-on payment is made.
The Payee Type field is optional. If the add-on is to be processed by an alternative source, select the source type for the add-on. Options are: Customer, Vendor, Employee, or Cost Center. If the field is left blank, it assumes the sales sku for the payment of the add-ons.
Transaction Entity ID is a required field if a different Payee Type is selected. Select the appropriate customer or cost center.
Taxable identifies if the item is taxable or non-taxable when the item is purchased. Tax codes must be assigned to the purchase order for the taxes to be calculated. Select the flag if the item is taxable.
The Rate will default as defined on the sales sku. Modify the rate as required. The calculated amounts will be displayed on the product detail line to display a total value of the product being purchased.
Select
the Print on Invoice flag
if the add-on is to be printed on the default system invoice. If the
add-on is not to be printed on the invoice, the option should not
be selected. This option can be further defined in price lists.
The Shipped tab contains details relating to the shipped product.

The Instructions tab contains instructions relating to the add-on (s).

The Bill of Materials tab is used to determine the products that must be used to ship the order.

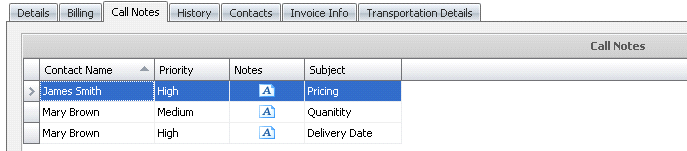
The Call Notes tab is used to enter information relating to calls or discussions held with contacts.
The History tab is used to indicate any changes that have been made to the order based on a pre-defined list of reason codes.

The Invoice tab identifies the details for all invoices created for the order.

The Transportation tab outlines the details related to the transportation of the product.
button
to add a new line.
![]()
There are three levels of approval within the sales order.