Stud Farm

Stud Farm Artificial Inseminations
are used to...
Prior to creating a Stud Farm Artificial Insemination transaction, the
following must first be created:
The following sections are outlined in the Entity Mode Artificial Insemination
document:
Create a Stud
Farm Artificial Insemination
- In TMTS>BIM>Transactions>Artificial
Inseminations, select Stud
Farm.
- In the Insemination Transaction index, click the
 button
to create a new transaction.
button
to create a new transaction.
General
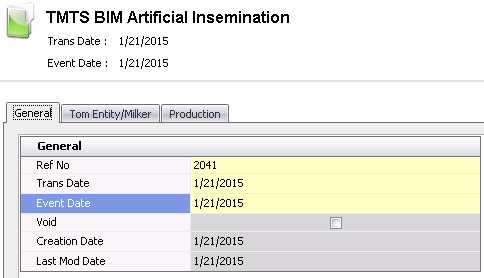
- Ref No
will default in with a unique transaction identity number, once the
transaction has been saved.
Trans Date
displays the date of the transaction.
Event Date
indicates the insemination date. Event Date will default to the transaction
date and can be modified if required.
Selecting the Void
flag will cancel the insemination transaction.
Creation Date
indicates the date the transaction was created.
Last Mod Date
indicates the date the transaction was last modified.
Tom Entity/Milker
The Tom Entity/Milker section contains two tabs relating to the source
entity:
Source
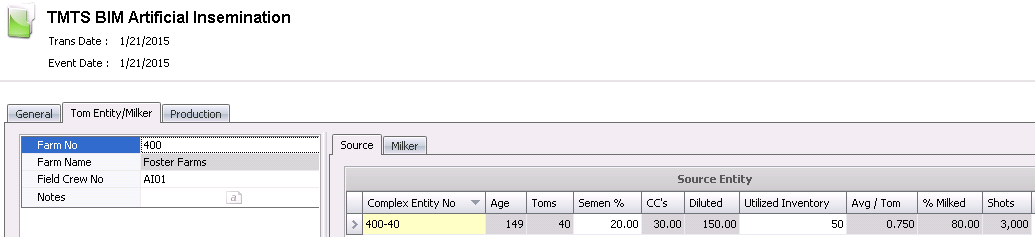
Details
- From the Farm
No drop-down menu, select the farm where the flock is located.
- Farm Name
will default in.
- From Field Crew
No, select the field crew that will be completing the insemination.
- Enter any additional Notes
related to the tom entity.
Source Entity
- Select the Source
Entity grid and click the button to add
a new source entity record.
- From Complex
Entity No, select the entity where the flock resides.
- The Age
will default in.
- Toms is a calculated field
to indicate the number of toms required to inseminate the flock.
- In
the Semen % field,
enter the percentage of semen...
- CC`s is a calculated field
representing... The number
will default in.
- Diluted is a calculated field
representing...The number will default in.
- In
the Utilized Inventory
field, enter the number of turkeys used for the insemination.
- Avg/Tom is a calculated field representing...The number will
default in.
- %
Milked is a calculated field representing
the percentage of toms that were milked for semen. The field will
default in.
- Shots is a calculated field representing the number of required
shots. The field will default in.
Milker
The Milker section contains information related to the milking of the
toms.

- Select the Milker
grid and click the button to add a new milker record.
- From Field Crew
No, select the field crew that will be completing the milking.
- Enter the number of Hours required.
- CC`s is a calculated field
representing... The number
will default in.
- Doses is a calculated field representing
the number of doses required. The number will default in.
- Toms will default in with the number
of toms required to be milked.
- Avg/Tom is a calculated field representing...The number will
default in.
- Milker/Man/Hr is a calculated field representing...
- Doses/Man/Hr
is a calculated field representing...
Production
The Production tab contains information related to the hen and semen
production. Most of the fields will default in with information from the
other tabs. The Production tab is comprised of the following sections:
Production

Hen Production
- Complex Entity
No identifies the entity where the hens reside.
- Shots
indicates the number of shots required for the hens.
- Doses Ordered
indicates the number of doses ordered for the hens.
- Percent Waste indicates the percentage
of waste.
- Doses Sent
displays the total number of doses sent.
- % Sent/Ordered is a calculated field representing: the % of doses sent/the
percentage of doses ordered.
- Hens/Toms/ is
a calculated field representing the percentage of hens to toms.
Semen Production
- Line Index
indicates the line item number.
- Milker No
identifies the milker.
- Complex Entity
No identifies the entity where the toms reside.
- Time Milked
displays the time the toms were milked.
- Time Delivered
displays the time the toms were delivered.
- Time Elapsed
displays the total time the toms were being utilized.
- Toms Milked
displays the total number of toms that were milked.
- Original Extender indicates
- Semen Volume
displays the expected volume of semen to be milked from each tom.
- Ext To Add indicates the amount
of extra to add.
- Total Volume
displays the volume of diluted semen used for insemination.
- Hen indicates
the total number of hens to be inseminated for the selected flock.
- Avg Prod/Tom is a calculated field representing...
- Avg Hens/Tom is a calculated field representing the ratio of hens
to toms.
- In the Final
Concentration field, enter the final concentration of semen.
- In the
Volume Split Count field,
enter...
- The Used (cc)
field will automatically calculate and represents: Semen Volume-Original
Extender.
Derived
- Hens Remaining
displays the number of hens remaining in the flock.
- Semen Remaining
displays the amount of semen remaining after insemination.
Usage
The details in the Usage tab will default
in.
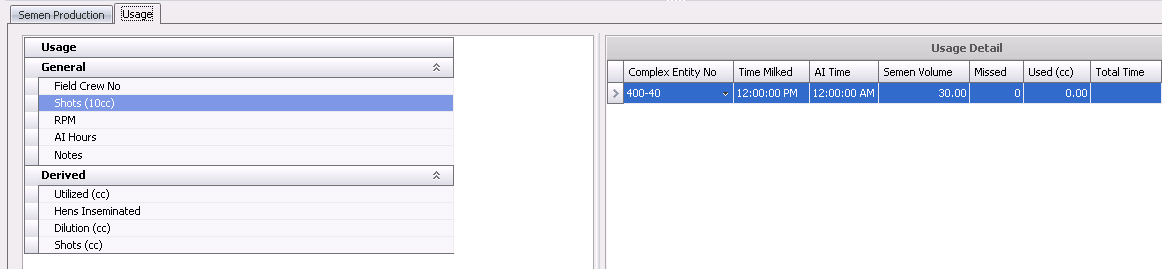
Usage
- Field Crew No
identifies the field crew used for the insemination.
- Shots (10cc) indicates the number
of shots used.
- RPM
- AI Hours indicates the number of
hours the artificial insemination took to perform.
- Notes
is an optional field to enter any additional information related to
the insemination.
- Utilized (cc) indicates
- Hens Inseminated
displays the total number of hens inseminated.
- Dilution (cc)
displays the total dilution.
- Shots (cc) displays...
Usage Detail
- Complex Entity
No identifies the entity where the flock resides.
- Time Milked
displays the time the toms were milked.
- In the AI
Time field, enter the time the insemination occurred.
- Semen Volume
indicates the volume of semen used.
- Missed indicates...
- Used (cc) indicates...
- Total Time displays the total time
the insemination process took.
Post a Stud
Farm Artificial Insemination
The posting process places the transaction in
`Posted` status. This prevents the transaction from being modified and
records the data to the Flock Master.
- In the Artificial Insemination main index, select
the required transaction and right-click to select 'Post'. Alternatively,
click the green check mark
 in the
top menu bar and select 'Post'.
in the
top menu bar and select 'Post'.
- To un-post a stud farm artificial insemination
transaction, select the required transaction and right-click to select
'Unpost'. This process
will set the record status to 'Reversed' status, which allows the
record to be edited.