![]()
The HPA module is a supply and demand tool that is used to analyze the variance between the eggs and chicks that can be produced as compared to the demand. The process uses the demand created by the BPA to create the supply. The HPA then takes the demand from internal placements and external orders to create the demand. There is some configuration related to farms and entities that is covered in the BPA document.
The following section outlines all of the setup requirements for HPA.
The following options are required to be set in the Poultry Registry;
The following master data items need to be configured:
The following supply items need to be added:
The following demand items are required:
The only registry switch that is required for the HPA is located in Registry>Poultry>Hatchery Planning (All Hatcheries).
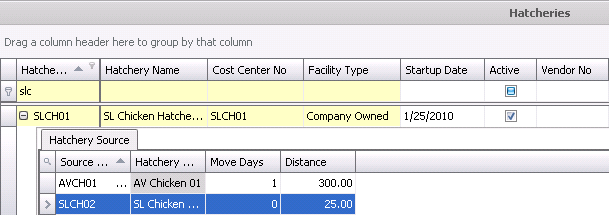
The Hatcheries facilities need to be configured to determine the order that eggs are supplied from one hatchery to another. The HPA only plans to transfer eggs and does not plan to transfer chicks.
 to add a source hatchery.
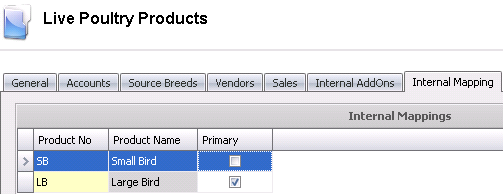
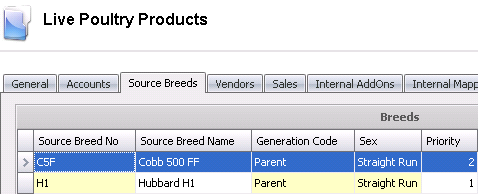
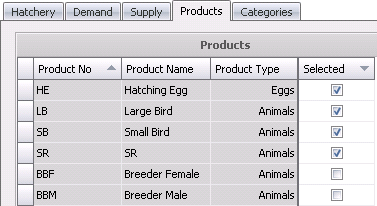
The details related to Products have been established in General>Products>Animals>Poultry. The Internal Mappings tab is required for the HPA which indicates the products that can be used interchangeably if the original product is not available. HPA also requires that the Source Breed tab has a source breed defined. This determines the breeds that are used to supply the product.
 to add a new product
and select the product from the drop-down list of available products
to add a new product
and select the product from the drop-down list of available products
to add a new breed code
and select the source breed code from the list of available breed
codes
Purchase orders will increase the available supply of product in the HPA for products to be received. In order to increase and project supply, purchase orders must be entered in the system for all future planned egg chick purchases.
Create the required purchase orders in General> Purchases> Orders as outlined in Creating a Basic Purchase Order.
Purchase orders must be posted for the supply to be available in HPA.
BRPA Movements plan broiler placements based on processing targets. The BRPA Movements are required to create the demand. If BRPA is not utilized, the BRPA Movements can be manually entered as required. Complete details related to BRPA Movements can be viewed by clicking here.
Sales Orders create demand for the HPA. Orders can be established as confirmed or tentative orders. There are options within HPA to only view confirmed orders or all orders.
The following item is required for the HPA Master Data:
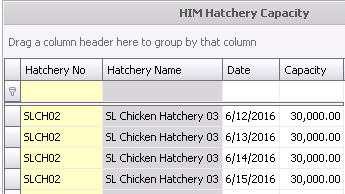
The hatchery capacity can be entered weekly or daily depending on the level of detail that is required. Capacity is entered based on egg set capacity.
In BMTS>HPA>Master Data, select Hatchery Capacity.
Select
to
create a new hatchery capacity record.
In the New Record dialog, select Hatchery No.
Enter Trans Date.
Click OK to create the new record
Enter the total egg capacity in Capacity.
Repeat the process for the remaining capacity or use the Copy feature to create new lines.
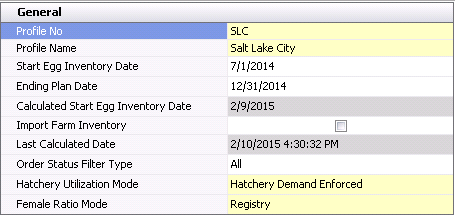
HPA Profiles establish the rules for the HPA supply and demand projection. Several profiles can be created to analyze various scenarios. There are several sections within the HPA Profile:
In BMTS>HPA>Profiles, select Profiles.
Click
to
create a new profile.
Breed: Use the ratio specified for the breed code.
Calculated: Calculate the ratio from the actual hatch results.
Registry: Get the ratio for the hatchery registry settings.
The Hatchery tab assigns the hatcheries to the profile and establishes the hatchery priority for the profile.
Click on the Hatchery section and click  to add
a new hatchery.
to add
a new hatchery.
From the Hatchery No drop-down menu, select the hatchery that is to be used in the profile.
Hatchery Name will default based on the Hatchery No selected.
Enter the Priority or order in which hatcheries are to be utilized.
Select the Import Egg Purchase Orders flag if purchased eggs are to be utilized as part of supply.
Select the Import Chick Purchase Order flag if purchased chicks are to utilized as part of supply.
Select the Use Hatchery Full Capacity flag to force the hatchery to be utilized at full capacity. If the option is not selected, then the egg set volumes will be determined based on the demand.
Select the Transfer Eggs Full Capacity flag to force the system to continue to transfer eggs until all of the hatchery capacities have been met or egg supply is exhausted.
In the Minimum Transfer Eggs field, enter the minimum number of eggs that are required to be transferred.

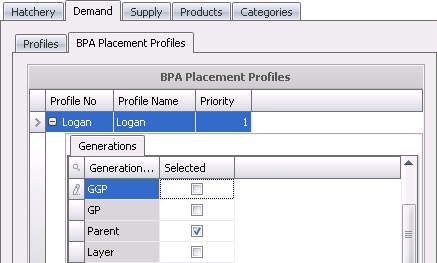
The Demand section utilizes the sales order as well as the BPRA and BPA Placement Profiles in order to calculate the total amount of demand required.
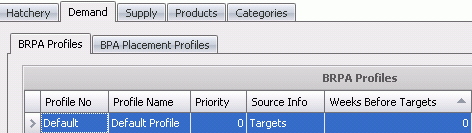
Select the Profile No from the drop down list. Must be setup in BPA as a BPA Profile.
Click on the child
grid  in the Profile No field to select the generation that will be used
in the profile.
in the Profile No field to select the generation that will be used
in the profile.
Profile Name will default based on the profile selected.
Enter the Priority in which the profiles are to be used.
The Supply tab identifies the BPA profiles and the priority that will be used to source the supply for the projection. Multiple profiles can be selected.

The Product tab specifies the products to be used in the profile.
The Categories tab further defines the projection into user defined categories based upon bird age and weight.

Product Availability is the projection of product and hatchery utilization matching supply to demand within the constraints of breed to product and hatchery mappings to create a view of available product to utilize. The Product Availability can be viewed based on egg projections or chick projections. There are also filters available to limit the data to product and/or breed if required. Product Availability is a read only screen that is driven by BPA/BRPA planning and sales orders for demand and supply is driven by actual production (BIM) and BPA Placement Schedules.
Prior to viewing the availability, the Calculate option must be generated to create the availability data.
 .
.Once the projection has been generated, the data is available to view.
.

The Projections tab displays the data that is generated for the availability. If the Product No and Breed No fields were selected in the edit dialog, the data will be filtered for only that data. There are two grids available to view the availability data.
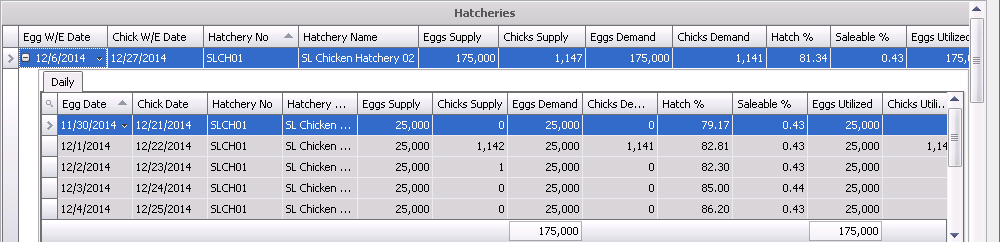
The Weekly grid displays all of the data for all hatcheries for the specified week. There are several options available in the weekly section. These options are accessed by selecting the required week and right-clicking to select the options. Details for each option can be viewed in HPA Availability Details.
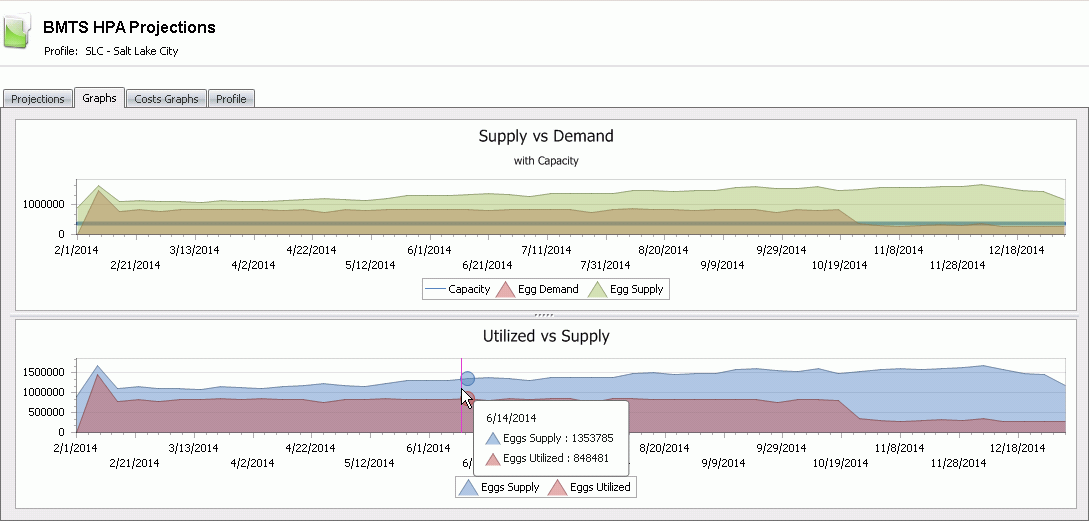
Chick W/E Date Date displays the ending date of the projected week. This will be the week that the chicks will be hatched and available.
Eggs Supply indicates the total egg supply for all hatcheries. Egg supply is calculated based on the following calculation. Egg Reduction is the number of eggs that have exceeded the maximum age as defined in Registry> Hatcheries> Egg Trans> Max Egg Age Inventory Reduction.
Egg Supply = Beginning Inventory + Eggs Received - Eggs Reduction
Chicks Supply indicates the total chick supply for all hatcheries. Chick supply is calculated based on:
Chicks Supply = Beginning Inventory + Projected Chick Supply + Chicks Purchased + Chicks Transferred In - Chicks Disposed
Eggs Demand represents Eggs Set + Eggs Sold.
Chicks Demand represents chicks required for demand: Chick Placements + Chick Sales.
Hatch % displays the percentage of eggs that hatched.
Saleable % displays the total saleable percentage of eggs and chicks.
Eggs Utilized displays the number of eggs utilized for sets and sales: Eggs Set + Eggs Sold.
Chicks Utilized displays the number of chicks that were used from the supply to meet the demand: Chicks Placement + Chicks Sold.
Eggs Utilized VS Demand is a comparison of demand to utilized and is calculated based on: Egg Demand - Eggs Utilized.
Chicks Utilized VS Demand compares the chick demand to chicks utilized and is calculated based on Chicks Demand - Chicks Utilized.
Eggs Capacity displays the total egg capacity for all hatcheries in the profile. The capacities are defined in BMTS>HPA>Master Data>Hatchery Capacity.
Eggs Capacity % represents the capacity utilized as compared to available capacity.
Eggs Remaining displays the number of eggs remaining at the end of the period: Egg Supply - Egg Demand
Chicks Remaining displays the number of chicks remaining at the end of the period: Chick Supply - Chick Demand
The Hatcheries grid displays the weekly data separated by hatchery. The fields and the calculations are the same as in the Weekly grid with some additional fields identified below.
The Hatcheries tab also displays the data for each hatchery for each day in the specified week. The Daily grid displays the same data as the Weekly grid.
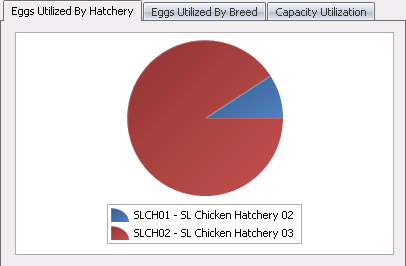
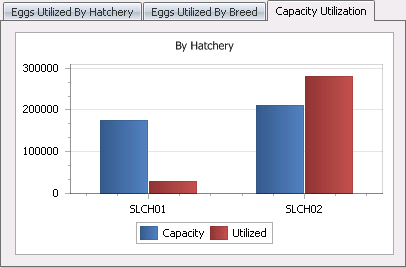
Eggs Utilized by Hatchery is one of the three graphs sourced from the Projections Weekly data. The graph compares the eggs utilized by hatchery. The source of this data is the Eggs Utilized field located in the Hatcheries grid.
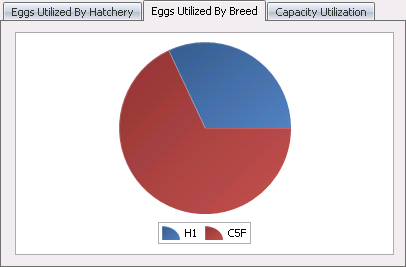
Eggs Utilized by Breed is the second of three graphs sourced from the Projections Weekly data. The graph compares the eggs utilized by breed. The source of this data is the Eggs Utilized field located in the Weekly grid.
Capacity Utilization is the third of three graphs sourced from the Projections Weekly data. The graph compares the eggs utilized by breed. The source of this data is the Eggs Utilized field located in the Hatcheries grid.
There are two graphs to display data in Availability. These graphs display the data for the projection period. Click on any point in the graph will display the data for the week.