![]()
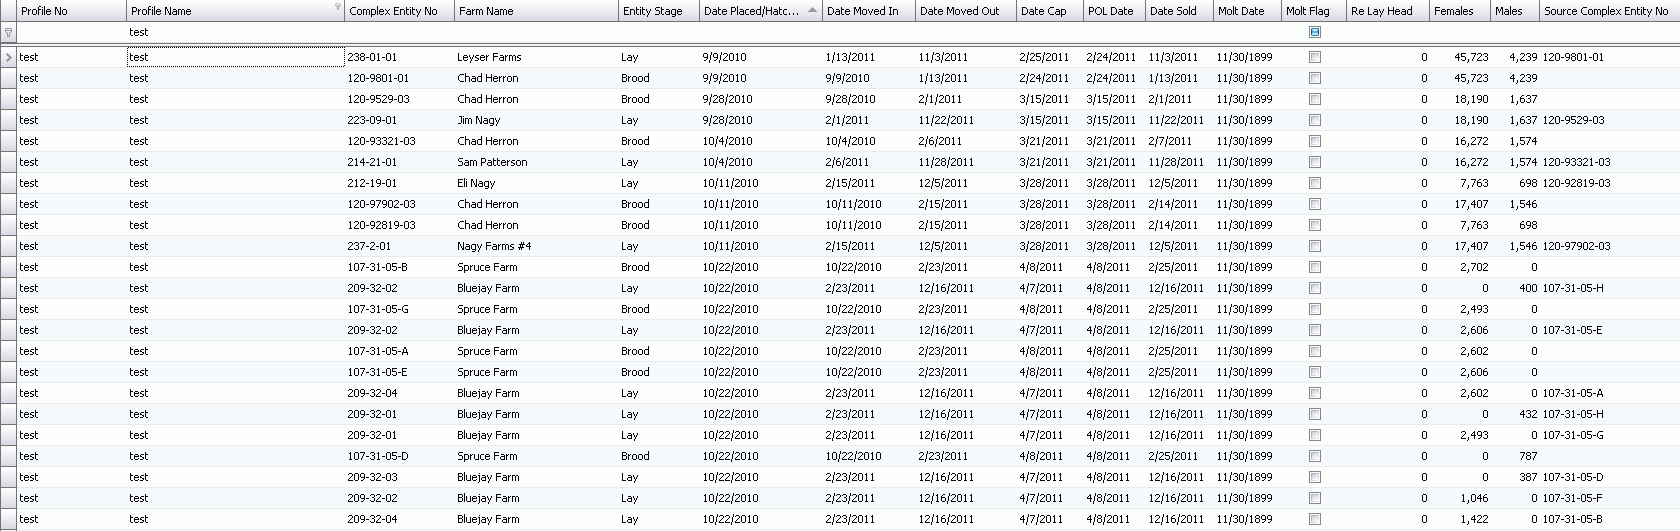
Movements, or the "Placement Plan", can be manually entered or system-generated. A Placement Profile must be selected prior to generating placements. The placement profiles are created in the Placements node of BPA Profiles. Once the placements have been confirmed, the placements can be posted to create a new BIM/BRIM entity. The placement plan will also be used in Projections to generate long range forecasts. When houses are not available for planning, Virtual Housing can be utilized.
Prior to creating placement plans, a Placement profile must be created. See: Profile Placements
The following are outlined in this document:
Manual Placements are used to enter a new farm/house for the first time if the new farm/house is not part of entity history. If the system-generated placements are not being utilized, then the placement plan will need to be entered manually.
There are two section in the Placement Schedule:
 button.
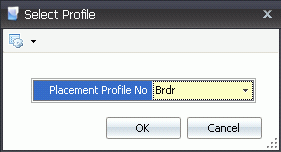 button to add new lines.


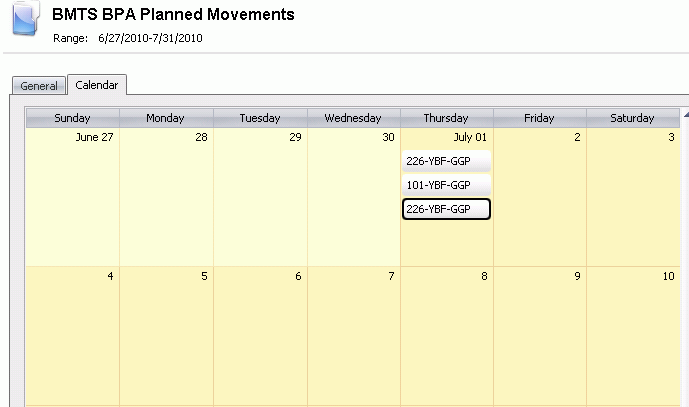
The BPA Placement tool uses a calendar function to easily view the planned
placements. While in the calendar tab, new placements can be created
by selecting the desired date then clicking thebutton,
and then clicking on the General tab to view the new record. Existing
placements can be easily moved by using the drag and drop function.
There are two options for the system to create a placement schedule: Plan Placements to Breed Targets, and Plan Placements to Full Capacity.
Plan Placements to Breed Targets was designed to fill the houses as they are needed to meet demand or targets. When demand/targets are greater than available housing, the system creates Virtual Houses and continues placing houses until targets are meet. See: Virtual Housing.
In order to use the Plan Placements to Breed Targets, several items must first be completed:
There are two components in planning placements to breed targets:
Before the Plan Placement to Breed Targets can be created, a base plan must be created first. To create the base placement plan, the first step is to import. *Note: The Import is only done the first time a placement is created
 button and select 'Import'.
Select the Placement Profile No that will be created. Placement profiles must first be created in: Profiles>Placements.
Select the Farm
Profile No that will be used in the creation of the new placement
schedule. Farm profiles must first be set up in: Profiles>Farms.
*Note: These two profiles must
contain all of the breed/generation combos that exist within the date
range for those entities that are on the farms in the farm profile.
In the Min
Date field, enter the beginning date that will be used
to import Source and Destination entities from BIM Transfers (Transfer
date).
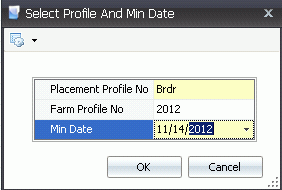
Click 'OK' and the import will create a based placement schedule.
Future housing can be created once the base plan has been established.
button and select 'Plan Placements to Breed Targets'.
Select the Projection Profile (created in Projections Profiles).
Enter the Threshold as a percent allowance for the projections to project over/under the target line.
If the Molt flag is selected, the system will plan to automatically molt flocks. If the flag is not selected, the system will not plan to molt flocks
If the Split Farm flag is selected, the system will allow the farm to receive chicks on multiple dates
If the Split House flag is selected, the system will allow the house to receive chicks on multiple dates.
Select the Plan Placement Start Basis to plan the housing schedule. If all the houses on the farms are to be filled before going to the next farm, select the 'Entire Farm' option. If houses are filled according to the first available, select the ' Individual House' option.
Select the Flock Number Stage Mode to indicate how the entities will be identified at each stage. There are two options:
Create a New Entity - will give the entity a new Entity No at each stage.
Keep Source Entity - will keep the same Entity No for the life of the entity.
Select the Virtual Brood Farm. If Targets project more birds than there are houses, the Virtual Farm will allow the system to keep placing birds into virtual houses until the target is met. Virtual Farms must be set up in BIM.
Select the Virtual
Grow Farm. If Targets project more birds than there are houses,
the Virtual Farm will allow the system to keep placing birds into
virtual houses until the target is met. Virtual Farms must be set
up in BIM.
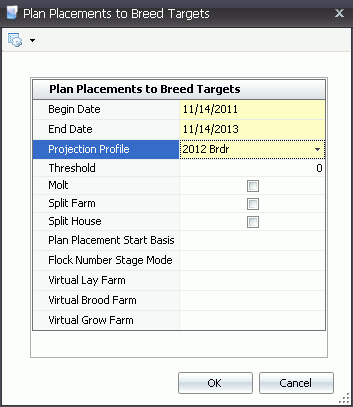
Click 'OK' and the placement schedule will be created.
Plan Placements to Fill Capacity was designed to fill the houses as they became available. The planning is not done based on targets, but rather on how many egg/offspring can be produced from the available housing.
In order to use the Plan Placements to Breed Targets, several items must first be completed:
There are two components in planning placements to full capacity:
Before the Plan Placement to Full Capacity can be created, a base plan must be created first. To create the base placement plan, the first step is to import. *Note: The Import is only done the first time a placement is created
button and select 'Import'.
Select the Placement Profile No that will be created. Placement profiles must first be created in: Profiles>Placements.
Select the Farm
Profile No that will be used in the creation of the new placement
schedule. Farm profiles must first be set up in: Profiles>Farms.
*Note: These two profiles must
contain all of the breed/generation combos that exist within the date
range for those entities that are on the farms in the farm profile.
In the Min
Date field, enter the beginning date that will be used
to import Source and Destination entities from BIM Transfers (Transfer
date).
Click 'OK' and the import will create a based placement schedule.
Future house can be created once the base plan has been established.
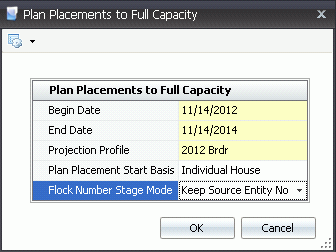
button and select 'Plan Placements to Full Capacity'.
Select the Projection Profile (created in Projections Profiles).
Select the Plan Placement Start Basis to plan the housing schedule. If all the houses on the farms are to be filled before going to the next farm, select the 'Entire Farm' option. If houses are filled according to the first available, select the ' Individual House' option.
Select the Flock Number Stage Mode to indicate how the entities will be identified at each stage. There are two options:
Create a New Entity - will give the entity a new Entity No at each stage.
Keep Source Entity - will keep the same Entity No for the life of the entity.
Click 'OK' and the placement schedule will be created.
When demand/targets are greater than available housing, the system can create Virtual Houses and continues placing entities until targets are meet. Virtual House are set up in BIM. See: Farms
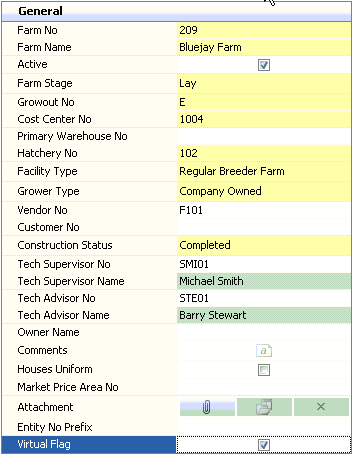
The Virtual Flag must be checked to identify the farm as a virtual farm. Only one virtual farm for each entity stage is required (Brood, Grow and Lay).
At least one house is required for the virtual farm. No virtual
identification is required at the house level. This is done when the house
is linked to the Farm at creation. See: Houses
*Note: The BPA Cycles tab must
be mapped for the grow and lay houses.
When Plan placements to Breed Targets are generated, the virtual farms must be selected for each entity stage that will be used. If the Virtual Farms are left empty, the system will place entities only to available farms. This can result in projections not meeting the targets.
