breed targets

Breed targets are established by progeny breed. The progeny breed is
the offspring of the flocks placed on the ground. The targets will be
the basis to determine required placements to meet the established targets.
The Breed
Codes must first be created.
The following sections are outlined in the creation of a Breed Target:
Create
a Breed Target
Breed Targets Index
There are five sections in the Breed Targets Index:
- In BMTS>BPA>Master
Data, select Breed
Targets.
- In the Breed Targets main index, click the
 button.
The Breed Targets screen will appear.
button.
The Breed Targets screen will appear.
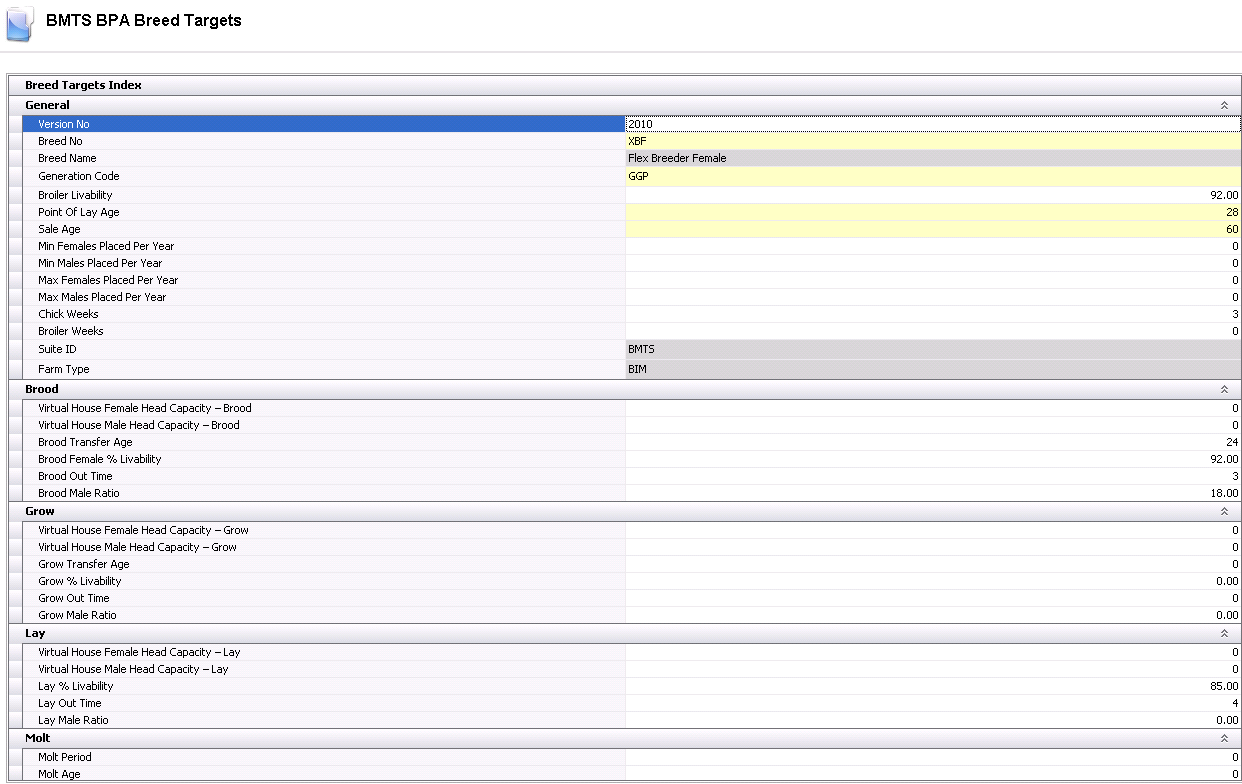
General
The General section of Breed Targets defines the breed for projections.
- Click on the General
tab.
- In the Version
No box, enter the version of the breed target that will
be used in projections. Alphanumeric, max 20 characters.
- Select the Breed
No from existing breed codes, to define the breed that will
be used in the projection. This will be the progeny breed code.
- Breed Name
is populated when Breed No is selected.
Select the Generation
Code, which is used to define the progeny breed.
- Enter the percent Broiler
Livability to calculate the number of broilers expected from
hatch egg production.
Enter the Point
of Lay Age to identify the first week of egg production.
Enter the Sale
Age, which is used to define the target sell age of the lay
entity. There are also options to define the target selling age in
the entity or the placement schedule. This value will default if not
entered in other options.
Min
Females Placed Per Year is an optional field to define the
minimum number of females that are placed for the breed and generation.
This restricts the system from placing less females than entered.
Min Males
Places Per Year is an optional field to define the minimum
number of males that are placed for the breed and generation. This
restricts the system from placing less males than entered.
Max Females
Placed Per Year is an optional field to define the maximum
number of females that are placed for the breed and generation. This
restricts the system from placing more females than entered.
Max Males
Placed Per Year is an optional field to define the maximum
number of males that are placed for the breed and generation. This
restricts the system from placing more males than entered.
In the Chick
Weeks field, enter the number of weeks between egg production
and chick production. For chicken, the value is usually three (3)
weeks, unless a company keeps a week of eggs in inventory and wants
to offset chicks by four (4) weeks. Similarly, for turkeys, the value
is usually entered as four (4) weeks unless egg inventory is maintained
for a week.
In the Broiler
Weeks field, enter the number of weeks between chick production
and processing.
Suite ID
auto populates and identifies the suite being used.
Farm Type
auto populates and identifies the farm type being used.
Brood
The Brood section defines the brood cycle of the entity.
- In the Virtual
House Female Head Capacity – Brood field, enter the default
head capacity for females, if using virtual farms.
- In the Virtual
House Male Head Capacity – Brood field, enter the default head
capacity for males, if using virtual farms.
- In the Brood
Transfer Age field, enter the default age, in weeks, that
the entity is transferred from brood to lay or, in a multi-stage operation,
the default age that the entity is transferred from brood to grow/lay.
- In the Brood
Female % Livability field, enter the number of female birds
that are expected to be transferred from brood to lay or brood to
grow.
- In the Brood
Male % Livability field, enter the number of male birds that
are expected to be transferred from brood to lay or brood to grow.
- In the Brood
Out Time field, enter the number of weeks between brood placements
generally used for clean-out.
- In the Brood
Male Ratio field, enter the percentage of males placed as compared
to females.
Grow
The Grow section is only required for completion if the operation is
multi-stage, and is generally only used for turkeys.
- In the Virtual
House Female Head Capacity – Grow field, enter the default
capacity for females when virtual farms are created.
- In the Virtual
House Male Head Capacity – Grow field, enter the default capacity
for males when virtual farms are created.
- In the Grow Transfer
Age field, enter the default age that the entity is transferred
from grow to lay.
- The Grow % Livability
field represents the number of birds that are expected to be transferred
from grow to lay.
- Grow Out Time
represents the number of weeks between grow placements generally used
for cleanout.
- Grow Male Ratio
represents the percentage of males placed as compared to females.
Lay
The Lay section defines the lay cycle of the entity.
- In the Virtual
House Female Head Capacity – Lay field, enter the default capacity
for females when virtual farms are created.
- In the Virtual
House Male Head Capacity – Lay field, enter the default capacity
for males when virtual farms are created.
- Lay % Livability
is the default percentage of birds that will be available for processing
at the end of the lay cycle, or the quantity that will be available
to transfer to molt.
- Lay Out Time
represents the number of weeks between lay placements generally used
for cleanout.
- Lay Male Ratio
represents the percentage of males placed as compared to females.
Molt
The molt section defines the timing if the company plans for molts.
- In the Molt Period
field, enter the number of weeks between the molt date and the
re-lay date.
In the Molt
Age field, enter the age that the entity begins the molt.
Breed Targets
The Breed Targets section is comprised of three tabs:
Targets
Targets defines, by weekending, the categories to be projected.
Target Dates can be entered one date at a time or by using the range
function. Set the focus on the Breed Targets section and click the button
to create the first line. The Target Date will populate with the
current date. The date can be changed as needed. *Note:
Before the range function can be used, a single line (week) must first
be created.
button
to create the first line. The Target Date will populate with the
current date. The date can be changed as needed. *Note:
Before the range function can be used, a single line (week) must first
be created.
- In the Target
Date field, enter the start date of the week for the target.
- Enter the number of targeted Chicks for each week. This field
is optional if planning is for Eggs.
- Saleable Chicks
indicates the number of saleable chicks required for each target date.
This field is optional if planning is for Eggs
- Enter the number of Eggs
that are targeted production for each week. This field is optional
is planning is for Chicks.
- Enter the number of Broilers
required for processing for each target date. This field is optional
if not planning for Broilers.
- In the Female
Feed Consumed field, enter the projected female feed consumption
in either lbs or kgs.
- In the Male
Feed Consumed field, enter the projected male feed consumption
in either lbs or kgs.
- Enter the projected Female
Weight sold to the processing plant. The weight can be
entered in lbs or kgs.
- Enter the projected Male
Weight sold to the processing plant. The weight can be
entered in lbs or kgs.
- In the Female
Inventory field, enter the projected female bird
inventory level.
- In the Male Inventory
field, enter the projected male bird inventory level.
To create a range, click the  button. The Date Range window will appear.
- Enter the Begin
Date and End Date of
the projected time period. Click 'OK' and the Breed Targets
will be created for the that time period, duplicating the information
from the week prior to the begin date.
Seasonal
Density
The Seasonal Density tab allows the user to define the density by month
in the event that there are different requirements based on seasonal temperatures.
Placement is entered in birds/ft2 or birds/m2.
Depletion
The Depletion tab projects for depopulation of flocks at the end of
life. Data is entered in weeks and percentages.
To enter the weeks and percent depopulation, set the focus in the Depletion
tab and click thebutton.
- Enter the Week.
'1' will be the week prior to final depopulation, '2' will be two
week prior to depopulation, etc
- Enter the Percent
Depletion, which defines the percentage of
reduction from the total population.
*Note: Two weeks prior to the
depopulation date, 50% of the entity will be sold. One week prior to final
depopulation, another 25% will be sold, leaving 25% of the flock being
sold on the final depopulation date.