physical inventory

Egg Room Physical Inventory is the process of taking a physical inventory
count. At the end of the fiscal period, most companies take an inventory
count. The difference between the perpetual or expected inventory and
the actual inventory is journalized to an inventory shrink account. The
Physical Inventory transaction records the difference between the perpetual
and physical inventory. The transaction will remove the eggs from inventory.
There are three options available to enter inventory counts.
- Physical
Inventory Count - When using this method, the user will enter
each line for the products that were counted.
- Auto-Load
from Inventory - This method will load all products in inventory
with the available inventory. The user will then enter the actual
inventory for the required products.
- Zero-Out
Inventory - The Zero-Out Inventory sets the quantity to zero.
When the record is saved, it will set all of the inventory records
to zero and create the adjustment, or the user can enter the inventory
quantities.
A Farm Receiving transaction must
be created before creating a Physical Inventory transaction.
The following options are outlined in this document.
Physical
Inventory Count
- In TMTS>BIM>Transactions>Egg
Room, select Physical
Inventory.
- In the Egg Room
Physical Inventory main index, click
 to create a new physical inventory record.
- In the New Record dialog box, from
Farm No, select the entity/farm
where the inventory is located.
- Enter the Date
of the Physical Inventory and then click 'OK'.
- In the Physical Inventory screen, click to add a new inventory product.
This will allow one product to be added at a time.

- From the Complex
Entity No drop-down menu, select the entity number of the farm
for the physical inventory.
- Farm Name
defaults in and displays the name of the farm where the physical inventory
is taking place.
- From Product
No, select the required product for the inventory count.
- Product Name
defaults from Product No and displays a description of the product.
- Tracking No
is a unique identification code use to identify the physical
inventory transaction. This can be manually or automatically entered.
- Prod Date
indicates the date the product was produced. This date can be modified
if required.
- From Buggy
No, select the buggy that the product was packaged
from, if applicable.
- Buggy Name
displays the name of the buggy.
- Package No
displays a unique reference number used to identify the packaging
transaction, if the product was packaged.
- Package Date
displays the date the product was packaged, if applicable.

- Package Sales
SKU No indicates the sales SKU number of the package, if applicable.
- Package Sales
SKU Name displays the name of the package sales SKU, if applicable.
- In the Quantity
field, enter the total number of units of the selected product.
- Time indicates
the time of the production date and can be modified if required.
- Adjustment Quantity
calculates the difference between what he system says is there and
the amount that is actually counted. *NOTE: Adjustment
Quantity and Adjustment Value will be calculated once the physical
inventory transaction is saved.
- Adjustment Value
automatically calculates the value using the selected valuation methodology
of Average Cost or FIFO
- Book Quantity
displays the product quantity in units depending on the system's numbers.
When the record is saved, Book Quantity will update to reflect the
number entered in the Quantity filed.
- In the Comments
field, enter any additional information related to the inventory feed
product.
- The Consignment
flag will be selected if the product was purchased with a .
- Once the fields have all been entered, click
 to save the inventory record, and then close the screen. Saving the
record will calculate the adjustment quantity and value. Ending Inventory
can be viewed in: Products>Inventory
from the folder.
to save the inventory record, and then close the screen. Saving the
record will calculate the adjustment quantity and value. Ending Inventory
can be viewed in: Products>Inventory
from the folder.
Auto-Load
from Inventory
Alternatively, all products from inventory can be automatically added
at one time rather than adding individual products one at a time.
- To add all products from inventory, in the Physical
Inventory screen, click the drop-down menu and
select 'Auto-Load from Inventory.'
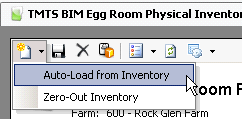
All of the products in inventory for the selected
date will be listed on the Physical Inventory screen with the current
inventory quantities.

- In the Quantity
field, enter the number of units of the selected product.
- If applicable, enter any additional information
In the Comments field.
- Once the fields have all been entered, click
to save the inventory record, and then close the screen. This process
will establish an ending inventory, unit quantity, and value.
Zero-Out
Inventory
The Zero-Out Inventory sets the quantity to zero. When the record is
saved, it will set all of the inventory records to zero and create the
adjustment, or the user can enter the inventory quantities.
- To add products from Zero-Out Inventory, in the
Physical Inventory screen, click the drop-down
menu and select 'Zero-Out Inventory.'
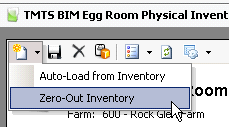
All of the products in inventory for the selected
date and farm will be listed on the Physical Inventory screen with
the inventory quantities set to '0'.
- In the Quantity
field, enter the number of units of the selected product.
- If applicable, enter any additional information
In the Comments field.
- Once the fields have all been entered, click
to save the inventory record, and then close the screen.
Post
a Physical Inventory Transaction
Once the physical inventory transaction has been created and saved,
the transaction needs to be posted. The posting process locks the transaction
to prevent edits, and updates the inventory based on the adjustment created.
- In the Physical Inventory main index, select the
required transaction and right-click to select 'Post'. Alternatively,
click the green check mark
 in the top menu bar and select 'Post'.
- To un-post an egg room physical inventory transaction,
select the required transaction and right-click to select 'Unpost'.
This process will set the transaction status to 'Reversed' status,
which allows the transaction to be edited.