
Breakout data is recorded in a tiered system Breakout, Residue Mortality and Residue Autopsy. Prior to create breakout transactions; breakout, residue mortalities and residue autopsy categories must be set up. Reside Autopsy categories are optional.
![]() Breakout Categories – captures those eggs where the embryo has
died and at what stage of death. Breakout categories need to be
defined prior to creating a transaction in: Admin>Business>Poultry>HIM>Breakouts.
Breakout Categories – captures those eggs where the embryo has
died and at what stage of death. Breakout categories need to be
defined prior to creating a transaction in: Admin>Business>Poultry>HIM>Breakouts.
![]() Residue Mortality Categories
– captures those embryo eggs from breakout that are attributable to types
of mortality. Residue Mortality categories need to be set up beforehand
in: Admin>
Business> Poultry> HIM> Breakouts> Residue Mortality.
Residue Mortality Categories
– captures those embryo eggs from breakout that are attributable to types
of mortality. Residue Mortality categories need to be set up beforehand
in: Admin>
Business> Poultry> HIM> Breakouts> Residue Mortality.
![]() Residue Autopsy
Categories – capture the results of the testing from those embryo
eggs labeled as Mortality. Residue Mortality categories need to
be set up beforehand in: Admin>
Business> Poultry> HIM> Breakouts> Residue Autopsy.
Residue Autopsy
Categories – capture the results of the testing from those embryo
eggs labeled as Mortality. Residue Mortality categories need to
be set up beforehand in: Admin>
Business> Poultry> HIM> Breakouts> Residue Autopsy.
Breakout transactions are created to identify fertility results for individual entities. Breakouts may be created directly from the breakout screen or, alternatively, from the Egg Set, Machine Transfer or Chick Hatched screens. Certain categories will default in if the transaction is created manually.
There are three types of breakout transactions:
The breakout transaction screen is similar for each type, with the main difference being that the breakout categories will only appear for the selected type. For example, residue breakout will only display residue categories.
A Chicks Hatched Transaction must be created prior to creating a Regrade transaction.
The following options are outlined in this document
 to create a
new preincubation breakout transaction.when
a new line is needed.
to create a
new preincubation breakout transaction.when
a new line is needed.

In the Eggs Set field, enter the number of eggs that were set for the breakout transaction.
Hatch of Fertile % is a calculated field that represents: Total Fertility/Chicks Hatched.
In the Actual Chicks Hatched field, enter the number of chicks hatched from the sample size. This figure is the denominator for Hatch of Fertility.
In the Number of Samples field, enter the number of eggs sampled. This figure is the denominator for breakout calculations.
Selected Eggs will default in and represents: Actual Chicks Hatched/Eggs Set. The field can be modified if required.
In the Clear/Infertile Eggs field, enter the number of eggs that were infertile/without an embryo.

If the Override Expected Hatch flag is selected, the Expected Hatch can be manually adjusted. If it is not selected, the Expected Hatch cannot be manually adjusted.
Projected Hatch displays the percentage of eggs expected to hatch and is based directly on Standards, or a system calculation using standards, past hatches, fertilities and an egg age decline table (if egg age decline is used).
The Expected Hatch field is used once the breakout transaction is complete. The user can then enter an updated hatchability percentage which can be reflected in the set transaction for more accurate projected hatch data. This can only be adjusted manually if the Override Expected Hatch flag is selected.
In the Notes field, enter any additional information related to the breakout transaction.
From Buggy No, select the buggy used if the eggs were loaded directly onto a buggy.
Enter the number of Trays used.
From Setter No, select the setter on which the eggs were placed.
Creation Date indicates the date the transaction was created.
Last Mod Date indicates the date the transaction was last modified.
Any additional fields, such as Broken Eggs or Damaged Eggs, are user defined fields. Enter the number of eggs in each category, if applicable.
Click  to save the transaction
to create a
new candling breakout transaction.when a new line is needed.

Hatch of Fertile % is a calculated field that represents: Total Fertility/Chicks Hatched.
In the Actual Chicks Hatched field, enter the number of chicks hatched from the sample size. This figure is the denominator for Hatch of Fertility.
In the Number of Samples field, enter the number of eggs candled. This figure is the denominator for breakout calculations.
Selected Eggs will default in and represents: Actual Chicks Hatched/Eggs Set. The field can be modified if required.
In the Clear/Infertile Eggs field, enter the number of eggs that were infertile/without an embryo.

If the Override Expected Hatch flag is selected, the Expected Hatch can be manually adjusted. If it is not selected, the Expected Hatch cannot be manually adjusted.
Projected Hatch displays the number of eggs expected to hatch and is based directly on Standards, or a system calculation using standards, past hatches, fertilities and an egg age decline table (if egg age decline is used). Note: When candling transaction is manually created the field will be blank and requires input.
The Expected Hatch field is used once the breakout transaction is complete. The user can then enter an updated hatchability number which can be reflected in the set transaction for more accurate projected hatch data. This can only be adjusted manually if the Override Expected Hatch flag is selected.
In the Prod Date field, enter the date that the breakout eggs were produced.
Received Date indicates the date the eggs were received at the hatchery.
Set Date represents the date the eggs were set.
In the Hatch Date field, enter the date the eggs hatched.
Selecting the Void flag will cancel the transaction.
In the Early Dead field, enter the number of embryo deaths that occurred between 1-7 days of development.
In the Mid Dead field, enter the number of embryo deaths that occurred between 8-18 days of development.
In the Machine Notes field, enter any notes that were entered to the eggs set.
In the Notes field, enter any additional information related to the breakout transaction.
From Buggy No, select the buggy in which the eggs were set.
Enter the number of Trays that were set.
From Setter No, select the setter that the breakout eggs were set in.
Creation Date indicates the date the transaction was created.
Last Mod Date indicates the date the transaction was last modified.
Any additional fields, such as Broken Eggs or Damaged Eggs, are user defined fields. Enter the number of eggs in each category, if applicable.
Click
to save the transaction.
There are three components in the Residue Breakout transaction creation process:
to create a
new candling breakout transaction.when a new line is needed.

Hatch of Fertile % is a calculated field that represents: Total Fertility/Chicks Hatched.
In the Actual Chicks Hatched field, enter the number of chicks hatched from the sample size. This figure is the denominator for Hatch of Fertility.
In the Number of Samples field, enter the number of eggs sampled. This figure is the denominator for breakout calculations.
Selected Eggs will default in and represents: Actual Chicks Hatched/Eggs Set. The field can be modified if required.
In the Clear/Infertile Eggs field, enter the number of eggs that were infertile/without an embryo.

If the Override Expected Hatch flag is selected, the Expected Hatch can be manually adjusted. If it is not selected, the Expected Hatch cannot be manually adjusted.
Projected Hatch displays the percentage of eggs expected to hatch and is based directly on Standards, or a system calculation using standards, past hatches, fertilities and an egg age decline table (if egg age decline is used).
The Expected Hatch field is used once the breakout transaction is complete. The user can then enter an updated hatchability percentage which can be reflected in the set transaction for more accurate projected hatch data. This can only be adjusted manually if the Override Expected Hatch flag is selected.
In the Prod Date field, enter the date that the breakout eggs were produced.
Received Date indicates the date the eggs were received at the hatchery.
Set Date represents the date the eggs were set.
In the Hatch Date field, enter the date the eggs hatched.
In the Early Dead field, enter the number of embryo deaths that occurred between 1-7 days of development.
In the Mid Dead field, enter the number of embryo deaths that occurred between 8-18 days of development.
In the Late Dead field, enter the number of embryo deaths that occurred between 19-22 days of development.
Selecting the Void flag will cancel the transaction.
The Machine Notes field displays any notes that were entered to the eggs set.
In the Notes field, enter any additional information related to the breakout transaction.
Enter the number of Trays that were set.
From Setter No, select the setter that the breakout eggs were set in.
Last Mod Date indicates the date the transaction was last modified.
to save the transaction.The mortality section outlines the reasons for embryos dying or the cause of death. Mortality categories need to be set up beforehand in: Admin>Business>Poultry>HIM>Breakouts>Residue Mortality.
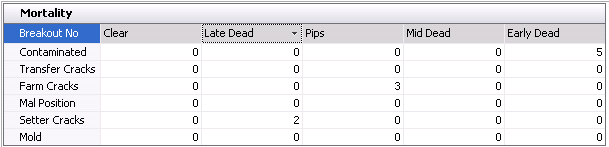
The Autopsy - outlines the reasons for the death

*Note regarding the use of Autopsy: One example of how to use the three tiers is - Late Dead (breakout category) that was Pip (mort category) and the reason was because the embryo was Deformed (autopsy).
In the Breakout main menu, there is an Edit menu that offers multiple options for editing the breakout transaction.
 drop-down menu.
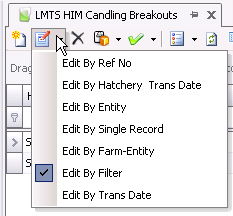
Edit By Entity
Edit By Single Record
Edit By Farm-Entity
Edit By Filter
Edit By Trans Date
Once the Breakout transaction has been created and saved, the transaction needs to be posted. The posting process locks the transaction to prevent edits, and posts the fertility statistics back to the BIM entity.
 in the top menu bar and select 'Post'.