![]()
Breakout Categories are used to determine group the breakout details and to calculate the fertility for an entity. There are some system defined categories, however, most breakout categories are user-defined, therefore can be specified as to whether the category is included in the fertility calculation. System defined categories are:
Breakout Categories are used in Breakout transactions.
The Breakout Category creation process contains the following components:
In Admin>Business>Poultry>HIM>Breakouts, select Categories
Select  to
create a new record.
to
create a new record.
The General tab is used to define the category.
Click on the General tab.
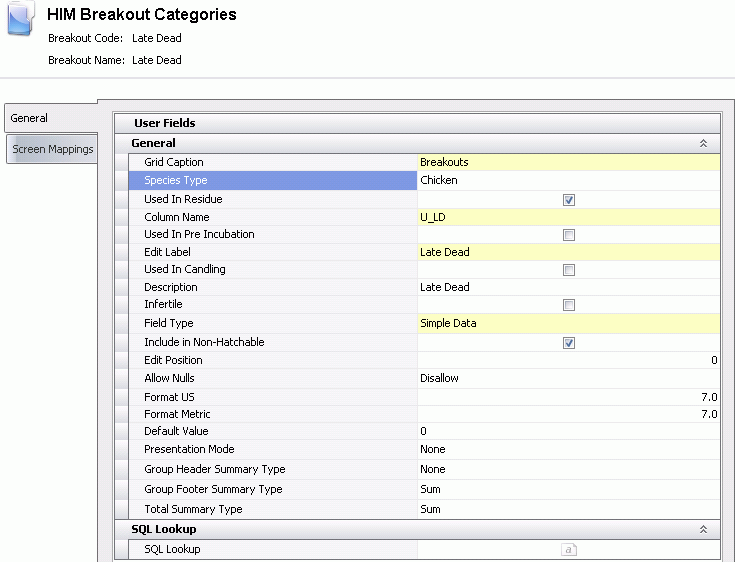
Select the Grid Caption where the category will be displayed.
Select the Species Type where the category will be used.
Check Used in Residue if the category will be used in HIM>Breakouts>Residue.
Enter a Column Name to be assigned to the database table. A prefix of U_ will automatically precede the column name.
Check Used in Pre Incubation if the category will be used in HIM>Breakouts>Pre Incubation.
In the Edit Label field, enter a name or label that will appear in the editor screen when editing this field.
Check Used in Candling if the category will be used in HIM>Breakouts>Candling.
Enter a Description for the category.
Check Infertile if the category is to be used in the infertile calculation.
Select the Field Type, the usage field type for the category. Available options are Simple Data and SQL.
Check the Include in Non-Hatchable flag if used in the Total Hatch% Calculation.
Enter an Edit Position to determine which column the category will be displayed.
Select the option to Allow Nulls for the category. If the Disallow option is checked, the category will always need to have a number greater than zero.
Enter a Format US to display the data format used for reporting purposes.
Enter a Format Metric to display the data format used for reporting purposes.
Enter a Default Value that will occupy the field when the new record is created. Optional.
Select the Presentation Mode used for reporting purposes. Determines the type of formate.
Select the Group Header Summary Type used for reporting purposes. Determines how the header data is displayed. Available options are: Sum, Average, Min, Max, Count and Custom.
Select the Group Footer Summary Type used for reporting purposes. Determines how the footer data is displayed. Available options are: Sum, Average, Min, Max, Count and Custom.
Select the Total Summary Type used for reporting purposes . Determines if the summary data is displayed. Available options are: Sum, Average, Min, Max, Count and Custom.
SQL Lookup specifies the query to be used, if Field Type is set to SQL.
The Screen Mappings tab is used to assign the category to the different suites in the system and is used BMTS, LMTS and TMTS.
In the Screen
Mappings tab, select to
add the category to a screen.
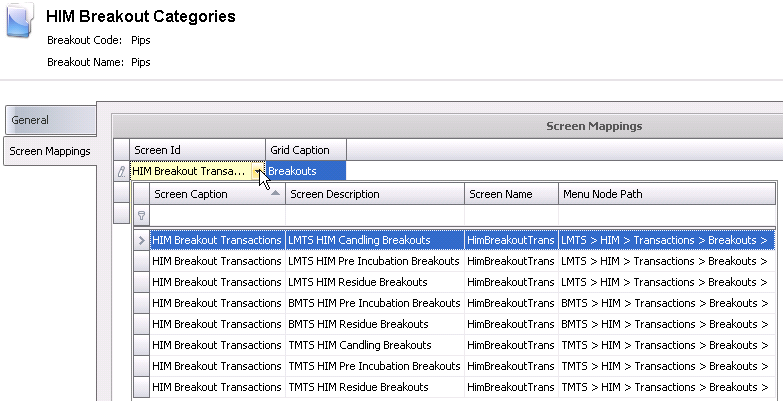
Select the Screen Id from the drop-down menu. The Screen id identifies the screen where the option will be displayed.
Select the Grid Caption to identify the grid where the option will be displayed.
Save and Close record.