internal processing

Processing transactions are completed in separate
transactions depending on the type of transaction.
- Internal
– Transfers from the farm to an internal plant at cost. Cost will
be determined in the period end process.
- Sales
– Sold from farm to an external plant. Revenue is based on the order
price at time of sale with the cost of sales being determined in the
period end process. There is a switch in setup to determine if customers
are charged on a per head or weight basis.
- Intercompany
Sales - The farm is a profit center and sells the animals to
an internal plant.
The Entity must be created
before creating an Internal Processing transaction.
The following procedures are outlined in the Internal Processing transaction
document:
Create
an Internal Processing Transaction
There are several tabs in the processing transaction to record the statistical
processing data for the entity. The
- In SMTS>GIM>Movements>Processing,
select Internal.
- In the Processing
Transactions (Internal) main index, click
 to create a new internal processing transaction.
General
The General tab is comprised of three parts:
General
- Click on the General tab.
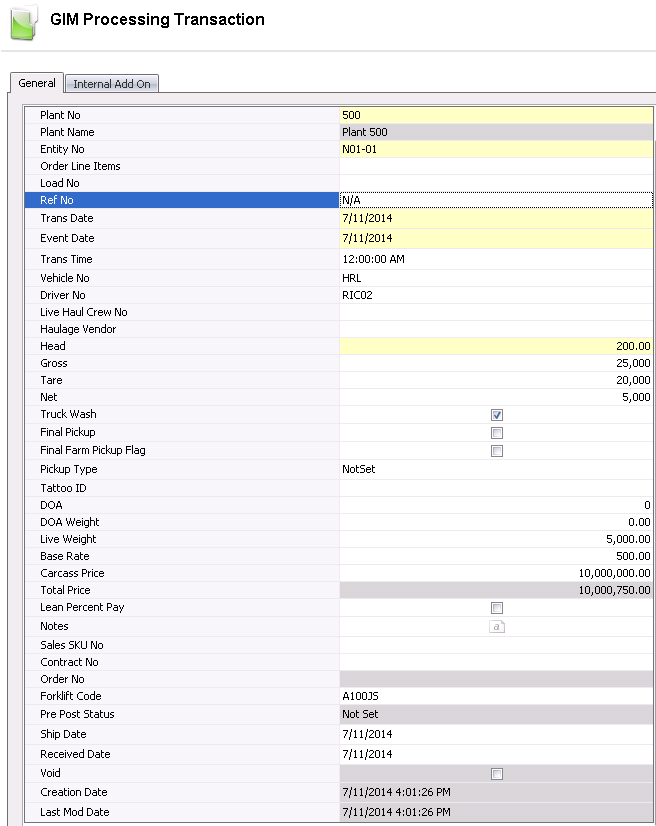
- From the Plant
No drop-down menu, select the plant that is being processed
for the transaction.
- Plant Name
will default in from Plant No.
- Select the Entity
No to identify the entity for the transaction.
- Order Line Items
- Load No
is an optional field to identify the load number of the delivery.
- Ref No
is an automatically generated field and displays a unique reference
number for the transaction.
Trans Date
displays the date of the processing transaction.
Event Date
defaults to the trans date. The date may be changed if the transaction
actually occurred on a different date, however this date does not
affect inventory or accounting.
In the Trans
Time field, enter the time of the transaction.
Vehicle No
is an optional field to identify the vehicle used to transfer the
product from farm to plant. Vehicles must be set up prior in: Admin>Business>General>Definitions>Vehicles.
Driver No
is an optional field to identify the driver that transfers the product
from farm to plant. Drivers must be set up prior in: Admin>Business>General>Definitions>Drivers.
If the transaction is a plant-type transaction,
Live Haul Crew No can be used
to selected a crew that is assigned to the plant for the processing
transaction. Crews must be set up prior to use in: Admin>Business>General>Definitions>Live
Haul Crews.
Haulage Vendor
can be used to select the haulage vendor, if applicable.
In the Head
field, enter the total number of animals being processed.
In the Gross
field, enter the gross weight of the loaded truck.
- In the Tare
field, enter the weight of the truck after it has been unloaded.
- The Net
field will default in with the weight of the truck delivered to the
plant.
- Select the Truck
Wash flag if the truck was washed at the plant.
- Select the Final
Pickup flag if this is the last pick-up of the hogs from the
farm.
- Select the Final
Farm Pickup Flag if
the final pickup for the entity has occurred. This will mark the entity
as 'Sold'.
- Select the Pickup
Type. Available options are: Cleanout, First Cut
or Other.
Selecting the Void
flag will cancel the transaction and exclude it from farm and entity
data.
- The Tattoo ID
field is optional and can be used to enter the animal ID stamped at
tuck unloading time.
- In the DOA
field, enter the number of head hogs on arrival at the plant.
- In the DOA Weight
field, enter the weight of the animals that arrived dead on arrival
to the plant.
- In the Live Weight
field, enter the weight of the animals to be processed net of DOA.
This can be entered in lbs or kgs.
- Enter
the Base Rate per live animal.
- In the Carcass
Price field, enter the total price per dead animal.
- Total Price
will calculate and default in once the transaction is saved.
- Select
the Lean Percent Pay flag
if...
- In the Notes
field, enter any additional information relating to the processing
transaction.
- Sales SKU No
is used to determine the product being sold, and is set up on the
animal product.
- If the hogs are sold on a contract, the Contract No field is used to enter
the contract number.
- Order No
is used if the processing transaction is to an external plant where
hogs are sold to the plant. When the processing transaction is created,
the Order No field will populate with the sales order number that
is created.
- From Forklift
Code, select the forklift that is used for the processing transaction.
Forklifts must be set up prior to use in: Admin>Business>General>Definitions>Forklifts.
- Pre-Post Status
will default in and indicates if the transaction is Active or Posted.
- In the Ship Date
field, enter the date the animals will shipped.
- In the Received
Date field, enter the date the animals were received.
- Selecting the Void
flag will cancel the transaction.
Creation Date
indicates the date the transaction was created.
Last Mod Date
indicates the date the creation was last modified.
Detail
The Detail section is comprised of two components:
Detail
The Detail section is used to enter specific information for each animal/carcass.
- Select the Details tab and clickto
add a new detail line.

- In the
Carcass ID field, enter a
unique identification that is placed on the carcass for reference.
- Enter the Fat
Depth measurements of the carcass.
- Enter the Meat
Factor measurement.
- Enter the Muscle
Depth measurements.
- Percent Lean
is used to indicate the percentage of lean meat.
- Select
the Probe flag if a metal
probe was used to obtain the fat percentage.
- Sequence
is a numerical field to indicate the order in which the carcass was
processed.
- Price
will default in with the total price of the animals.
- From Carcass
Type No, select from a list of user-defined carcass types.
Carcass types must be created prior to use in: Admin>Business>SMTS>Definitions>Carcass
Types.
- From Trim Cut
Type No, select from a list of user-defined trim cut types.
Trim cut types must be created prior to use in: Admin>Business>SMTS>Definitions>Trim
Cut Types.
- Condemnation No is used
to enter a reference number for the condemnation.
- In the Pre Trim
Weight field, enter the weight of the carcass before trimming,
in either lbs or kgs.
- In the Post Trim
Weight field, enter the weight of the carcass after trimming,
in lbs or kgs.
Scale Details
The fields in the Scale Details section default in and cannot be modified.
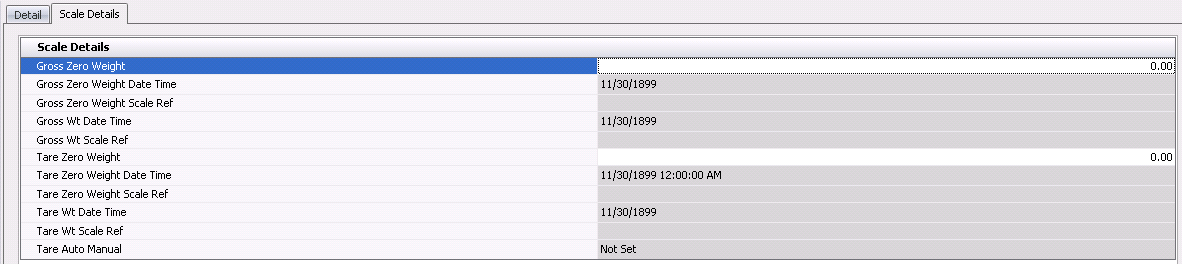
- Enter the Gross
Zero Weight.
- Gross Zero Weight
Date Time displays the date and time that the gross zero weight
was recorded at the scale.
- Gross Weight
Scale Ref displays the reference number for the gross zero
weight scale reading.
- Gross Wt Date
Time displays the date and the time that the gross weight was
recorded at the scale.
- Gross Wt Scale
Ref displays the reference number for the gross weight scale
reading.
- Enter the Tare
Zero Weight.
- Tare Zero Weight
Date Time displays the date and time that the tare zero weight
was recorded at the scale.
- Tare Zero Weight
Scale Ref displays the reference number for the tare zero weight
scale reading.
- Tare Wt Date
Time displays the date and time that the tare weight was recorded
at the scale.
- Tare Wt Scale
Ref displays the reference number for the tare weight scale
reading.
- Tare Auto Manual
indicates the tare setting of Auto or Manual.
Rejects
The Rejects section is used to enter information related to rejections
of the hogs.

- Select the Rejects tab and clickto
add a new reject line.
- From Processing
Reject No, enter the reason for the rejection. Rejection codes
must be set up prior to use in: Admin>Business>SMTS>Definitions>Processing
Reject Codes.
- In the Head
Count field, enter the number of hogs that were rejected.
- Enter the total Weight
of the hogs being rejected.
- In the Price
field, enter the deduction amount for the selected code.
Internal
Add On
The Internal Add On section contains information
for any internal add-ons. All details will default in.

- Product No
identifies the internal add-on product.
- Product Name
displays a description of the product.
- Rate indicates
the rate of the add-on.
Post
a Processing Transaction
Once the processing transaction has been saved and closed, it will need
to be posted. The posting process will lock the transaction from further
edits and post the statistics to the entity. As well, if the processing
transaction is to an external plant, the posting process will automatically
create the sales order and order shipment. For external processing, a
journal transaction will be created to debit the accrued receivable and
credit sales revenue as well as the cost of sales and inventory, only
if an internal price is established.
Journal entries will not be created for internal processing transactions
unless there is an internal price assigned to the product. If that is
the case, there will be a journal transaction created at post where it
will credit the flock value and debit the plant inventory for the internal
prices established for the product. There is a switch in setup to determine
if the product is priced based on a $/head or a $/lb or kg.
- In the Processing Transactions main index, select
the required transaction, rick-click and select 'Post.' Alternatively,
click the green check mark
 in the top menu bar and select 'Post'.
- To un-post a processing transaction, select the
required transaction and right-click to select 'Unpost'. This
process will set the transaction status to 'Reversed' status, which
allows the transaction to be edited.