movements

Movements is the tool used to plan the placements. The placements can
be calculated using Profiles
or, alternatively, manually created. When the planned movements are posted,
the entities are automatically created and available for actual placement.
Before creating a Movement record, the following must be created:
The following components are outlined related to creating a Movement
Transfer transaction:
Calculation
- Placement Specifications
- In TMTS>TPA>Planning,
select Movements.
In the Planned
Movements main index, click  to create placement
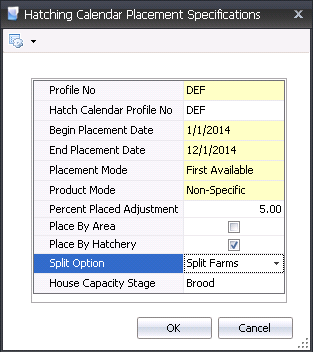
specifications. The calculate option opens a selection grid where
the user can enter the values to determine the placements based on
the selected profiles.

- From the Profile
No drop-down menu, select the profile that will be assigned
to the movements.
- From Hatch Calendar
Profile No, select the hatch calendar profile
that sets the hatched poult targets for the placements.
- Enter the Begin
Date for the projected placements. The Begin Date will be the
first date hatched and placed.
- Enter the End
Date for the projected placements. The End Date will be the
last date hatched and placed.
- Select the Placement
Mode to determine how the placements are assigned. Available
options are First Available and Delivery Area.
Select the Product
Mode to determines how the placements are assigned to the farm
based on the planned hatch product. Available options are:Available
options are:
Non-Specific
– Places the next available product.
Previous Placement –
Places the same product as the previous placement.
Varying –
Places a product different than the last placement.
House Product Specific - Places the product that is assigned to the
House.
In the Percent
Placed Adjustment field, enter the percentage below the
daily hatch that is acceptable for placement.
Select the Place
by Area flag to determine placements based on the growout area
that is assigned to the farm.
Select the Place
by Hatchery flag to determine placements based on the hatchery
that is assigned to the farm.
Select the Split
Option to determine if or how placements can be split. Available
options are:
No Split -
Placements will not be split.
Split Farms -
Select this option if the placement to the farm can be made in
split over more than one hatch date.
Split Farms and Houses - At all times
- Farms
and Houses can be split over more than one hatch date.
Split Farms and Houses - Contingency
- Farms
and Houses will have split delivery days as needed.
Select the House
Capacity Stage to determine at which stage the poults will
be placed.
Click 'OK and the placements will
be created.
Create
a Manual Movement
- In TMTS>TPA>Planning,
select Movements.
Select  to create a new record.
In the Profiles dialog box, select the Profile No.
In the Planned
Movement main index, click
 to
add a new record.

- From Hatchery
No, select the hatchery from where the placement is being sourced.
- Select the Hatch
Hatchery No.
- From Farm
No, select the farm where the poults will
be placed.
- Farm Name
will default from the selected Farm No.
- Select the Entity
Stage to represent the stage of the entity. In
multiple stage operations, the original placement will be set to 'Brood'
and the movement will have an entity stage of 'Grow'.
- Entity No
is automatically created based on the registry set up. See: Registry
- From House No,
select the house where the turkeys are being placed. This
field is only populated if house granularity is selected.
- Enter a Pen No
to indicate the pen in which the turkeys are being placed. This
field is only used if pen granularity is selected.
- Enter a Hatch
Date to indicate the date on which the poults
are hatched.
- Movement Status
represents the type of movement. The default will be set to
'Initial Placement' with an option to select 'Additions' if the placement
is not the initial placement.
- Enter a Date
Moved In to indicate the date that the poults were placed at
the farm.
- Enter a Date
Moved Out. If the operation is multi-stage, the
date moved out will be populated with the date that the entity is
to be transferred from Brood to Grow.
- In the Head
Placed field, enter the number of head that are placed to the
complex entity. If the operation is multiple stage, the head placed
can also represent the head moved to the grow stage.
- Lot No
is an optional field to enter a lot number for the placement, if applicable.
- Planned Density
automatically calculates the density based on the head placed and
available area. The density will be displayed in either square feet
or square meters, depending on the unit of measure used by the division.
- Enter a Product
No to define the product being sold.
- Formula Assignment
No is an optional field to assign the feed program to the entity
to be used in FDSA.
- Target Age
automatically populates with the target processing age defaulting
from the product placed.
- Target Head Count
Steps defines the reason the flock was selected for processing.

- Select a Source
Complex Entity No. This field is only populated
if the operation is multi-stage. The movement to grow will be populated
with the brood source.
- Area is
derived from the House table.
- Planned Density automatically
calculates the density based on the head placed and available area.
The density will be displayed in either square feet or square meters,
depending on the unit of measure used by the division.
- Actual Density
is derived from TPA>Master
Data>Product Groups.
- Vendor No
is used if the poults are being sourced from an external
supplier. Select the vendor from whom the chicks are being purchased.
- If the poults are being purchased, from Complex PO, select the purchase
order that is assigned to the vendor.
- The Notes
field is used to enter additional information related to the movement
transaction.
Planned
Movements
The plan can be viewed in the Movements screen once the specifications
have been defined and the plan has been calculated. Movements will display
the planned placements and, if the operation is multi-stage, the process
will also determine the transfers from brood to grow. The screen is in
a calendar format that allows the data to be displayed in a calendar,
grid or combination of both.
General
In the Planned
Movements main index, select
the required record and double-click.

Calendar
View
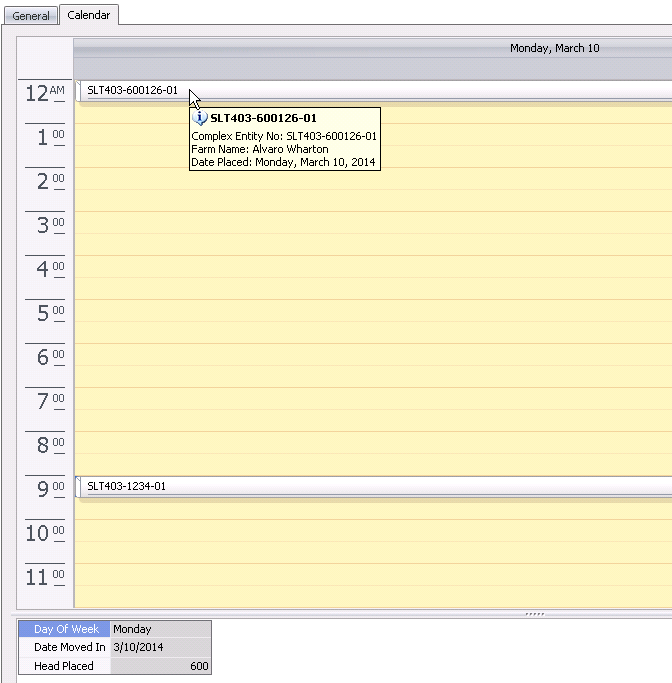
The Calendar screen is a view-only screen with the ability to change
one or more placement dates by dragging and dropping the placement/s to
another date. The bottom grid displays Head Placed by Date Moved
In, for all hatcheries and products.

Post the Movement
Once the placement schedules have been entered and the
entries have been reviewed, the transactions should be posted. The posting
process accomplishes three tasks:
Prevents the record from being
modified.
Records the data to the FDSA
placement schedule so that feed deliveries can be scheduled accordingly.
Creates the TIM Entities.
- In the Planned Movements main index, select the
required record and right-click to select 'Post'. Alternatively, click
the green check mark
 in the top menu bar and select 'Post'.
To un-post a transfer record, select the require


 to create placement
specifications. The calculate option opens a selection grid where
the user can enter the values to determine the placements based on
the selected profiles.
 to create a new record.
 to
add a new record.


 in the top menu bar and select 'Post'.