feed production receiving

Feed Production Receiving transactions record the Finished Feed in inventory
at the received cost as defined in the purchase order. Journal transactions
are recorded at receiving to record the charge to inventory/expense and
the offset to accounts payable accrual.
Prior to creating a Feed Production Receiving, the following items must
be created:
The following procedures are outlined related to creating a Production
Receiving:
Create
a Feed Production Receiving
- In FMIM>Transactions>Feed
Production, select Receivings.
- In the Finished Feed Receivings main index,
select the
 button to create a new record.
Header
The Header section contains the following components:
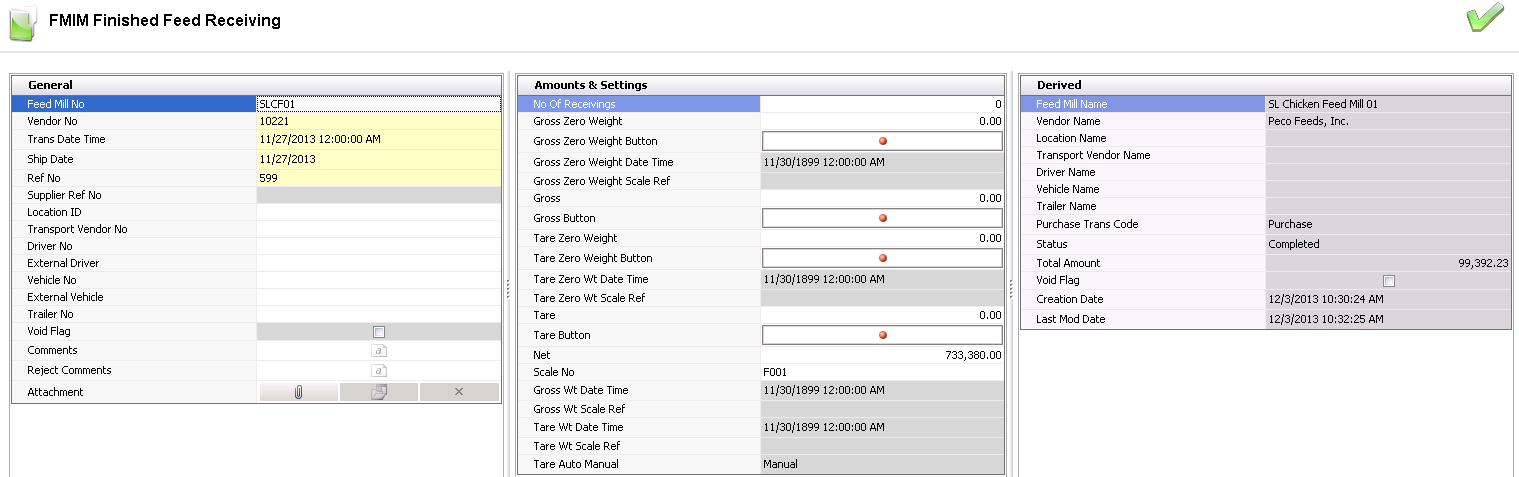
General
The General section relates to the Purchase Order. The Feed Mill, Vendor
No and Trans Date Time are what link this screen to the Purchase order.
- Click on the General
tab.
- From Feed Mill
No, select the feed mill that is receiving the
ingredients.
- From Vendor No,
select the vendor that is supplying the ingredients. The selected
vendor must match the purchase order.
- In the Trans
Date Time field, enter the date and time that the ingredients
were received.
- Enter the Ship
Date to indicate the date that the ingredient was shipped
from the vendor.
- Ref No
is an automatically-generated reference number that uniquely identifies
the receiving transaction.
- Supplier Ref
No is an optional field that is used to transfer the supplier
reference from the purchase order.
- Location ID
indicates the location from which the vendor shipped the ingredients.
Location ID is set up in:
Vendor Details
- Transport Vendor
No displays the vendor that hauled the goods if the purchase
order excluded or delayed freight.
- Driver No
is an optional field to identify the internal driver delivering the
ingredients. Drivers must be set up prior in: Admin>Business>General>Definitions>Drivers.
- External Driver
is an optional field to identify the external driver delivering the
ingredients.
- Vehicle No
is an optional field to identify the internal vehicle that is delivering
the load. Vehicles must be set up prior in: Admin>Business>General>Definitions>Vehicles.
- External Vehicle
is an optional field to identify the external vehicle that is delivering
the load.
- Trailer No
is an optional field to identify the internal trailer that is delivering
the load. Trailers must be set up prior in: Admin>Business>General>Definitions>Vehicles.
- Selecting the Void
Flag will delete the transaction and all corresponding journal
transactions.
- In the Comments
field, enter any additional details related to the receiving transaction.
- In the Reject
Comments field, indicate the reason that the load was rejected,
if applicable.
- The Attachment
field can be used to attach any additional documents related to the
receiving transaction.
Amounts
& Settings
- In the No of
Receivings field, enter the number of receipts for the receiving
transaction. A default of ‘0’ indicates a single receiving transaction.
- From Scale No,
select the number of the scale that is reading the weights.
Scales must be set up prior to creating a receiving transaction in:
Admin>Business>General>Definitions>Weight
Scales.
- From Scale
Operator No, select the scale operator number.
Scale operators must be set up prior to creating the receiving
transaction in: Admin>Business>FMIM>Scale
Operators.
- Enter the Gross
Zero Weight if a zero weight is required.
- Gross Zero Weight
Button is used if a zero weight
is required.
- Gross Zero Weight
Date Time indicates the date and time that zero weight was
recorded.
- Gross Zero Weight
Scale Ref is a reference number generated from the scale for
the zero weight.
- In the Gross
field, enter the gross weight of the vehicle. This field can be manually
read or interfaced from a scale.
- Enter the Tare
Zero Weight if a zero weight is required.
- Tare Zero Weight
Button is used if a zero weight is required.
- Tare Zero Wt
Date Time indicates the date and time that zero weight was
recorded.
- Tare Zero Wt
Scale Ref is a reference number generated from the scale for
the zero weight.
- In the Tare
field, enter the tare weight of the vehicle. This field can be manually
entered or interfaced from a scale.
- Net is
the difference between gross and tare. This field can be manually
entered or, if weights are entered, it is calculated automatically.
- Gross Wt Date
Time displays the date and time that the gross weight was recorded
at the scale.
- Gross Wt Scale
Ref No displays the reference number for the gross weight scale
reading.
- Tare Wt Date
Time displays the date and time that the tare weight was recorded
at the scale.
- Tare Wt Scale
Ref No displays the reference number for the tare weight scale
reading.
- Tare Auto Manual
indicates the tare setting of Auto or Manual.
Derived
The information in the Derived fields automatically generates from the
first two grids - General and Amounts and Settings. The fields are read-only
and cannot be modified.
Details
The line details relate to the product that is being received from the
vendor. In the child grid for the line item are the details related to
add-ons and assays. These amounts will default as defined from the purchase
order and cannot be modified at receiving. If there is freight assigned
to the product, two lines will appear in the lines details for each product
received. The first line will be related to the product details and amount
,with the second line referencing the freight amounts.
- Click on the Details
grid.
- Select to create
a new detail line.
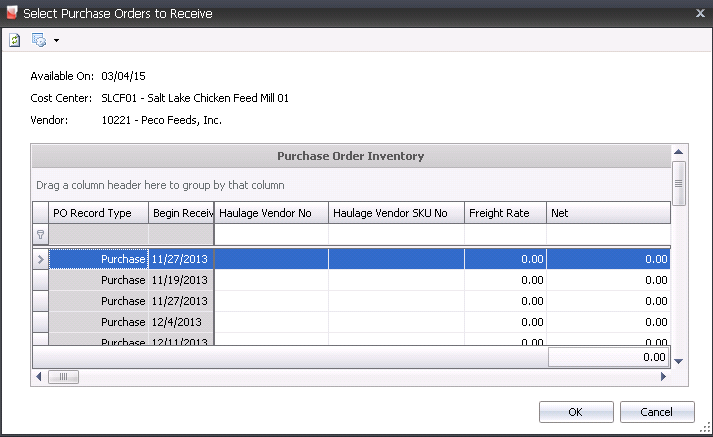
- In the Purchase Order Inventory dialog box, select
the required purchase order and then click 'OK'.
The Details tab contains the base information
relating to the products being received from the vendor.

- Complex Po No
indicates the purchase order that is being received. Purchase orders
must be in 'Posted' status. Purchase orders will be filtered based
on the cost center and vendor selected in the header.
- In the Product
No field, enter the product number that is being received on
the purchase order.
- Product Name
defaults from product No and displays the name of the product being
purchased.
- Lot No
is an optional field to record the lot number for the ingredient being
received. The lot number will follow the ingredient through to the
production process.
- Silo No
is an optional field to record the silo location from which the product
is being received.
- Silo Name
defaults from Silo Name and displays a description of the selected
silo.
- Pay Basis
defaults from the purchase order and indicates if the payment to the
vendor is being determined based on the received weight or the shipped
weight.
- Received Weight indicates
the weight that is being received. This amount will default from the
net weight in the contract header. Depending on a setup switch that
determines whether the receiving transactions are recorded based on
inventory units or vendor units, this field may be automatically calculated.
- Received Vendor
Units indicates the number of vendor units that are being
received. For example, the received weight is in pounds, but the product
was purchased from the vendor in tons. Depending on a setup switch
that determines whether the receiving transactions are recorded based
on inventory units or vendor units, this field may be automatically
calculated.
- Shipped Weight
is an optional field to enter the shipped weight if the vendor is
being paid based on shipped weight. Depending on a setup switch that
determines whether the receiving transactions are recorded based on
inventory units or vendor units, this field may be automatically calculated.
- Shipped Vendor
Units is an optional field to enter the shipped vendor units
if the vendor is being paid based on shipped weight. Depending on
a setup switch that determines whether the receiving transactions
are recorded based on inventory units or vendor units, this field
may be automatically calculated.
- Unit Description
is derived from Vendor Sku and display the unit of measure from which
the product was purchased from the vendor.
- Units Per is
derived from the Vendor Sku and indicates the number of units
in each vendor unit.
- Amount
is a calculated field and represents Received/Shipped Vendor Units
x Unit Price.
- The Unit Price
defaults from the purchase order with no option to modify at
receiving.
- Total Add-ons
is a calculated total amount of premium add-ons that will be added
to the vendor payment based on the amounts defined in the purchase
order. Details are located in the child grid.

- Total Discounts
is a calculated total amount of discount add-ons that will be deducted
from the vendor payment based on the amounts defined in the purchase
order. Details are located in the child grid.
- Total Taxes
is a calculated amount based on the taxable product and/or add-ons
as defined in the purchase order. Details are located in the child
grid.
- Total Assay Penalty
is a calculated amount that will be deducted from the vendor payment
based on the configuration of the assays. Details are located in the
child grid.
- Total Assay Bonus
is a calculated amount that will be added to the vendor payment based
on the configuration of the assays. Details are located in the child
grid.
- Total Amount
is a calculated total amount of the receiving transaction based on
the amounts that are defined in the purchase order.
- Bill of Lading
is a location to enter the bill of lading reference for the receiving
line.
- Currency No
displays the required currency and is derived from the purchased order
- Currency Name
defaults from Currency Name and displays a description of the currency.
- The Prepaid
Final Receiving flag will be selected if the receiving is the
final receiving.
Additional
Details
The line details relate to the ingredient that is being received from
the vendor. Click on the + in the line item to view the child
grid for the details related to add-ons and assays. These amounts will
default as defined from the purchase order and cannot be modified at receiving.
There are three tabs related to the line details:
AddOns Premium
& Discount
Premium and discount add-ons default from the purchase order. Amounts
will be calculated based on the amount received.
- Click the
 button on the Complex PO No field to display the child grid.

- Product No
displays the code of the selected add-on.
Product Name displays a description
of the add-on.
Transaction Basis is a read-only
field that defaults from the selected add-on and determines how the
add-on is calculated on orders. Options are: Per Unit, Percentage,
Flat Rate, or Free Percentage.
Payment
TypeTransaction:
Processed with the sales invoice.
Rebate: Processed at a date later than the invoice..
Internal: An internal transaction is a transaction that is not invoiced
to an external source (Example: There is an internal haulage
department that gets a credit for hauling products).
is a read-only field that derives from the purchase order and determines
when the add-on payment is made.
Payee Type is an optional field
that indicates the source type for the premium or discount add-on.
Transaction
Entity ID is a required field if a different Payee Type is
selected. If Payee Type is set, the selected vendor or cost
center name will appear in this field.
Pay Calculation
Type defaults from the vendor sku and determines the base amount
of the add-on calculation.
Product
Amount - the add-on is calculated based on only the product
amount and does not include any other add-on in the calculation
of the amount.
Net
Amount - the add-ons is calculated based on the net amount
of the transaction based on the product amount including other
add-on amounts, but excluding taxes.
- Vendor Calculation
Type determines if the payment is calculated based on
the base add-on logic using Transaction basis or if the add-on amount
is only deducted from the vendor payment.
Normal
- the add-on is calculated based on the rules established
by Transaction Basis and the Payment Type defined in the vendor
SKU and sales SKU.
Deduction
Only - the add-on is calculated based on the rules
established by Transaction Basis, however the add-on is only
deducted from the vendor payment.
Taxable identifies if the item is
taxable or non-taxable when the add-on is purchased. The flag will
be selected if the item is taxable.
Currency No defaults based on the
currency assigned to the purchase order as defined, with no option
to modify.
Currency Name displays a description
of the currency type.
Amount displays the total cost of
the add-on.
Taxes
Tax codes as defined on the purchase order will default to the receiving
transaction. The amount will be calculated based on the rate that is in
effect on the receiving date. There are two types of taxes.
- Accrual Taxes:
Will record the tax accrual and record the journal transaction at
time of receipt.
- Invoice Taxes:
Will calculate the tax at time of receipt, however the journal transaction
is not created until the purchase invoice is processed. Invoice taxes
are generally used for federal taxes that are reimbursed to the company
by the government and cannot be actually recorded until the vendor
invoice is received.
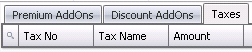
Tax
No identifies the tax code to be applied to the product and
premiums/discounts for the selected line item. The Taxable flag must
be selected in the product and premiums/discounts for taxes to calculate.
Tax
Name describes the selected tax code.
Amount
is the total amount of tax applicable on the product.
Once the transaction is completed, save and
close the document.
Post the record by using the right-click option
or on the menu using the green check mark.  . Posting
the record will lock the record and create debit and credit journal
transactions.
. Posting
the record will lock the record and create debit and credit journal
transactions.
Right-Clicking
Options: General Information
While in the In the FMIM Feed Receiving index screen, more transactions
are available by right-clicking on any line item. These options are also
available on the menu.
- Edit allows
changes to be made to the record before it is posted.
- Delete
removes the record completely from the system. Records
must be in 'Unposted' status first.
- Post locks
the record and the record becomes-read only.
- Unpost
unlocks the record so that the record can be edited.
- Void Records
leaves the record in the system in 'voided' status, and also voids
the journal transaction so it is not included in the data. This option
is used when an audit trail is needed..
- Return
is used when the feed/ingredient was returned to the vendor.
- Create
PO Adjustment allows the adjustment of the outstanding
amount on the purchase order. This applies to debit or credit adjustments.
- View PO Adjustments
shows a summary of the adjustments that have been made to the purchase
order for the ingredient that is being received.
- Replace
Purchase Order is used if the purchase
order has been received to the wrong PO.
Create a Return
Create a Return transaction to return Finished Feed to the vendor. Journal
transactions are created during this process. Returns are used for 'Posted'
records only.
- In the FMIM Feed Receiving index, right-click
on the required record and select 'Return'.
- Enter the date of the return and click 'OK'.
- In the Purchase Return dialog box, enter the number
of Units to be returned
- Available
auto-populates, and is the amount of units in inventory.
- Original
auto-populates, and is the number of original purchased units.
- Returned
auto populates with the units of previous returns for this record.
- Units Mode
- system default.
Create
a Purchase Order Adjustment
Creating purchase order (PO) Adjustments adjusts the amount of ingredients
that can be received on a PO. This option allows user to adjust the outstanding
amount on the purchase order. This is done when the ingredient has
been received to the wrong PO. Create PO Adjustments are created for 'Posted'
records only.
- In the FMIM Ingredients Receiving index, right-click
on the line item that requires an adjustment.
- In the Adjust Receiving dialog box, enter the
Date of the adjustment.
- The Debit PO
will auto-populate from the original-created PO.
- Select the Credit
PO - to be adjusted .
- Enter the Quantity
(Inv Units) amount to be adjusted by.
- Available (Inv
Units) is the amount of product in inventory.
- Earliest Date
is the earliest date the adjustment can be made.
Replace
Purchase Order
If the purchase order has been received to the wrong PO, Replace Purchase
Order can be utilized. From 'Replace Purchase Order', a list of purchase
orders for the same vendor and product can be found in order to switch
the PO. Replace Purchase Order will replace the cost of the ingredients,
where PO Adjustment will only adjust the amount of the ingredients.
Replace Purchase Order cannot be used with a 'Posted' record.
- In the FMIM Feed Receiving index, highlight the
record that needs to be replaced.
- Right-click and select Replace
Purchase Order.
- Select the PO that will replace the original PO
by checking the box in the selected column and clicking 'OK'.
- The original PO will be placed back in PO inventory
to be used at a later date.
- If Delayed Freight was used to create the PO,
the Haulage Selection will need to be entered.
- In the Inventory Haulage Selection dialog box,
select/Change the Haulage Vendor
No, if applicable.
- Select/Change the Haulage
Vendor Sku No, if applicable.
- Enter the Freight
Rate and then click 'OK'.
- The original PO will be placed back in PO inventory
to be used at a later date.