External Transfers

Feed External Transfers are
created in order to bring feed and transactions into MTech's system, from
an outside source. External transfers are used when the feed purchase
and receiving transactions are maintained in an external system. The external
transfer will move the feed to MTech in order for the feed and costs to
be assigned to other farms or entities.
The following must be created before creating a Feed External Transfer:
The following components are
outlined related to creating a Feed Receiving transaction:
Create a Feed External
Transfer
Deliveries
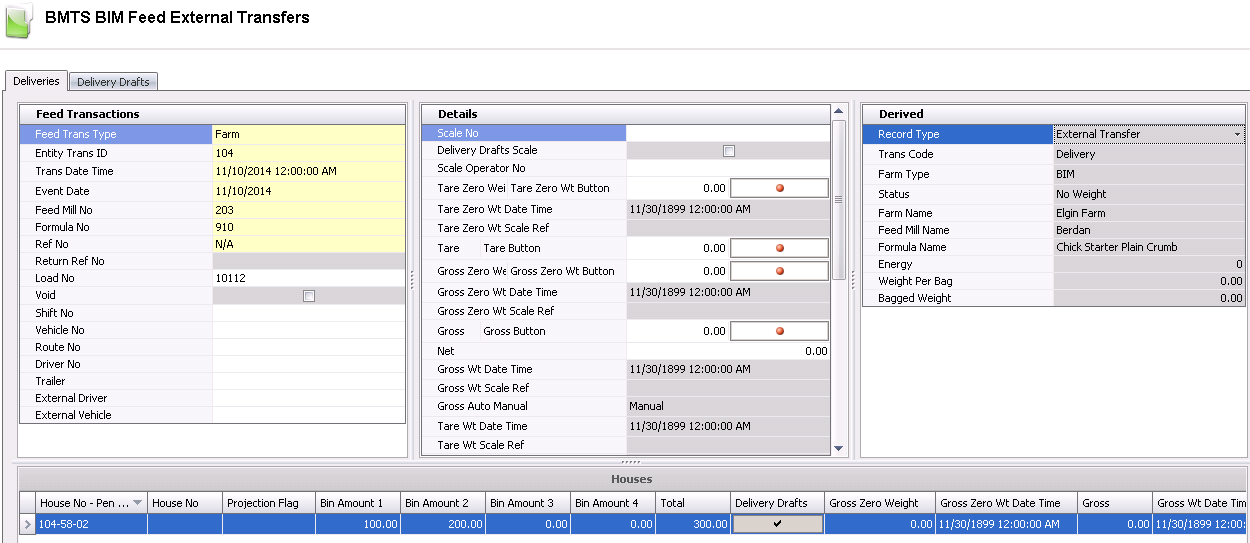
The Deliveries section contains the base details relating to the transfer
as well as bin details.
Transfer Header
The header is divided into three sections to group the data.
- In BMTS>BIM>Transactions>Feed,
select External Transfers.
- In the Feed External Transfers main index,
select the
 button to create a new record.
Feed
Transactions
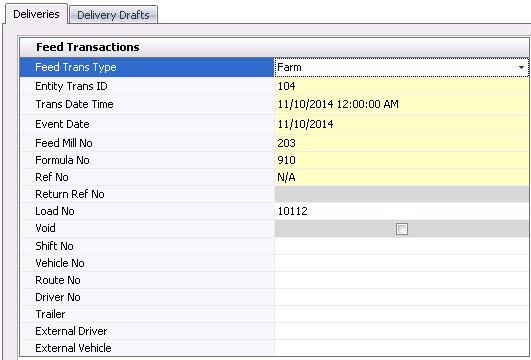
- Click on the Feed
Transactions tab.
- From Feed Trans
Type, select the level of the feed transfer. Available
options are Entity or Farm.
- From Entity
Trans ID, select the entity or farm that is receiving
the feed. Depending on the selected Feed Trans Type, the Entity ID
list will be sourced from a farm, entity, or customer.
- In the Trans
Date Time field, enter the date and time that the feed is transferred.
- Event Date
will default to the same date as the transaction date, and represents
the date that the journal transaction will be posted. The date can
be modified if required.
- From Feed Mill
No, select the feed mill that is supplying the feed. Vendors
that supply feed must have a feed mill created in Facilities for feed
to be purchased .
- From Formula
No, select the feed formula being transferred.
- Ref No
is an automatically-generated unique reference number that identifies
the receiving transaction.
- Return Ref No indicates
- Load No
will auto-generate a load number. If required, modify the load to
an existing load.
- Selecting the Void
flag will delete the external transfer.
- In the Shift
No field, enter the shift number for the load.
- Optionally, the Route
No that the delivery truck will take can be selected.
- From Driver No,
select the internal driver who will transfer the feed. Drivers must
be set up prior to use in: Admin>Business>General>Definitions>Drivers.
- From Trailer
No, select the internal trailer that will be used to deliver
the feed. Trailers must be set up prior to use in: Admin>Business>General>Definitions>Vehicles.
- External Driver
is an optional field to identify an external driver that will deliver
the feed.
- External Vehicle
is an optional field to identify an external vehicle that will deliver
the feed.
Details
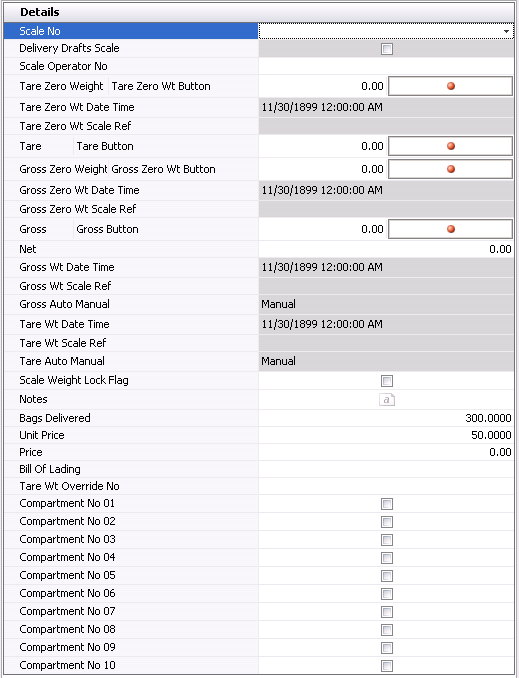
- Scale No
is an optional field to enter the scale on which the truck was weighed.
Select the scale from the drop-down menu, if desired. Scales
must be set up prior to use in: Admin>Business>General>Definitions>Weight
Scales.
- The Delivery
Drafts Scale flag will be selected if delivery drafts
is being utilized.
- Scale Operator
No can be used to select the scale operator. Operators
must first be defined in: Admin>Business>General>Definitions>Plant
Scale Operators.
- Tare Zero/Tare
Zero Weight Button is used if a tare zero weight is required.
Tare Zero
Weight Date Time displays the date and time that the tare zero
weight was recorded at the scale.
Tare Zero
Weight Scale Ref is a reference number generated from the scale
for the tare zero weight.
Tare/Tare
Button is the tare weight of the vehicle. This field can be
manually entered or interfaced from a scale.
- Gross Zero/Gross
Zero Weight Button is used if a zero weight is required.
Gross Zero
Weight Date Time indicates the date and time that the gross
zero weight was recorded.
Gross Zero
Weight Scale Ref is a reference number generated from the scale
for the gross zero weight.
Gross Button
is the total weight of the vehicle and the product. The button is
used if there are scales integrated to the receiving process. This
field can be manually entered or interfaced from a scale.
Net
is the difference between gross and tare. This field can be manually
entered or, if weights are entered, it is calculated automatically.
Gross Weight
Date Time displays the date and time that the gross weight
was recorded at the scale.
Gross Weight
Scale Ref displays the reference number for the gross weight
scale reading.
Gross Auto
Manual determines if the gross scale readings are Auto or Manual.
Tare Weight
Date Time displays the date and time that the tare weight was
recorded at the scale.
Tare Weight
Scale Ref displays the reference number for the tare weight
scale reading.
Tare Auto
Manual determines if the tare scale readings are Auto or Manual.
- Selecting the Scale
Weight Lock flag indicates the transaction values are locked
because the ticket value originates from a scale interface.
The Notes
field can be used to enter additional information.
Enter the number of Bags
Delivered.
Enter the Unit
Price of each bag.
The
total Price will default in.
In the Bill
of Lading field, enter the number from the feed delivery ticket
that references the delivery.
Enter the Tare
Weight Override No.
The Compartment
field flags are used to indicate the compartments that were used for
the feed delivery.
Derived
The information in the Derived fields automatically generates from the
first two grids - Feed Transactions and Details. The fields are read-only
and cannot be modified.
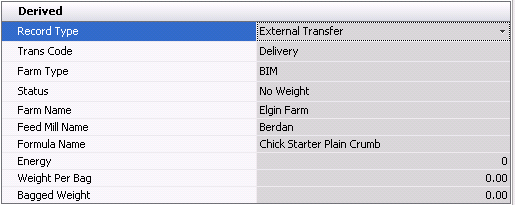
- Record Type
displays the type of feed record and will default to External Transfer.
- Trans Code
displays the type of feed transaction and will default to Delivery.
- Farm Type
indicates the type of farm.
- Status displays the status of...
- Farm Name
displays the name of the farm based on the selected farm or entity
for the transaction.
- Feed Mill Name
displays the name of the feed mill that delivered the feed.
- Formula Name
displays the description for the selected feed formula for the delivery.
- Energy
is a calculated field that determines the energy value of the delivered
formula. Energy value is defined on the Nutrients tab of the Feed
Formula Version.
- Weight Per Bag
displays the weight of each bag of feed.
- Bagged Weight
indicates the total weight of bagged feed.
Houses
The Houses section contains details related to where the feed is stored.

- From House No
- Pen No, select the house and pen number where the feed is
being transferred.
- The House No
field can be used to select the house.
- Projection Flag will default in
- In the Bin Amount
fields, enter the amount of feed in each bin.
- The Total
field will default in with the total amount of feed in the bins.
- The Delivery
Drafts flag can be clicked and utilized if delivery drafts
is configured. See below.
- Gross Zero Weight
displays if a zero weight is required.
Gross Zero
Wt Date Time indicates the date and time that the gross zero
weight was recorded.
Gross
displays the total weight of the vehicle and the product.
Gross Wt Date
Time displays the date and time that the gross weight was recorded
at the scale.
Delivery Drafts
In order to use Delivery Drafts, it must first be configured in Admin>Business>General>Definitions>Weight
Scales. The Scale No must also be selected when creating Deliveries.
Delivery Drafts is a weighting system based upon the equipment at the
feed mill. The weighting system has a hopper that holds a minimal
amount of feed. The hopper is filled and weighed then feed is placed in bin/compartment
of trailer. The process is repeated until all of the bins are filled or
the load is completed.
- In the Houses tab, select the Delivery Drafts flag.
- Complex Entity
No will auto-populate based
upon data entered in Delivery tab.
- Draft No displays
the trailer or compartment number.
- Zero Weight Date
indicates the date the beginning weight was recorded.
- Zero Weight
is the beginning weight. The beginning weight has to be set to zero.
Click on the red dot in the Zero Weight Button column to begin recording,
then enter 'zero' and click the red dot again to set the amount
to zero.
- Gross Weight
Date indicates the date the gross weight was recorded.
- Gross
is the amount of feed per draft. Click on the red dot in
the Gross Button column to begin recording, then enter the Gross
feed amount and click the red dot again to set the amount..
- Net Weight Date
indicates the date the net weight was recorded.
- Net is
the total amount of feed weighted. Remaining columns are derived based
upon the system date and time of the Draft transactions.
- By clicking 'OK', the weights will be updated
in the Houses and Details sections.

Post a Feed External Transfer
Once the feed external transfer
is completed and saved, the transfer needs to be posted. The posting process
locks the transfer to prevent edits, and creates the debit and credit
journal transactions.
- In the Feed External Transfer main index, select
the required transaction and right-click to select 'Post'. Alternatively,
click the green check mark
 in
the top menu bar and select 'Post'.
- To un-post a feed external transfer, select the
required transaction and right-click to select 'Unpost'. This
process will set the transaction status to 'Reversed' status, which
allows the transaction to be edited.
Right-Click Feed Transfer
Option
Feed transfers can be created by highlighting a posted record and right-clicking
on Transfers.
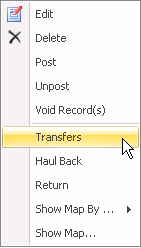
- In the Feed External Transfers main index, select
the required transaction, right-click and select `Transfers`.
- The Feed Transfer screen will appear.
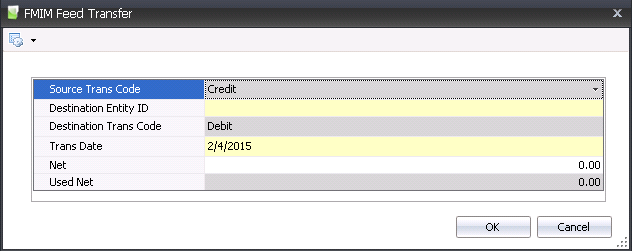
- Select the Destination
Entity ID, where feed is to be delivered.
In the Trans
Date field, enter the date that the transaction will occur.
In the Net
field, enter the amount of feed transferred.
Click 'OK' and the two new transaction screens
will appear. Note the TRs (transfer source) and TRd (transfer destination)
at the end of the new Feed records.
![]()

 button to create a new record.


 in
the top menu bar and select 'Post'.
