disposals

When eggs need to be disposed of at the farm, Egg Room Disposals will
remove the eggs from inventory. There is an option to put a value on the
disposed eggs.
Before creating a Disposal record, the following must be created:
The following procedures are outlined in the Disposals document:
Create a Disposal Record
- In BMTS>BIM>Transactions>Egg
Room, select Disposals.
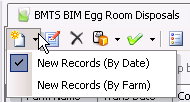
- In the Egg Room
Disposals main index, click
the
 drop-down menu and select one of the following
options to add a new disposal record: `New Records (By Date)` or `New
Records (By Farm)`. Once the option is selected, it will be saved
in the user profile and remain as the default until the option is
modifiied.
drop-down menu and select one of the following
options to add a new disposal record: `New Records (By Date)` or `New
Records (By Farm)`. Once the option is selected, it will be saved
in the user profile and remain as the default until the option is
modifiied.
- In the New Record dialog box, from Farm
No, select the required farm. *Note:
This option is only available if a new record is being created `By
Farm`.
- Enter the Date
the eggs will be disposed of and then click 'OK'.
- In the Disposals screen, click to
add a new disposal line.
- The Egg Room Inventory box will display all current
inventory for the selected farm.
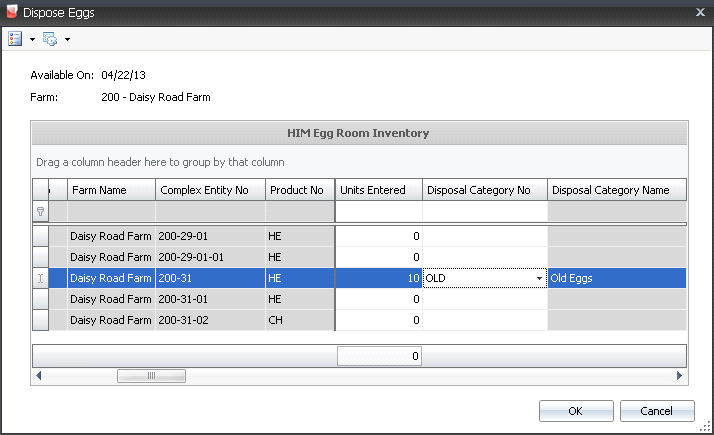
- Select the required entity where the eggs will
be disposed from and, in the Units
Entered field, enter the number of eggs to be disposed of.
- From the Disposal
Category drop-down menu, select the reason for disposing of
the eggs. Disposal Category Name
will default in. Categories or reasons for the disposals are set up
in: Admin>Business>General>Definitions>Disposal
Categories.
- Click 'OK'.
- The Egg Room Disposals screen will add the disposal
line with fields populated.

- Tracking No
displays a unique reference number used to identify the eggs that
are being disposed. This number will default in from the receiving
transaction.
- Complex Entity
No displays the entity that produced the disposed eggs. This
can be modified if required.
- Breed No
is a derived field based on the selected entity, and is used to identify
the breed code of the eggs that are being disposed.
- Breed Name
displays a description of the breed code.
- Product No indicates
the egg product that is being disposed. This can be modified
if required.
- Product Name
displays a description of the product.
- Production Date
indicates the date that the disposed eggs were produced, in order
to determine egg age.
- Received Date
indicates the date the eggs were received at the hatchery.
- Buggy No indicates
the buggy used if the eggs are loaded directly onto a buggy.
- Buggy Name
displays the name of the buggy.
- Package No
displays the package number if the eggs have been packaged and appear
in inventory. The disposal will be done by disposing by the packaging.
The system will then calculate the number of eggs disposed.
- Package Date
displays the date that the eggs were packaged.
- Package Sales
SKU No displays the sales SKU number of the package, if applicable.
- Package Sales
SKU Name displays the package sales SKU name.
- Eggs displays
the number of eggs to be disposed of. This can be modified here if
required.
- In the Comments
field, enter any additional information relating to the disposal line.
- The Consignment
flag will be selected if the eggs are custom hatch eggs.
From
Force Move Costs Mode, select the
method for how the disposal transactions are accounted. Available
options are:
Allocate
to Remaining Breed-Generation Flocks - Removes eggs and
leaves costs to flow through inventory for the balance of eggs
for the flock.
Default
Action - Looks to the registry switch, where the options
will be to either flow the disposal cost, or to only remove eggs
with no financial impact recorded for the disposal transaction.
Send
to Costs of Goods Sold - Moves the value of these eggs
or chicks to COGS, thereby reducing the value of the remaining
eggs or chicks.
- Disposal Category
No indicates the reason for the disposal and defaults based
on the selection in the Inventory dialog box. This can be modified
if required.
- Disposal Category
Name displays a description of the reason for disposal.
- Selecting the Void
Flag will cancel the transaction.
Post a Disposal Record
Once the disposal record has been created and saved, the record needs
to be posted. The posting process locks the record to prevent edits, and
updates the inventory.
- In the Disposals main index, select the required
record and right-click to select 'Post'. Alternatively, click the
green check mark
 in the
top menu bar and select 'Post'.
in the
top menu bar and select 'Post'.
- To un-post a disposal record, select the required
disposal and right-click to select 'Unpost'. This process will
set the record status to 'Reversed' status, which allows the record
to be edited.