![]()
Freight-only purchase orders are only used when freight charges are required to transfer the product from facility to facility and there are required charges to an external/internal vendor to haul the product. These transactions are created using Facility Transfers.
The following options are outlined in the Freight-Only Purchase Order document:

The purchase order header contains the base data to outline the freight-only purchase order. The header is divided into two sections to group the data that is entered in the purchase order.
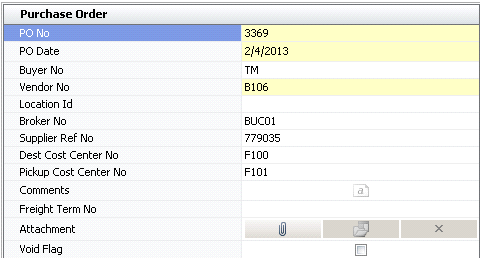
The Purchase Order tab contains the base data for the purchase order.
In General>Purchases, select Orders.
In the Purchase
Orders index, click  to create a new purchase order.
Click on the Purchase
Order tab.

In the PO No field, the purchase order number will auto-generate. The user can override the PO No if required.
From Buyer No, select the buyer that is assigned to the purchase order. Buyers are created in: Admin>Business>Definitions>Buyers.
From Vendor No, select the vendor that will supply the products on the purchase order.
Location Id is used if the vendor has multiple locations that ship products. Use the drop-down menu to select the appropriate location. Locations are defined in General>Master Data>Vendors.
From Broker No, select the broker that is assigned to the purchase order. Brokers are created in: Admin>Business>General>Definitions>Brokers.
From Dest Cost Center No, select the cost center that will receive the products identified on the purchase order. This is also referred to as the destination cost center which will be receiving the transferred goods.
From Pickup Cost Center No, select the cost center from which the products will be picked up. This is also referred to as the source cost center which will be shipping the goods to the destination cost center.
In the Comments field, enter any additional information related to the purchase order.
Freight Term No determines the freight terms for the purchase order. Freight terms default from the vendor but can be modified if necessary. Some common examples of freight terms are: FOB, CIF. This field is typically not used for freight only options as the goods are being transferred between two internal facilities.
In the Attachment field, any type of file can be attached (Example: Word document, picture, music or video clip).
Select the Void Flag to nullify the purchase order.
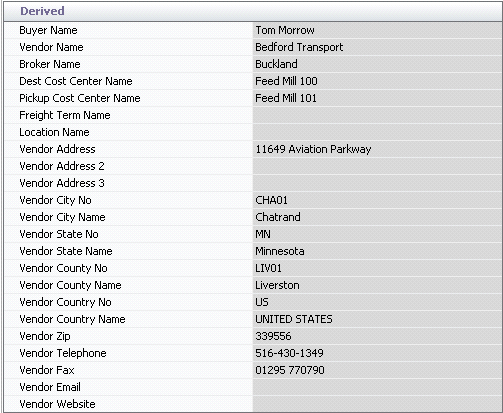
The fields in the Derived tab will automatically generate based
on the selections in the Purchase Order tab. The Derived fields cannot
be modified.

After completing the header of the order, the freight line can be added
to the purchase order. There are several fields and tabs in the Purchase
Order Line Details that also must be completed in the creation process.
There are many fields in the details, however they can be sorted or removed
to accommodate the user requirements. For this document, they have been
divided into different parts in order to show a screenshot of all fields.
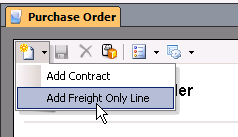
 and select Add
Freight Only Line to create a new purchase order freight detail
line.


The PO Line No is assigned by default and indicates the purchase order for the selected line.
Dest Cost Center No and Dest Cost Center Name will default based on the Dest Cost Center No with no option to modify. This will be the feed mill receiving the transferred product.
Price Mode determines where in the process the price can be changed. Select the required Price Mode. Available options are:
PO Price - The vendor will be paid based on the price entered on the purchase order. Any differences recognized at invoice will require a debit or credit memo to adjust for the difference. Debit and credit memo amounts will be applied to a purchase price variance account.
Invoice Price - The purchase invoice can be adjusted based on the invoice received from the vendor. Differences between purchase order price and invoice price will be applied to a purchase price variance account.
Market Price - Freight will be received based on the prices established in Market Prices. The invoice will be paid to the vendor based on the received price. Further details related to this option can be located in Create market price purchase order.
Payment Term No defaults from the selected vendor. Payment terms can be modified if required.
Currency No defaults based on the currency assigned to the product vendor. Select from the list to change the currency.
Currency Exchange Rate automatically
sets to the current exchange rate if the Currency No is changed. The
currency rate can be manually entered if there is a guaranteed exchange
rate related to the purchase order. Otherwise, the rate will be determined
based on the rate that is in effect on the date that the product is
received. The rate will also be adjusted at purchase invoice with
the difference in rate between receive date and invoice date being
coded to the foreign exchange gain/loss account.

Product Name will be derived from the Product No.
Product Type defaults to Freight and cannot be modified.
Unit Description displays how the freight will be calculated (Example: Tonnes).
Enter the number of Vendor Units that will be number of inventory units transferred from facility to facility.

Freight cannot be modified for a Freight product.
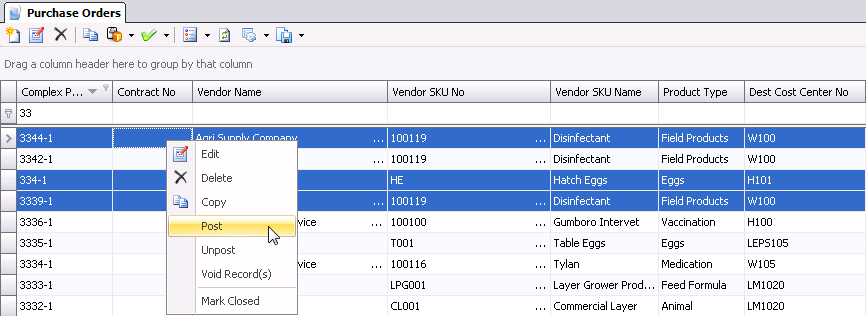
The purchase order must be saved and posted for the purchase order to be used in a Facility Transfer. Posting will also prevent a purchase order from being modified. With proper permissions, a purchase order can be un-posted and posted as many times as required until a facility transfer has been entered for the purchase order. Once a facility transfer has been entered, the purchase order can no longer be un-posted. If the approval process is implemented, the purchase order must be approved prior to being posted. Details related to approving purchase orders can be reviewed in Purchase Order Approval.
 to save the purchase order.
