Contracts are optional in the purchasing process. Contracts are agreements between the company and the vendor to supply the product at an agreed quantity and price. Contracts are product-specific, which means that only one product can be defined on the contract. As quantities are released to purchase orders, contract inventory levels are maintained until all of the quantity has been used. All details related to the product default from the vendor sku defined on the product. A contract must be in 'posted' status to be available for purchase orders. Contracts cannot be received unless a purchase order is derived from the contract.
Prior to creating a Purchase Contract, the following items should be created.
The following procedures are outlined related to contracts:
In General>Purchases, select Contracts.
In the Purchase
Contracts index, click  to create a new purchase contract.
Click on the General tab.
The contract header contains the base data to outline the contract agreement. The header is divided into three sections to group the data that is entered in the purchase contract.
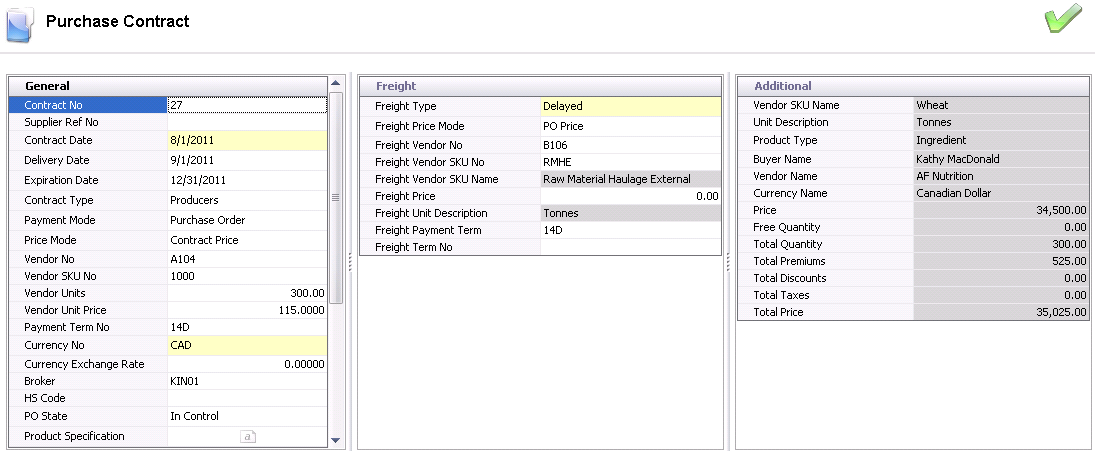
The General tab contains the base data for the purchase contract.
Contract No is an auto-assigned unique number that identifies the contract.
Supplier Ref No is an optional field that can be used to identify the vendor agreement number.
Select the Contract Date from the drop-down calendar to identify the date the contract was initiated.
Select the Delivery Date to identify the date the order will be delivered.
Select the Expiration Date to identify the last date that the contract can be used. Purchase orders cannot be created after the expiration date, even if there are quantities left on the contract . The expiration date defaults to one year from the contract date.
Select the Contract Type to indicate the type of contract being created. Contract pricing is generally used in commodities. This selected option is used only for filtering and reporting and does not have any additional associated logic. Options available are Futures or Producers.
Payment Mode indicates whether the contract is paid for based on purchase order transactions or if there is a pre-defined payment schedule. Options are: Purchase Order or Payment Schedule. The logic is currently not implemented for this option.
Price Mode determines where in the purchase process the price can be modified. Available options are:
Contract Price: Will only allow the price to be changed on the contract.
PO Price: Defaults the contract price to the purchase order, but allows the user to change the price on the purchase order
Invoice Price: Allows the user to modify the amount on the contract, purchase order or purchase invoice.
Market Price: Establishes the price based on the selected market price table and effective rate on the receive date.
From Vendor No, select the Vendor that is assigned to the contract.
Vendor SKU No indicates the product that will be purchased. A list of vendor skus assigned to the vendor will be displayed in the list. Vendor skus must be created on the applicable product before being purchased.
In the Vendor Units field, enter the contract quantity in the vendor unit of measure. For example, if the vendor sku is in tons, enter the number of tons.
In the Vendor Unit Price field, enter the price assigned to the contract that is to be paid for each vendor unit. This field is only applicable if Price Mode is set to Contract Price, PO Price or Invoice Price. If Price Mode is set to Market Price, then the price will be displayed as 0.00 and valued on the effective price based on the receiving date.
Payment Term No defaults from the selected vendor. Payment terms can be modified if required.
Currency No defaults in US dollars. Select from the list to change the currency.
Currency Exchange Rate automatically sets to the current exchange rate if the Currency No is changed. The currency rate can be manually entered if there is a guaranteed exchange rate related to the contract. Otherwise, the rate will be determined based on the rate that is in effect on the date that the product is received. The rate will also be adjusted at purchase invoice with the difference in rate between receive date and invoice date being coded to the foreign exchange gain/loss account.
Select the Buyer that is assigned to the contract. Buyers are created in: Admin>Business>General>Definitions>Buyers.
From the Broker drop-down menu, select the broker that is assigned to the contract. Brokers are created in: Admin>Business>General>Definitions>Broker.
PO State refers to the form of the silo certificate and determines whether the product is available for trading or if it is confirmed for purchase. Select the PO state for the product from one of the following options: Actual, Electronic, Folio, and In Control. The general concept is that Actual and Electronic can be traded, but Folio and In Control cannot be traded, however there is no additional logic to address these options and the field is used only for information.
Pay Basis determines if the vendor is paid based on received units or shipped units. Select the required pay basis type.
Complex Market No sets the market price table and futures table for the contract. Complex Market No can only be set if Price Mode is set to Market Price.
Basis Price is used with Market Price Mode, and sets the basis price for the contract. The received price will be the market price +/- the pay basis.
Price Mode Override is an option used for Market Price Mode. If this option is selected, then the basis point can be modified by selecting an alternative market price table in the purchase order.
In the Comments field, enter any additional comments related to the contract (alphanumeric, max 2000 characters).
Price Basis Mode is used for Market Price Mode to indicates whether the market price is established based on received date or shipped date.
Select Void to nullify the contract.
Select Closed to manually close the contract if required. The contract will automatically expire when the date expires or the quantity of the purchase contract is at zero. If the contract is required to be closed prior to either this, click the Closed flag to complete the contract.
In the Attachment field, any type of file can be attached (I.e. Word document, picture, music or video clip).
The Freight section of the header contains the freight details for the contract if applicable.
Included: Indicates that the sales unit includes the cost of the freight, or there are no additional freight charges.
Excluded: Indicates that there will be additional freight charge. The haulage vendor and rate is known when the purchase contract is created.
Delayed: Indicates that there will be additional freight charges. The haulage vendor and the rate is not confirmed at the time the purchase contract is created.
The Freight Price Mode determines where in the process the freight price can be changed. This is independent of the product price mode.
Click the drop-down in Freight Vendor No to select from a list of previously defined haulage vendors. Vendors must be previously defined in General> Master Data> Vendors and also must have the Transport flag selected on the vendor master record to indicate that is it a transport vendor.
Enter the Freight Vendor SKU No to identify the freight product for the contract. The vendor must be assigned to the freight product in Products>Freight prior to selecting in contracts.
Freight Vendor SKU Name will automatically default from the selected Freight Vendor SKU No
In the Freight Price field, enter the freight rate based on the Freight Type defined for the freight product.
Freight Unit Description will automatically default based on the selected vendor sku.
Freight Payment Term will default based on the selected haulage vendor. The user can optionally modify the payment terms for the contract.
The fields in the Additional tab will automatically generate based on the selections in the previous two tabs - General and Freight. The Additional fields cannot be modified.
Vendor SKU Name displays the product name for the selected vendor sku.
Unit Description displays the units that the vendor sku is purchased in. Examples: Tons, Tonnes, Boxes, lbs, kgs, etc.
Product Name represents the product type of the selected vendor sku. Examples: Ingredients, Field Products, Feed, Eggs, etc.
Buyer Name displays the name of the selected buyer.
Vendor Name displays the name of the vendor that is assigned to the contract.
Currency Name displays the currency rate that has been selected for the contract.
Price represents the Vendor Units x Unit Price. This will be the product cost before any add-ons, discounts, or taxes.
Free Quantity displays the amount of any applicable free quantity that is allocated to the contract. This field generally applies to chick products. Free Quantity is calculated using a premium add-on with Transaction Basis set to Free Percentage.
Total Quantity represents Vendor Units + Free Units.
Total Premiums calculates the total premium add-ons assigned to the vendor sku. Add-ons must be defined on the product vendor sku to be available on the contract.
Total Taxes represents the total calculated taxes if taxes are assigned to the contract. Taxes are optional at the contract level.
Total Price represents the total value of the contract and = Price + Premium Add-Ons - Discount Add-Ons + Taxes.
After completing the header of the contract, there are several tabs in the Purchase Contract screen that also must be completed in the creation process. The majority of the data defaults from the vendor sku with the option to modify. It is important to note that add-ons cannot be added in the contract screen. The add-on must be assigned to the vendor sku to be used in the contract.
Premium and discount add-ons default from the vendor sku. Add-ons must be defined on the vendor sku to transfer to the contract. If necessary, add-ons can be deleted from the contract if not required. Rates can also be modified.

Transaction Basis is a read-only field that defaults from the selected add-on and determines how the add-on is calculated. Options are: Per Unit, Percentage, Flat Rate, or Free Percentage. Free Percentage is currently only used in poultry products.
Payment Type determines when the add-on payment is made. Options available are:
Transaction: Processed at time of receiving and will be included in the vendor payment.
Rebate: Will record accrual amount at time of receiving but will not transfer to the invoice. Payment/invoice will be processed at a later date.
Internal: An internal transaction that is not invoiced to an external source (Example: There is an internal haulage department that gets a credit for hauling products).
The Payee Type field is optional. If the add-on is to be processed by an alternative sources, select the source type for the add-on. Options are: Customer, Vendor, Employee, or Cost Center. If the field is left blank, it assumes the vendor sku for the payment of the add-ons.
Transaction Entity ID is a required field if a different Payee Type is selected. Select the appropriate vendor or cost center.
Product Amount - the add-on is calculated based on only the product amount and does not include any other add-on in the calculation of the amount.
Net Amount - the add-ons is calculated based on the net amount of the transaction based on the product amount including other add-on amounts, but excluding taxes.
Normal - the add-on is calculated based on the rules established by Transaction Basis and the Payment Type defined in the vendor SKU and sales SKU.
Deduction Only - the add-on is calculated based on the rules established by Transaction Basis, however the add-on is only deducted from the vendor payment.
Taxes can be optionally added to the contract. Taxes should only be added to the contract if the supply is being distributed to cost centers within the same tax zones. The taxable flag needs to be selected on the vendor sku for the taxes to be applied.
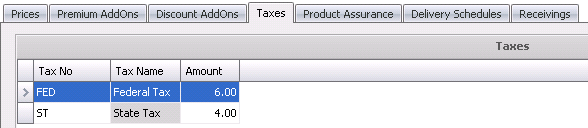
to select the Tax
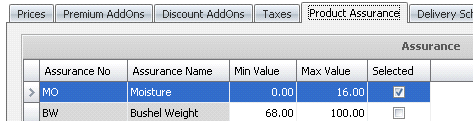
No for the applicable tax.Product Assurance relates to the assays that will be assigned to the contract. Assays are currently only used for ingredient products. The assays will default from the ingredient version if defined or from the ingredient if there are no assays defined on the ingredient version. The user has the option of selecting and defining the assay parameters for the contract.
The Delivery Schedule allows the contract quantity to be assigned to cost centers and defined by a delivery date schedule. If a Delivery Schedule is defined, the purchase orders for the contract will be automatically created when the contract is posted.

From Cost Center No, select the cost center that will be receiving the product.
Cost Centers Name displays the description of the selected cost centers.
Enter the number of vendor Units to be received for the product. The units entered in Delivery Schedules must equal the total units in the contract.
The Begin Receive Date, will default from the header value. The date can be modified if required.
The End Receive Date, will default from the header value. The date can be modified if required.
Enter the Number of Receivings to define the number of receiving transactions for the delivery schedule. If not defined, the default value of "0" will apply.
The Receivings tab will display all of the receiving transactions for the contract.

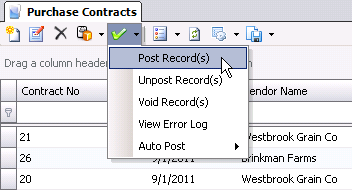
Once the contract has been entered and the data verified, the contract can be posted. Posting the contract will complete the following tasks:
There are two options available to post the contracts.
|
|
|
 |
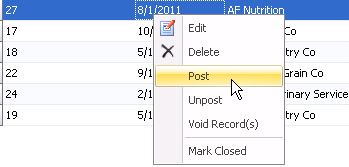 |
 and then select Post Record(s)