
Lab tests are designed to record the test analysis administered to an entity and ensure that the eggs meet the standard requirements before processing and shipping to the customer. These test and the results are recorded in Lab Test. The lab test transaction identifies the product and feed mill being tested and the laboratory doing the testing.
There are two types of lab test transactions that can be created:
Prior to creating a Lab Test transaction the following items must be created:
The following procedures are outlined in the Lab Tests document:
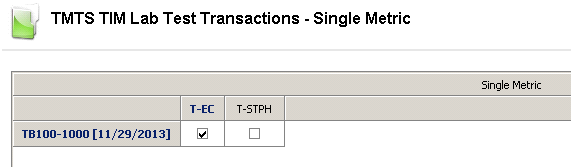
A Single Metric transaction is used when only one metric is recorded on a lab test. The Single Metric screen displays only the metrics that have a single result. If there are test codes created with a single value (Pass or Fail), this value will default to single metric. There is a test code with Analysis No = ES, with a metric value called 'Pass'. If the Pass box is selected, then the ES box in single metric is also selected. After the lab has run the test for the analysis no, the user will enter the results in the Metrics.
 button to create a new
single metric transaction.
button to create a new
single metric transaction.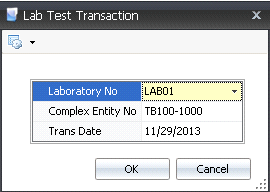
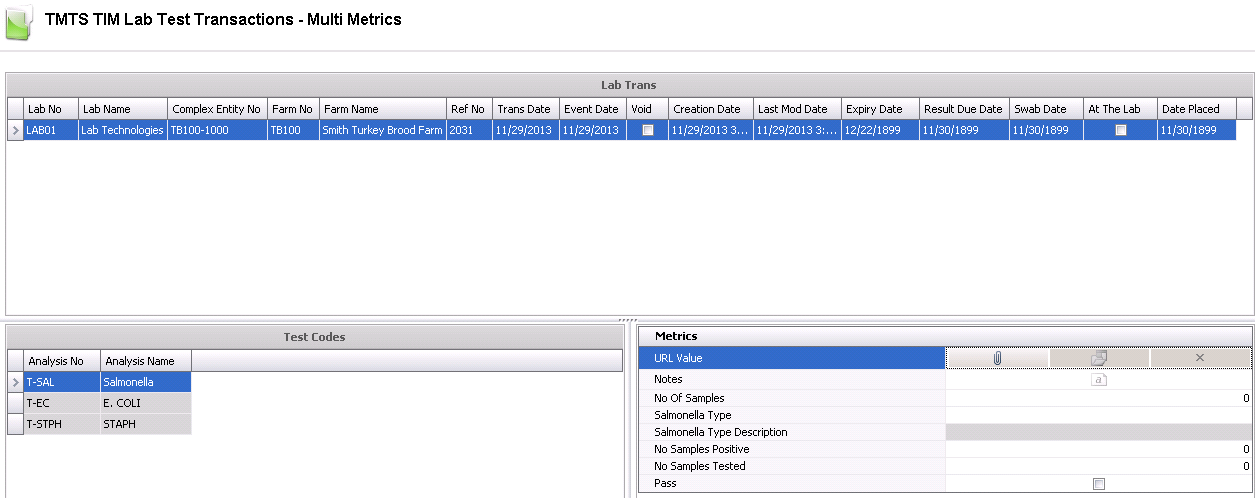
The Multi Metric transactions is used when running multiple metrics on a lab test, using multiple ways of testing it. There are three components in the creation of a Multi Metric Lab Test transaction:
to create a new multi metrics
lab test transaction.
to
add another test line.Lab No indicates the lab code where the testing will take place.
Lab Name displays the name of the testing lab.
Complex Entity No indicates the entity that is being tested.
Farm No indicates the farm that is being tested.
Farm Name displays the name of the farm being tested.
In the Trans Date field, enter the date of the lab test. This date will be used for all inventory and accounting transactions.
Event Date defaults in as the same as the Trans Date. This date may be changed if the transaction actually occurred on a different date, however, this date does not affect inventory or accounting.
Ref No is an automatically generated number that uniquely identifies the transaction.
If the egg product is already at the lab, in the Date Placed field, enter the date it was placed at the lab.
Select the At The Lab flag if the egg product is currently at the lab for testing.
Result Due Date defaults to the system null date of 11/30/1899. This field is optional and can be modified to reflect the date the results are due back.
Swab Date defaults to the system null date of 11/30/1899. This field is optional and can be modified to reflect the date the swab was taken.
Expiry Date defaults to the system null date of 11/30/1899.This field is optional and can be modify to reflect the date that the testing expires.
If the Void flag is selected, the transaction will be voided and excluded from the entity’s statistics.
Test Codes will default in and must be predefined in: Admin>Business>General>Definitions>Lab Test>Lab Test Codes.
Metrics are user-defined and configured to the test codes so that the required information is gathered for each test code. Metrics must set up in: Admin>Business>General>Definitions>Lab Test>Lab Test Codes Metrics. .Metrics can be used for statistical and tracking information.
In the Notes field, enter any additional information relating to the multi metric transaction.
In the No of Samples field, enter the number of samples that are being sent for testing.
In the No Samples Positive field, enter the number of samples that tested positive.
In the No Samples Tested field, enter the number of samples that have been tested.
Select the Pass flag if the test passed.
Once the Lab Test transaction has been created and saved, the transaction needs to be posted. The posting process locks the transaction to prevent edits, and the information gets posted back to the entity.
 in the top menu bar and
select 'Post'.
in the top menu bar and
select 'Post'.