physical inventory

Feed Physical Inventory is the process of taking a physical inventory
count of the feed. At the end of the fiscal period, most farm take an
inventory count. The difference between the perpetual or expected inventory
and the actual inventory is journalized to an inventory shrink account.
There are two options available to enter inventory counts.
- Physical
Inventory Count - When using this method, the user will enter
each line for the products that were counted.
- Auto-Load
from Inventory - This method will load all products in inventory
with the available inventory. The user will then enter the actual
inventory for the required products
A Feed Delivery transaction
must be created Before creating a Feed Physical Inventory transaction.
The following options are outlined in this document
Physical
Inventory Count
- In TMTS>TIM>Transactions>Feed
Inventories, select Physical
Inventory.
- In the Feed
Physical Inventory main index,
click the
 button to create a new physical inventory
record.
button to create a new physical inventory
record.

- In the New Record dialog box, in
the Trans Code field, select
the type of transaction. Available options are:
Adjustment
- Used when the difference between perpetual and physical inventory
is to be reported for financial purposes. Valuation is determined
at global post and the difference is reported as a shrink variance.
Non-Inventory
- Only used for internal reporting purposes to analyze inventory
quantities. There is no valuation on this type of physical inventory
transaction.
- In the Trans
Date field, enter the date of the physical inventory transaction.
Generally, physical inventory records are created at the end of the
fiscal year.
- From Farm No,
select the farm where the inventory is located, and then click 'OK'.
- In the Feed Physical Inventory screen, click to
add a new inventory product. This will allow one product to be added
at a time.

- From the Complex
Entity No drop-down menu, select the entity number of the farm
for the physical inventory adjustment.
- From Feed
Type No, select the type of feed being counted.
Based on a customer defined list, the feed formula is assigned to
a feed type. *NOTE: Feed Type
No or Formula No will only be displayed if the respective mode is
selected. If Single Inventory is the selected option, neither field
will be displayed in the physical inventory screen. The registry switch
is located in: Admin>System>Registry>Poultry
Registry>Poultry>PMTS>Layer Breeder>General>Feed Inventory
Mode. Select ``Inventory By Feed Type`` or ``Inventory
By Formula`` to display the desired fields to select from.
- Feed Type Name
defaults from Feed Type No and displays the name of the feed
type.
- Ref No
is a unique identification code for the physical inventory transaction.
This can be manually or automatically entered.
- Empty Space
is an optional field and refers to the empty space of
the silo. Select the Empty Space field and hit 'F12' while still in
the field. This calculates the quantity based on the dimensions of
the silo, the density of the ingredient, and the empty space.
- Enter the Quantity
in units of the selected feed product.
- Book Quantity
will default in and displays the perpetual inventory units based on
the transactions that have been entered.
- Adjustment Quantity
will default in once the transaction has been saved, and displays
the calculated difference between Quantity (actual inventory) and
Book Quantity.
- Adjustment Value
will default in and displays the estimated value of the
shrink adjustment. When global post is run, this will be updated to
the actual adjustment value.
- In the Comments
field, enter any additional information related to the inventory feed
product.
- Selecting the Void
Flag will cancel the inventory
line.
- Once the fields have all been entered, click
 to save the inventory record, and then close the screen. Saving the
record will calculate the adjustment quantity and value. Ending Inventory
can be viewed in: Products>Inventory
from the folder.
to save the inventory record, and then close the screen. Saving the
record will calculate the adjustment quantity and value. Ending Inventory
can be viewed in: Products>Inventory
from the folder.
Auto-load
from Inventory
Alternatively, all products from inventory can be automatically added
at one time rather than adding individual products one at a time.
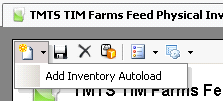
- To add all products from inventory, in the Physical
Inventory screen, click the drop-down
menu and select 'Add Inventory Autoload.'
- All of the products in inventory for the selected
date will be listed on the Physical Inventory screen with the current
inventory quantities.
- Empty Space
is an optional field and refers to the empty space of
the silo. Select the Empty Space field and hit 'F12' while still in
the field. This calculates the quantity based on the dimensions of
the silo, the density of the ingredient, and the empty space.
- In the Quantity
field, enter the number of units of the selected product.
- If applicable, enter any additional information
In the Comments field.
- Once the fields have all been entered, click
to save the inventory record, and then close the screen. This process
will establish an ending inventory, unit quantity, and value.
Post
a Physical Inventory Transaction
Once the physical inventory transaction has been created and saved,
the transaction needs to be posted. The posting process locks the transaction
to prevent edits, and updates the inventory.
- In the Feed Physical Inventory main index, select
the required transaction and right-click to select 'Post'. Alternatively,
click the green check mark
 in the top menu bar and select 'Post Record(s).'
- To un-post a physical inventory transaction, select
the required transaction and right-click to select 'UnPost'. This
process will set the transaction status to 'Reversed' status, which
allows the transaction to be edited.
Journal
Transaction