Breeder Placements

Depending on the generation of the eggs hatched,
the chicks can be placed in breeder or broiler farms. Parent generation
is placed on broiler farms. All other generations are placed on breeder
farms. There is also a registry switch that determines if chick inventory
is used for parent detail in placements. If period end costing is being
used, the chick inventory options must be used for proper cost allocation.
The switch is located in: Admin>System>Registry>Poultry>Poultry
Registry>Hatcheries>HIM>Chick Breeder Chick Inventory.
Breeder Placements are internal placements sourced from an internal
hatchery. Internal pricing may be used to estimate the cost of the placement;
however, the actual cost of the placement is determined at period end.
At the time
that the chick placement transaction is created, determine if the parent
entity is negative or positive based on the entity status. The placement
entity should inherit the health status from the parent entity. The entity
can became negative during the life after a lab test or entity status
transaction.
Before creating a Breeder Placement, the following must be created:
The following procedures are outlined in the Breeder Placements document:
Create
a Breeder Placement
General
The General tab contains the base data to outline the breeder placement.
The tab is comprised of four sections, including grids and details, to
group the data.
- In LMTS>HIM>Transactions>Chicks,
select Breeder Placements.
- In the Breeder
Placements main index, click
 to create
a new breeder placement transaction.
to create
a new breeder placement transaction.
- Click on the General
tab.
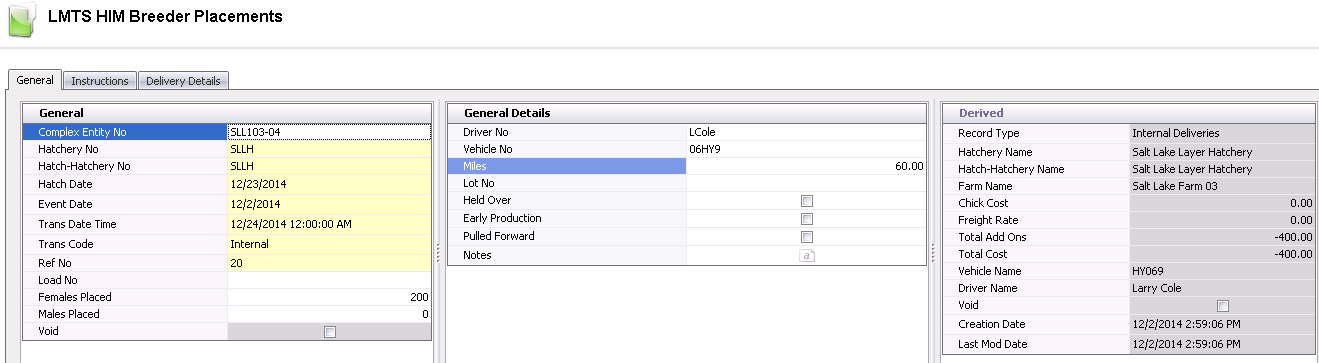
General
The General tab contains the details related to the placement.
- From the Complex
Entity No drop-down menu, select the entity where
the chicks will be received.
- From Hatchery
No, select the hatchery where the chicks are being transferred
from.
- Hatch-Hatchery
No represents the hatchery that hatched the chicks. This will
default in based on the selected hatchery and is usually the same
as the Hatchery No unless the chicks have been transferred.
- In the Hatch
Date field, enter the date that the chicks hatched.
- Event Date
will default to the same date as the transaction date, and can be
modified if required.
- In the Trans
Date Time field, enter the date the chicks will be placed.
This date will be used for all inventory and accounting transactions.
Trans Code displays the type of transaction and
will default to 'Internal'. Once a breeder placement has been completed
and posted (internal),, if changes need to be made, the trans
code identifies the type of transaction. Available options are:
Credit
- Will credit the entity inventory.
Debit
- Will debit the entity inventory.
DOA
- Identifies the number of dead chicks upon arrival and then the
inventory is reduced.
Entity
Change - Will change the entity that received the birds.
Internal
- The chicks are purchased from an internal source at cost.
- Ref No
displays a unique reference number that identifies the transaction.
This can be automatically or manually entered.
- Load No
is an optional field to enter a load number for the placement.
- In the Females
Placed field, enter the number of female chicks being placed.
- In the Males
Placed field, enter the number of male chicks being placed.
- Selecting the Void
flag will cancel the breeder placement.
General
Details
The General Details tab contains optional fields to enter additional
information related to the placement.
- Driver No
is an optional field to identify the driver that delivered the chicks.
Drivers must be set up prior in: Admin>Business>General>Definitions>Drivers.
- Vehicle No
is an optional field to identify the vehicle used to deliver the chicks.
Vehicles must be set up prior in: Admin>Business>General>Definitions>Vehicles.
- The Miles
field is used if the distances are defined from the farm to the hatchery,
in Farms. If distances are defined, the mileage from the hatchery
to the farm will be calculated.
- Lot No
is an optional field to enter the lot number for the transaction,
if lot tracking is used.
- Select the Held
Over flag if the chicks were held over at the hatchery.
- Select the Pulled
Forward flag if chicks are hatched a day early.
- Select the Early
Production flag if the placement is sourced from early production
entities.
- In the Notes
field, enter any additional information related to the placement.
Derived
The fields in the Derived tab default in from information entered in
the first two tabs - General and General Details. The fields cannot be
modified.
- Record Type
displays the type of record.
- Hatchery Name
displays the name of the hatchery where the chicks hatched and are
being transferred from.
- Hatch-Hatchery
Name displays the name of the hatchery that hatched the chicks.
- Farm Name
displays the name of the farm where the chicks will be placed, and
will default from the Complex Entity No.
- Chick Cost
displays the cost per chick. If internal pricing is used, the defined
price will transfer to the placement transaction. The price will be
adjusted to actual price in the period end process.
- Freight Rate
displays the total cost for freight.
- Total Add Ons
displays the total cost for the add-ons.
- Total Cost
displays the total cost of the chicks being placed.
- Vehicle Name
displays the name of the vehicle used to deliver the chicks, if entered.
- Driver Name
displays the name of the driver delivering the chicks, if entered.
- Creation Date
displays the date the transaction was created.
- Last Mod Date
displays the date the transaction was last modified.
Houses
The Houses section contains the details relating to the chicks being
placed. Some of the details will default in with no option to modify.
- Click on the Houses
tab and select to create a new line detail.

- From the House
No - Pen No drop-down menu, select the house that is receiving
the chicks
- The Sex
field will default in from the entity product and indicates the sex
of the chicks.
- In the Head
Placed field, enter the number of head being placed in the
house. The total of the houses must equal the total head identified
in the General section.
- Chick Price
will default in if internal pricing is used. The price
will be adjusted to actual price in the period end process.
- Head Free
is used if the hatchery supplied free head to the placement.
This quantity must be included in the total amount placed. Enter the
number of free head, if applicable. This amount can be calculated
as a standard percentage as defined in Internal Prices. Alternatively,
the user can enter the quantity delivered free in the Head Free field.
- Extra Free
is an optional field to enter any additional free chicks.
- In the Placement
Mortality field, enter the number of head mortality at placement.
- Plant No
indicates the processing plant used, which is specified at placement.
The plant is assigned to the Farm in BIM, in the planning tab under
'Live Haul'.
- Total Quantity
is a calculated field that represents: Head Placed + Head Free - Placement
Mortality. This amount will be the beginning inventory of the entity.
- If FDSA is being used, from Feed
Program No, select the program to be used for feed planning.
- Feed Program
Name will default in with a description of the feed program.
- Feed Program
Effective Date indicates the date the feed program becomes
effective, if applicable.
Product No
defaults in and indicates the product defined on the entity.
Override Product
is an optional field that can be used to override the product
that was defined on the entity.
Additional
Details
Within the Houses tab, there is a child grid with additional details
relating to the placement add-ons.
Internal add-ons are initially defined on the product. The internal
add-ons must then be assigned to the product in Internal Pricing. If the
products are configured for add-ons, the add-ons will default to the placement
transaction and the cost of the add-ons will be calculated. Depending
on the configuration of the add-on, the cost of the add-on may or may
not be included in the cost of the placement. Examples of add-ons for
chick placements are services such as: de-beaking, toe clipping, or vaccinations
provided at hatch.
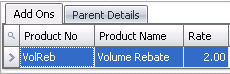
- Product No
displays the code of the selected add-on.
Product Name displays a description
of the add-on.
Rate displays the total cost of
the add-on.
The Parent Details section defines the
entities that sourced the placement and contains information regarding
the source/s of the chicks being placed. There is a registry switch that
determines if chick inventory is not used and is required to source internal
placements. Customers using period end valuation process must have this
switch selected to balance financial transactions.
- Click on the Parent Details tab and select to
add a new detail line.

- From Parent Entity,
select the source entity for the chicks placed.
- Egg Product No
indicates the type of egg product.
- Egg Product Name
displays a description of the egg product.
- The Chicks
Sex field will default in from the entity product and indicates
the sex of the chicks.
Production
Date represents the production date of the eggs set for hatch.
The date will default to the number of incubation days prior to hatch,
with the option to modify.
Received Date
displays the date the eggs were received at the hatchery.
Override Parent
Age is an optional field to enter a number that will override
the age of the entity.
In the Head
Placed field, enter the number of head placed for the source
entity.
In the Chick
Weight field, enter the average weight of the chicks placed.
Weight can be entered in lbs or grams.
Breed No
displays the breed of the source entity.
Age
displays the age of the source entity on the production date of the
eggs set.
In the Uniformity
field, enter the weight uniformity of the chicks.
% displays
the percentage of chicks from each Parent Entity. For example, if
100 females were purchased, and 50 of the females came from Parent
Entity X, the % would be 50%.
Egg Age
displays the number of days from production date to set date.
Egg Class
represents the egg classification of the eggs set.
Hatcher No
indicates the hatcher that hatched the eggs.
Setter No
indicates the setter that the eggs were set in for hatch.
Instructions
The Instructions tab is used to add additional instructions related
to the breeder placement. Instruction codes must be set up in Admin>Business>Poultry>HIM>Product
Instructions prior to selection.
- Click on the Instructions tab and select to
create a new instruction line.
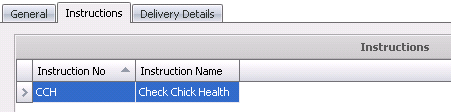
- From Instruction
No, select the required instruction.
- Instruction Name
defaults from Instruction No and displays a description of the instruction.
Delivery
Details
The Delivery Details tab contains optional fields to enter details relating
to the placement of the chicks. Many of the fields, such as temperature
and humidity recordings, will help identify the problem if a mortality
occurs on the delivery. The tab is comprised of two sections.
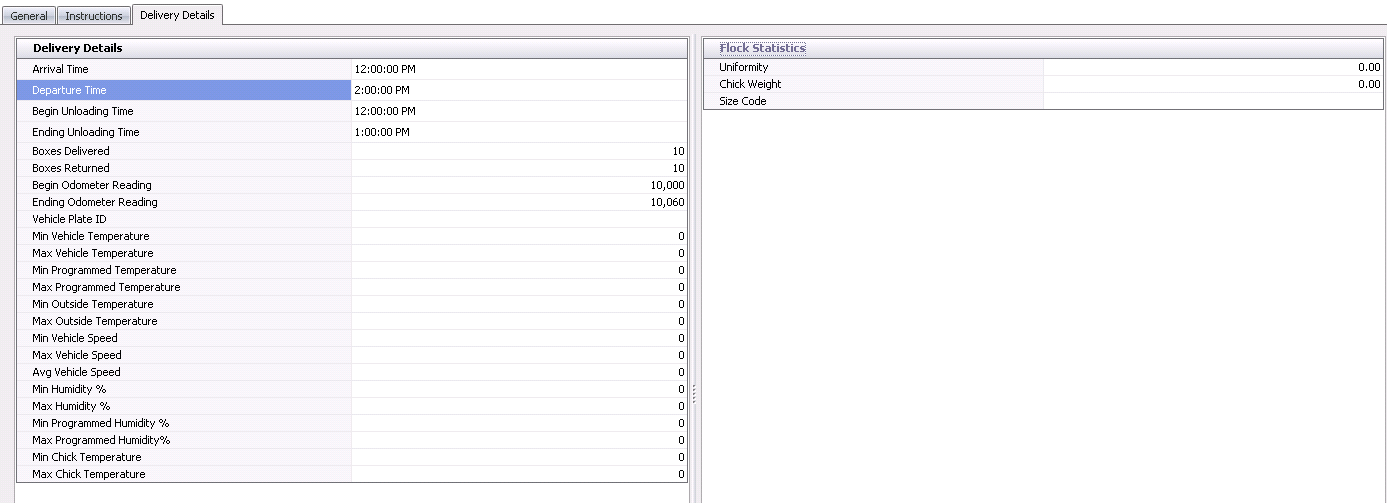
Delivery
Details
- In the Arrival
Time field, enter the time that the delivery truck will arrive.
- In the Departure
field, enter the time that the delivery truck will depart.
- Begin Unloading
Time indicates the time that the chicks will begin unloading.
- Ending Unloading
Time indicates the time that the unloading will end.
- Boxes Delivered
indicates the amount of boxes unloaded at the destination.
- Boxes Returned
indicates the amount of boxes returned to the hatchery farm when chicks
are shipped to the customer in plastic boxes. This number will generally
be the same as the 'Boxes Delivered' number.
- Begin Odometer
Reading indicates the odometer reading when the truck
- Ending Odometer
Reading indicates the odometer reading when the truck
- Enter the Vehicle
Plate ID.
- The Min Vehicle
Temperature/Max Vehicle Temperature fields indicate the minimum
and maximum temperatures allowed inside the vehicle.
- The Min Programmed
Temperature/Max Programmed Temperature fields refer to the
programmed minimum and maximum programmed temperatures inside the
vehicle.
- The Min Outside
Temperature/Max Outside Temperature fields indicate the minimum
and maximum outdoor temperatures allowed.
- The Min Vehicle
Speed/Max Vehicle Speed fields indicate the minimum and maximum
speeds of the delivery vehicle.
- Avg Vehicle Speed
refers to the average speed of the delivery vehicle.
- The Min Humidity
%/Max Humidity % fields indicate the minimum and maximum humidity
levels allowed inside the vehicle.
- The Min Programmed
Humidity %/Max Programmed Humidity % fields indicate the minimum
and maximum programmed humidity levels allowed inside the vehicle.
- Min Chick Temperature/Max
Chick Temperature indicate the allowed minimum and maximum
temperatures of the chicks being placed.
Flock
Statistics
- Uniformity
represents the weight uniformity of the chicks.
- Chick Weight
indicates the average weight of the chicks placed. Weight can be entered
in lbs or grams.
- Size Code
is used to enter the applicable size code of the chicks being placed.
There is no validation on the data entered in this field.
Post
a Breeder Placement
Once the breeder placement transaction has been created and saved, the
placement needs to be posted. The posting process locks the transaction
to prevent edits, updates the entity and hatchery inventories, and creates
the journal transaction to record the liability. The UnPost option unlocks
the placement and reverses the journal transactions.
- In the Breeder Placements main index, select the
required transaction and right-click to select 'Post'. Alternatively,
click the green check mark
 in the top menu bar and select 'Post'.
- To un-post a placement transaction, select the
required transaction and right-click to select 'Unpost'. This
process will set the transaction status to 'Reversed' status, which
allows the transaction to be edited.
Journal Transaction
If there is an internal price associated
with the transaction, there will be a journal transaction recorded to
debit the entity chick inventory and credit the hatchery chick inventory
for the internal price. The period end process will reverse this transaction
and record the actual cost of the transaction based on the period costs.