farm receivings

The Egg Room Farm Receiving transaction records the egg being received
from the entity and recorded in inventory at the egg room on the farm.
The Egg Room Mode switch must be selected before creating an egg room
farm receiving transaction. The switch is located in: Admin>System>Registry>Poultry>PMTS>Broiler
Breeder>Period End>BIM Farm Egg Room Mode.
Note: When using the list index,
a filter must be applied before sorting the data. There is an option to
save the filters for future use. The following fields cannot be
used to filter data:
- Complex
Entity No - a combination of the fields Farm No, Entity
No, House No and Pen No can be used to locate the data.
Before creating a Farm Receiving transaction, the following must be
created:
The following procedures are outlined in the Farm Receiving document:
Create a Farm Receiving Transaction
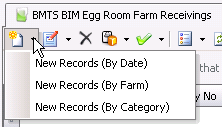
There are three options when creating a Farm Receiving transaction.
- New Records
(By Date): Creates the transaction based on the date entered.
- New Records
(By Farm): Creates the transaction based on the farm as well
as the date selected.
- New Records
(By Category) Creates the transaction based on the egg category
selected. *Note: This option
is only available in version 7.26 and up.
- In BMTS>BIM>Transactions>Egg
Room, select Farm Receivings.
- In the Egg Room
Farm Receivings main index,
click
 and select 'New Records (By Farm)'.
- In the New Record dialog box, from Farm
No, select the required farm.
- Enter the Date
of the transaction and then click 'OK'.
- In the Farm Receivings screen, click
 to add a new receiving
line. This automatically defaults to a Receiving transaction. Other
options in the
  drop-down menu are:
- Debit
Adjustment (To Flock) - Debit adjusts the quantity to the
entity only, but does not affect egg inventory.
- Credit
Adjustment (To Flock) - Credit adjusts the quantity to
the entity only, but does not affect egg inventory.
- Negative
Variance Adjustment (To Inventory) - Credit adjusts the
egg inventory.
- Positive
Variance Adjustment (To Inventory) - Debit adjusts the
egg inventory.
- Beginning
Inventory Entity - Enters beginning inventory balances,
and is only used at startup for the hatchery.

- WOL displays
the number of weeks in lay that the entity produced eggs.
- Egg Trans Code
indicates the type of egg transaction, and will default to 'Received'
when a new receiving transaction is recorded.
- In the Tracking
No field, enter a unique reference number to identify the group
of eggs in the receiving transaction. Tracking No is a required field.
- From the Complex
Entity No drop-down menu, select the entity that produced the
eggs.
- Farm Name
will default in from Complex Entity No and displays the name of the
farm that produced the eggs.
- From Product
No, select the egg product that will be received/transferred.
- Product Name
will default from Product No and displays a description of the product.
- Breed No
is a derived field based on the selected entity, and is used to identify
the breed code of the eggs.
- Breed Name
displays a description of the breed code.
- Generation is
a derived field based on the selected entity, and is used to identify
the generation of the eggs.
- Production Date
indicates the date that the eggs were produced, to determine egg age.
- Received Date
indicates the date the eggs were received at the hatchery.
Egg Age
is a derived field based on the received date less the production
date.
Flock Age
is a derived field based on the selected entity and the production
date.
Enter the number of Units
being received/transferred.
Eggs
is a calculated field based on the number of units received and the
eggs per unit received.
Units Per
is a derived field that defines the number of eggs per unit received.
Enter the total Price
for the eggs being received.
Outside Temperature
is used to enter the recorded external temperature of the farm. Outside
Temperature can be entered in either oF or oC.
Vehicle Temperature
is used to record the trailer temperature and can be entered in either
oF or oC.
Unit Price
is an automatically calculated field that displays the per unit price
of the eggs. Unit Price = Price/Units
Ref No
is an optional field to enter a unique reference number to identify
the transaction. This can either be entered manually or automatically-generated.
Load No
is an optional field to enter the load number of the delivery.

In the Egg
Weight field, enter the weight per egg, or a single average
weight of all the eggs being received.
Uniformity
M is an optional field to enter the consistency of the weight
of the male birds.
Egg CV Uniformity
is an optional field to enter the coefficient
variable for the weight samples. A CV uniformity column is available
for each sex.
From Vehicle
No, select the vehicle that will be used to transport the eggs.
Vehicles must be set up prior to use in: Admin>Business>General>Definitions>Vehicles.
Vehicle Name
will default from Vehicle No and displays a description of the vehicle.
From Driver
No, select the driver who will be transporting the eggs. Drivers
must be set up prior to use in: Admin>Business>General>Definitions>Drivers.
Driver Name
will default from Driver No and displays the name of the driver.
- From Buggy No,
select the buggy used if the eggs are loaded directly onto a buggy.
- Buggy Name
will default from Buggy No and displays the name of the buggy, if
applicable.
- Base Hatch
defines the hatchability of the eggs, and will default from the standard
table assigned to the entity.
- Projected Hatch
adjusts the based hatch percent on the egg age if an egg age decline
table is used as well as recent hatch transactions.
- Projected Chicks
is a calculated field based on the eggs being received multiplied
by the projected hatch percentage.
- In the Notes
field, enter any additional information relating to the farm receiving
transaction.
- Sales SKU No
identifies the sales SKU number of the product, if applicable.
- Sales SKU Name
displays the sales SKU name.
- Package No
displays the package number, if the product was packaged.
- Select the Final
Egg Pickup flag if this is the last or final egg pickup of
the entity. If the flag is selected, no more eggs will be received
from that entity.
- Selecting the Void
flag will cancel the receiving transaction.
Additional Options to
Add a Record
An Egg Receiving new record can also be added in two additional ways
instead of By Farm:

By Date
- In the Egg Room
Farm Receivings main index,
click
 and select 'New Records (By Date)'.
- In the Date dialog box, enter the Date
of the record and then click the OK button.
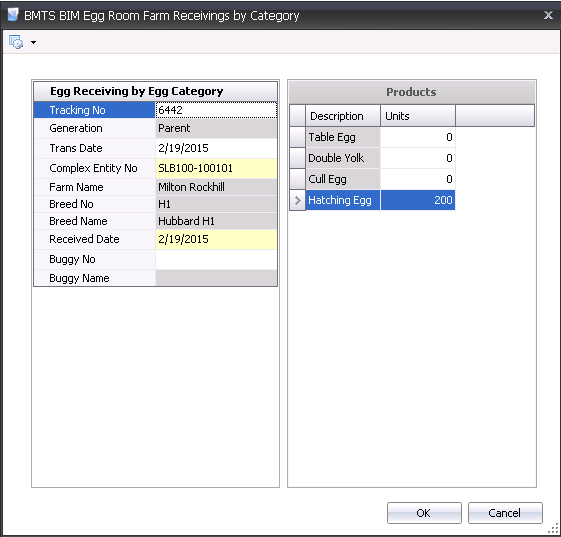
By Category
The By Category option is only available in version 7.26 and up.
- In the Egg Room
Farm Receivings main index,
click
 and select 'New Records (By Category)'. This
will open the dialog box to enter additional information.

- In the Egg Receiving by Egg Category section,
enter a unique Tracking No
to identify the record.
- Select the Complex
Entity No from where the egg will be received.
- In the Received
Date field, enter the date the eggs will be received.
- Optionally, the Buggy
No can be selected.
- In the Products section, select the required egg
product and enter the number of Units
required.
- Click the OK button and the main Farm Receiving
transaction screen will appear.
Post a Farm Receiving
Transaction
Once the farm receiving transaction is saved and closed, the transaction
can be posted. The posting process locks the transaction to prevent edits,
and will add the product to egg room inventory and pass the statistical
data back to the entity. Journals will be created if there is an internal
price set up for the product. This amount will be reversed at period end
when the actual amount is calculated. If there is no internal price, there
are no journals.
- In the Farm Receivings main index, select the
required transaction, rick-click and select 'Post.' Alternatively,
click the green check mark
 in the top menu bar and select 'Post'.
- To un-post a farm receiving transaction, select
the required transaction and right-click to select 'Unpost'. This
process will set the transaction status to 'Reversed' status, which
allows the transaction to be edited.
Journal Transaction
The posting process creates the journal transaction if there is an internal
price set up for the product. In these cases, the journal transaction
is created to debit the egg room inventory of the hatchery and credit
the breeder that transferred out the farm eggs.

![]()
 and select 'New Records (By Farm)'.
 to add a new receiving
line. This automatically defaults to a Receiving transaction. Other
options in the
  drop-down menu are:


 and select 'New Records (By Date)'.
 and select 'New Records (By Category)'. This
will open the dialog box to enter additional information.
 in the top menu bar and select 'Post'.