Chicks Hatched

Chicks Hatched is used once the eggs have hatched, to record the number
of baby chicks hatched from eggs that were set. Dates will guide this
flow. Based on the registry set-up, the chicks hatched transaction can
be manually created or system created. The registry switches are located
in the Hatcheries tab in: Admin>System>Registry>Poultry
Registry. Under Hatcheries>Him, select 'Hatch' and change
the Hatch Transfer Mode for the
required hatchery to 'Manual'. Then select 'Setter Transfer' and change
the Setter Transfer Mode for the
required hatchery, to 'Manual'.
Before creating a Chicks Hatched transaction, the following must be
created:
The following procedures are outlined in the Chicks Hatched document:
Create
a Chicks Hatched Transaction
Line
Details
- In LMTS>HIM>Transactions>Chicks,
select Chicks Hatched.
- In the Chicks
Hatched main index, click
 to add a new
hatched transaction.
to add a new
hatched transaction.
- In the New Record dialog box, from Hatchery
No, select the required hatchery.
- In the Trans
Date field, enter
the date that the eggs hatched and then click 'OK'.
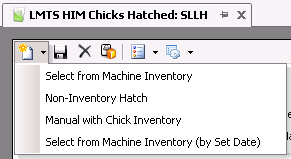
- If the registry switches are set to Manual, the
lines will need to be added manually. In the Chicks Hatched screen,
click to add a new hatch line. This automatically
defaults to a Machine Inventory transaction. Available options in
the drop-down menu are:
- Select
from Machine Inventory - the transaction is created
by selecting from the setter machine inventory.
- Non-Inventory Hatch - the
entity is created first, then a Chicks Hatched transaction
is created manually, allowing the user to key the data.
- Manual
with Chick Inventory - the transaction is validated
against inventory.
- Select
from Machine Inventory (by Set Date) - the transaction
is created by selecting from the setter machine inventory
based on hatch data or trans date.
- The Egg Room Inventory box will display all current
inventory for the selected hatchery.
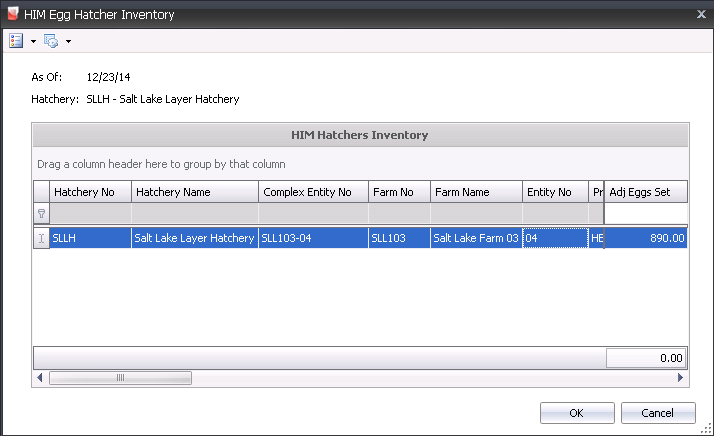
- In the Egg Hatcher Inventory dialog box, select
the required hatcher product, and in the Adj
Eggs Set, enter the number of eggs still in the machines after
adjustments (Example: rejects, destroyed, etc.) Click 'OK'.
- The details in the Chicks Hatched details screen
will default in.

- Record Type
indicates the type of record being created and will default to 'Setter
Transfer'. If the Non-Inventory Hatch transaction type is selected,
'Non-Inventory' will be displayed in this field.
- Complex Entity
No indicates the entity number for the eggs that were hatched.
- Farm Name
will default in from Complex Entity No and displays the name of the
farm that produced the eggs.
- Breed No
is a derived field based on the selected entity, and is used to identify
the breed of the chicks.
- Breed Name
displays a description of the breed type.
- Progeny Breed
No identifies the parent breed of the chicks.
- Progeny Breed
Name displays a description of the parent breed.
- Tracking No
indicates the tracking number that the eggs were received on.
- Egg Product No indicates the
egg product that was received and is being hatched.
- Egg Product Name
displays the name of the egg product.
- Hatcher No
identifies the hatcher that the eggs were transferred to.
- Hatcher Name
displays the name of the hatcher.
- Buggy No
identifies the buggy used, if the eggs were loaded directly onto a
buggy.
- Buggy Name
displays the name of the buggy used, if applicable.
- Setter No
identifies the setter on which the selected eggs were placed.
- Setter Name
displays the name of the setter used.
- Transfer Date
displays the date that the eggs were transferred from the setter
to the hatcher.
- Production Date
indicates the date that the eggs were produced, to determine egg age.
- Received Date
displays the date the eggs were received at the hatchery.

- Adjusted Eggs
Set displays the number of eggs still in the machines after
adjustments (such as rejects, destroyed, etc.).
- Eggs Set
displays the number of eggs that were set for hatch.
Hatchable
Eggs Set displays the number of eggs set that were hatchable.
Total Chicks
Hatched is used when the switch is selected in the registry.
If enabled, logic will take the total number of chicks hatched and
subtract all other categories to then calculate the total number of
Sexor Culls. The registry switch is located in: Admin>System>Registry>Poultry
Registry. Under Him, select 'Hatch' and select the 'Chicks
Hatched Total Chicks Mode' box.
- x Time
is an optional field to enter the time the chicks hatched.
- Egg Age
is a derived field based on the received date less the production
date.
Flock Age
is a derived field based on the selected entity and the production
date.
WOL
displays the number of weeks in lay that the entity produced eggs.
Base Hatch
indicates the estimated hatch at the time the eggs were received.
If the entity had a standard table associated with the entity, the
base hatch will be established from the standard table based on the
age of the entity at receipt.
- Projected Hatch
adjusts the based hatch percent on the egg age if an egg age decline
table is used as well as recent hatch transactions.
- Projected Chicks
is a calculated field for the estimated number of chicks, based on
the eggs being received multiplied by the projected hatch.
- In the Female
Weight field, enter the weight per chick, or a single average
weight of all the female chicks.
- In the Male Weight
field, enter the weight per chick, or a single average weight of all
the male chicks.
- In the Straight
Run Weight field, enter the weight per chick, or a single average
weight of all the straight run chicks.
- Hatchability
% is a calculated field that displays the hatchability for
the hatch transaction for the entity.
Salability
% is a calculated field that displays the percentage of saleable
chicks for the entity.
Cull %
is a calculated field that displays the percentage of cull chicks
for the entity.
Selecting the Void
flag will cancel the transaction and exclude the transaction from
the entity data.
The Consignment
flag will be selected if the eggs were purchased using a Consignment
Purchase Order and received for custom hatch.

- In Graded
SR field, enter the number of straight run, un-sexed
chicks. *Note: The Graded
SR field is for use with GP and higher and represents unneeded saleable
product that is by product for accounting purposes.
- In the Saleable
Males field, enter the number of male chicks that are
saleable.
- In the Cull
Males field, enter the number of males from the hatch that
were culled.
- In the Saleable
Females field, enter the number of female chicks that
are saleable.
- In the Sexor
Culls field, enter the number of birds that were culled at
the sexing stage.
- In the Saleable
SR field, enter the number of straight run, un-sexed chicks.
*Note: Saleable SR should
only be used with Parents as it is a broiler product; not any
higher generations.
- If the chicks are a primarily female line, in
the By Product Males field,
enter the number of off-sex males.
- If the chicks are a primarily male line, in the
By Product Females field,
enter the number of off-sex females.
- In the Cull
Females field, enter the number of females from the hatch that
were culled.
Chicks Hatched
Graph
The graph section displays the percentages for chick hatchability, saleability,
and culls, according to numbers entered in the Details section.

Post
a Chicks Hatched Transaction
Once the chicks hatched transaction is saved and closed, the transaction
can be posted. The posting process locks the transaction to prevent edits,
posts the statistical data back to the entity, and creates a chick inventory
- In the Chicks Hatched main index, select the required
transaction, rick-click and select 'Post.' Alternatively, click the
green check mark
 in the
top menu bar and select 'Post Record(s).'
in the
top menu bar and select 'Post Record(s).'
- To un-post a chicks hatched transaction, select
the required transaction and right-click to select 'UnPost'. This
process will set the transaction status to 'Reversed' status, which
allows the transaction to be edited.