![]()
The following document outlines the installation procedures for v7 implementations. There are several sections related to the installation procedures.
Physical or Virtual Servers can be utilized as long as the general hardware guidelines are adhered to. Note that MTech recommends that 64-bit operating systems be used where possible.
The Application Server hosts the shared services - locking, caching, web services, multi-language, optimizer, and long running batch processes (reports, projections, period end tasks, etc). The application server role can be combined w/ the Citrix/Terminal Server role.
The application requires .NET 4.0 framework.
1-5 Users 6-25 Users 25-50 Users 50+ Users
APPLICATION/TERMINAL SERVER:*
CPU: 2.0Ghz Dual Core 2.5Ghz Dual Core 2.5Ghz Quad 2x2.5Ghz Quad
RAM: 4GB 8GB 16GB 32GB
DISK: SATA SATA SATA/SCSI SATA/SCSI
DATABASE SERVER:
CPU: 2.0Ghz Dual Core 2.5Ghz Dual Core 2.5Ghz Quad 2x2.5Ghz Quad
RAM: 4GB 8GB 16GB 32GB+
DISK: SATA SATA/SCSI RAID SCSI RAID SCSI RAID
BI SERVER:
CPU: 2.0Ghz Dual Core 2.5Ghz Dual Core 2.5Ghz Quad 2x2.5Ghz Quad
RAM: 4GB 8GB 16GB 32GB+
DISK: SATA SATA/SCSI RAID SCSI RAID SCSI RAID
WAN BANDWIDTH PER TERMINAL/CITRIX SERVER / CLIENT - approximately 8-12 KBps / user over dedicated digital line (ISDN, DSL, T1, T3, etc)
Install the Locking Service by running LockingSetup.msi. The following will occur during installation:
Locking Service will install into a separate folder
The Locking Service will act as a separate Windows Service.
The service should be configured to run under the NETWORK SERVICE account and should remain unchanged.
Open the LockingWindowsServiceexe.config from the install folder in the step above. Note the port number.

Install the Record Cache Service by running RecordCacheSetup.msi. The following will occur during installation:
Record Cache Service will install into a separate folder
The Record Cache Service will act as a separate Windows Service.
The service should be configured to run under the NETWORK SERVICE account and should remain unchanged.
Open the RecordCacheWindowsServiceexe.config from the install folder in the step above. Note the port number.

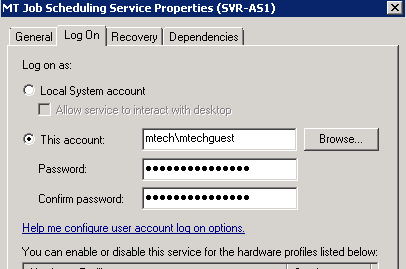
Configure the MT Job Scheduling Service to run under a USER that has permissions to write and read from the export and import folders. This can be done by clicking on the Log On tab under the service properties and configuring the account via the ‘This account’ field (screenshot below). A domain service account may be created for this purpose.
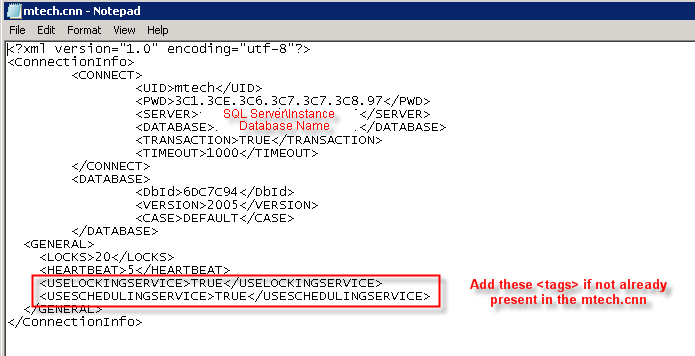
Edit the MTechSystems.JobScheduler.Service.exe.config file in the installation folder of the MT Job Scheduling service (Step 1) as follows. Edit the datasource.default.connectionstring value to match the values found in the mtech.cnn.

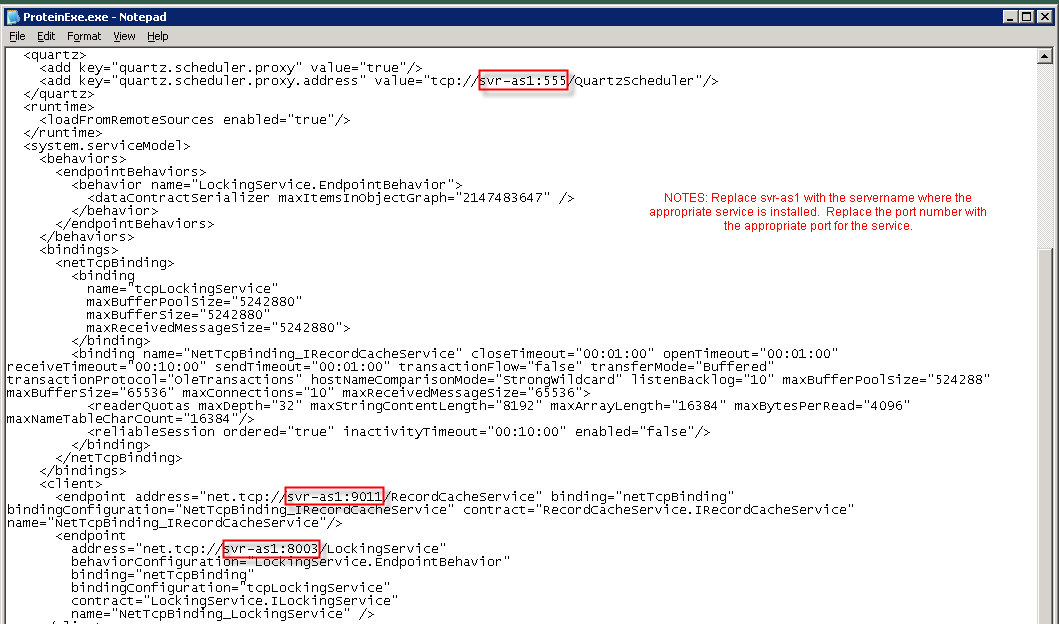
Edit the Proteinexe.exe.config to reflect the server:port specified from the MTechSystems.JobScheduler.Service.exe.config from Step 9.

Ensure that the Protein folder and subfolders have read/write/modify permissions for all users that intend to use the program.
Edit the proteinexe.exe.config.
Set the data path of the application if installing a version 7.15 or later.

Replace svr-as1 with the servername where the appropriate service is installed. Replace the port number with the appropriate port for the service.
Ensure that the Protein folder and subfolders have read/write/modify permissions for all users that intend to use the program.
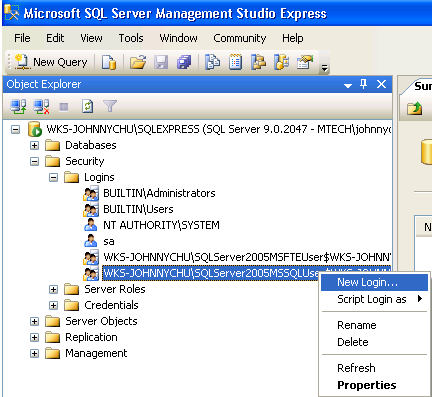
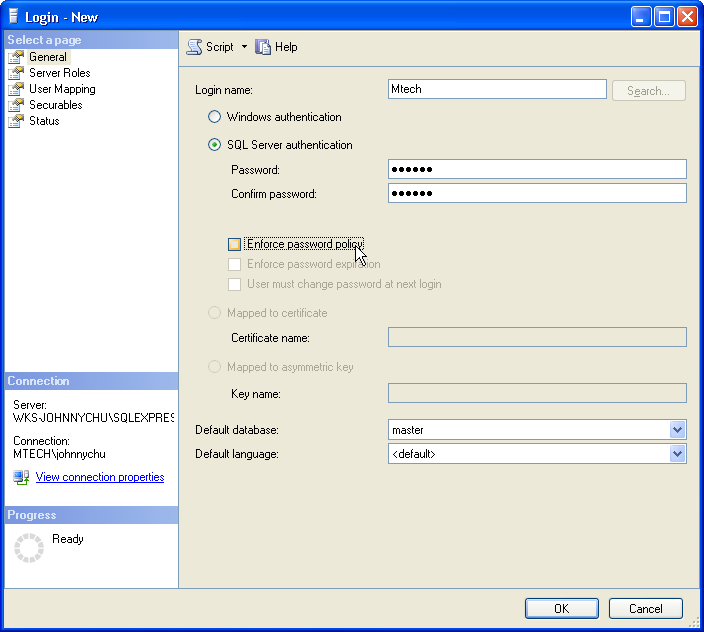
In the Login screen, enter the following:
Login Name: mtech
Select SQL Server Authentication
Enter password: coffee (Please contact techsupport@mtech-systems.com if a different password is required.
Uncheck Enforce password policy
Click OK
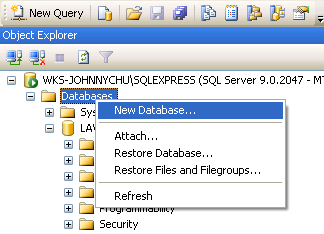
Create new database by selecting Databases
Right-click and select 'New Database'
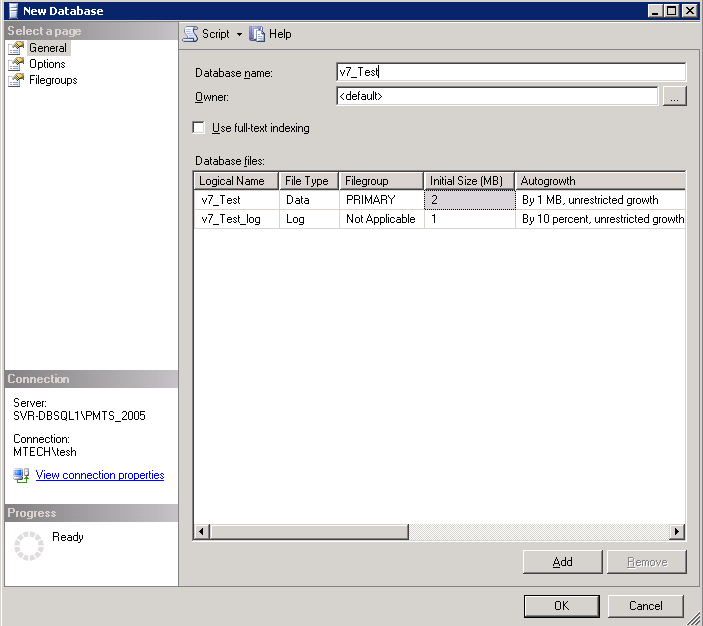
Enter Database name: V7_Test
Click OK
Click on Security > Logins
Double-click on the SQL login ‘MTech’
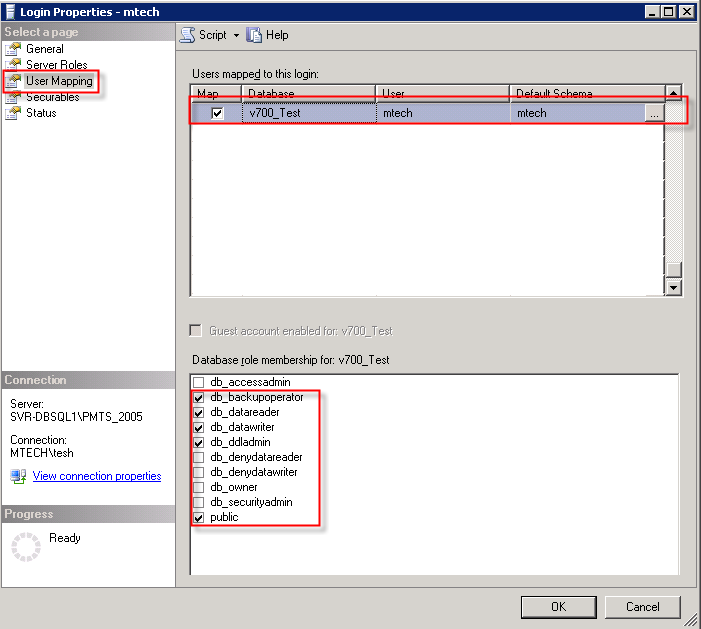
Click User Mapping on the left
Select the Database that is to be mapped – V7_Test in this example.
Select db_backupoperator
Select db_datareader
Select db_datawriter
Select db_ddladmin
Select public
Click OK
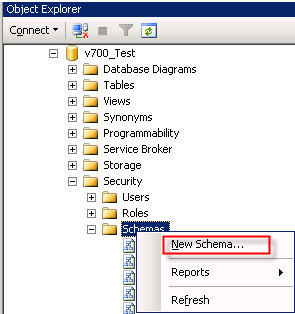
Go to Databases> V7_Test > Security > Schemas
Right-click and select New Schema
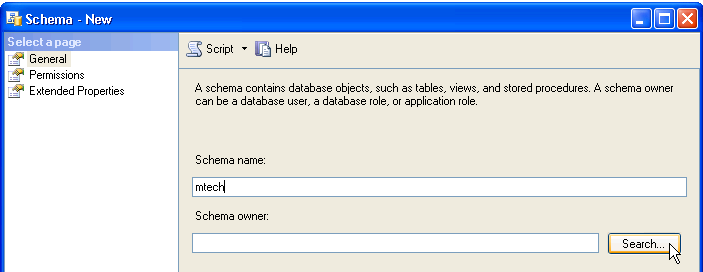
Enter the Schema name “mtech”
Click 'Search'
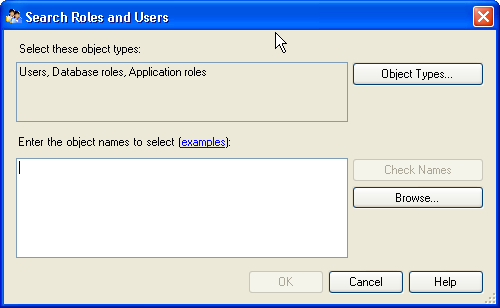
Click 'Browse'
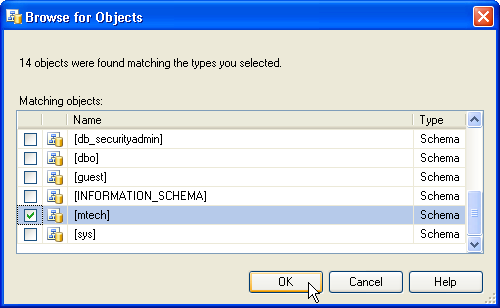
Choose the login 'mtech'
Click OK
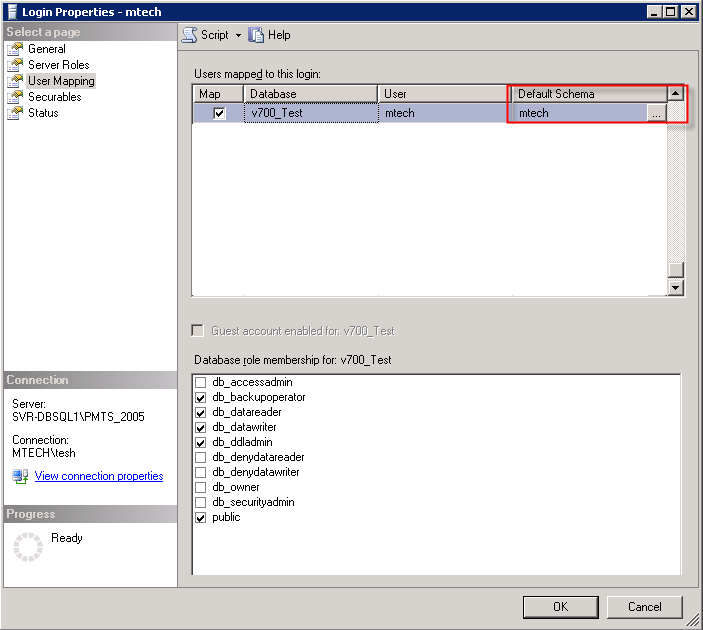
Go to Security>Logins>mtech
Click User Mapping on left
Click 'Default Schema'
Click 'Browse'
Select mtech schema
Click OK
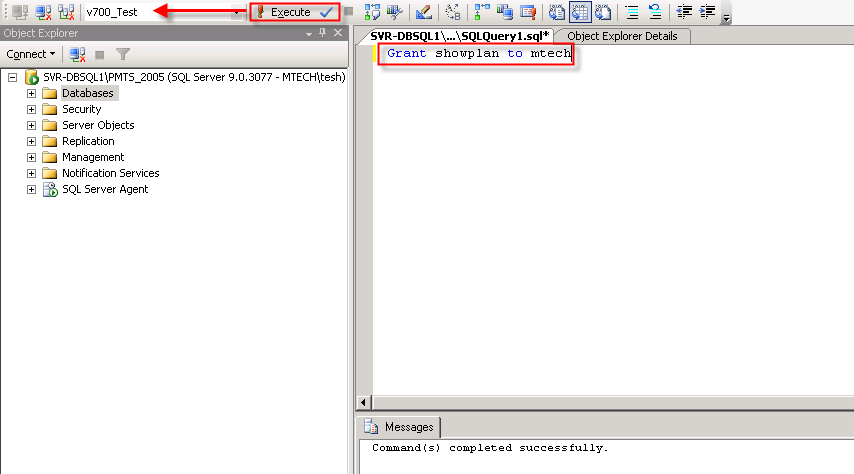
Select v700_Test database
Run the query 'Grant showplan to mtech'
This section contain instructions for the following:
Click Start
Click Run
Type dcomcnfg to launch the Component Service Management console
Click to expand Component Services
Click to expand Computers
Right-click My Computer
Select Properties
Click MSDTC tab on My Computer Properties dialog
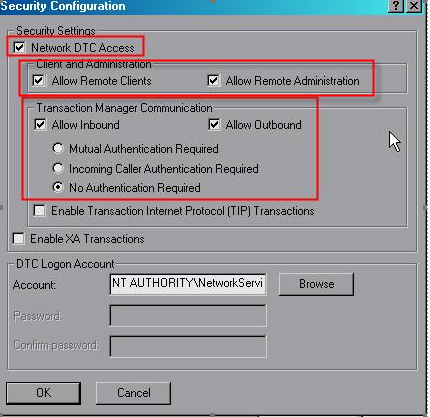
Select Security Configuration option to display Security Configuration dialog

Check the Network DTC Access option and the other options identified in the screen shot
Click OK to restart the MSDTC service
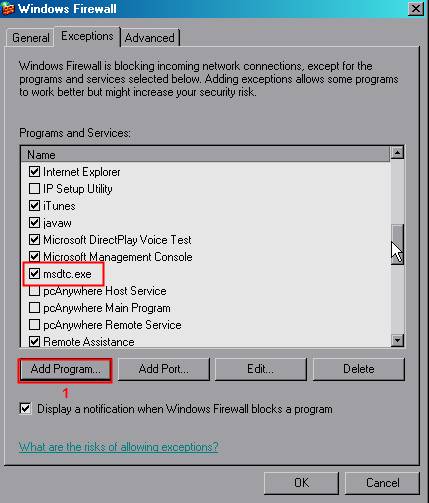
Windows Firewall should be enabled to allow access to MSDTC.exe
Select Control Panel>Windows Firewall>Exceptions
Click Add Program>Browse
Navigate to \Windows\System32
Select MSDTC.exe
Click Start
Click Run
Type dcomcnfg then click OK to open Component Services
In the console tree, click to expand Component Services
Click to expand Computers
Click to expand My Computer
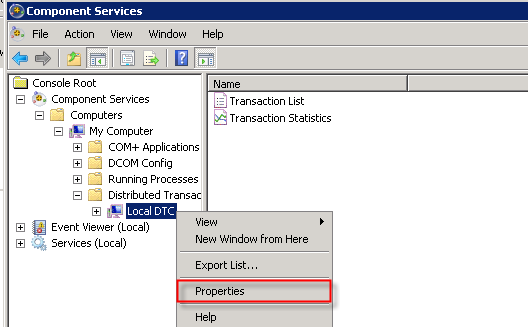
Click to expand Distributed Transaction Coordinator
Click local DTC
Right-click local DTC and select Properties to display Local DTC Properties dialog
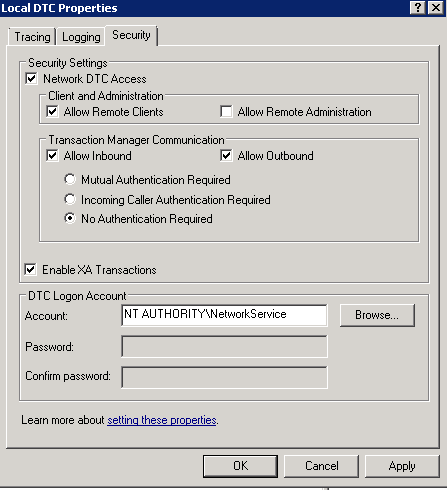
Select Security tab
Set the following options on the Security tab
Click OK
Distributed Transaction coordinator errors may be encountered in the form of errors such as the following. Visit http://msdn.microsoft.com/en-us/library/aa561924.aspx for tips on how to resolve issues with MSDTC.
"A Microsoft Distributed Transaction Coordinator problem prevented connection to the Configuration database. The transaction manager has disabled its support for remote/network transactions."
"A Microsoft Distributed Transaction Coordinator problem prevented connection to the Configuration database. The transaction has already been implicitly or explicitly committed or aborted".
"Error Code: 0x8004d00a, New transaction cannot enlist in the specified transaction coordinator".
"Could not retrieve transport type data for Receive Location 'MySample ReceiveLocation' from config store. Primary SSO Server 'MyServer' failed. The RPC server is unavailable".
"Error Code: 0x8004d025, The partner transaction manager has disabled its support for remote/network transactions".
"Error Code: 0xc0002a24, Could not import a DTC transaction. Please check that MSDTC is configured correctly for remote operation".