The purpose of this document is to outline the basic items required to setup to configure and generate LHS schedules.
In BMTS>BRPA>Master Data, select Profiles.
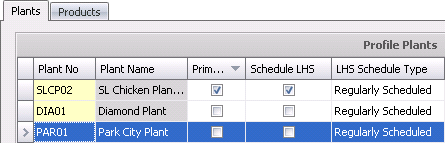
Assign to the profile the plants that are to be scheduled by selecting Schedule LHS.
Assign the LHS Schedule Type. Options will be as follows:
Catch Crews Only - LHS will only schedule catch crews.
Drivers/Vehicles Only - LHS will only schedule drivers and vehicles.
No Resources - LHS will not schedule any resources, only pickups.
Regularly Scheduled - LHS will schedule catch crews, drivers and vehicles.
In Admin>Business>General>Definitions>Facilities, select Plants.
Enter the following data for each plant that is to be scheduled.
Yard Capacity
Latitude
Longitude
First Truck Arrival Time
Last Truck Arrival Time
Distance per Driver
For each plant that is to be scheduled, select the child grid and select Plant Line tab.
Click  to add
a new plant line.
to add
a new plant line.
Define the following fields:
Min Truck Inventory
Min Start Truck Inventory
Click on the child grid for the selected plant line and select Plant Line Detail.
Click to add
a new plant detail line and define the following:
Product No
Process Order
Min Wt.
Max Wt.
Birds Per Hour
Min Birds Per Hour
Start Time for Day
Hours of Operation for Each Day
Click on the child grid for the selected plant line and select Down Times.
Click to add
a new down time parameter and define the following:
Plant Down Time No
Weekday
Start Time
End Time
In Admin>Business>General>Definitions, select Vehicle Types.
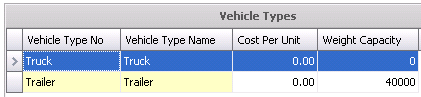
Add the Vehicle Types used by each plant and assign the Weight Capacity.
In Admin>Business>General>Definitions, select Vehicles.
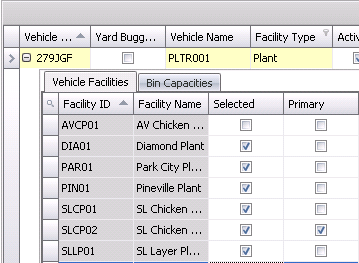
For each vehicle, set the Facility Type to “Plant”`.
Assign the Vehicle Type.
Set “Trailer” to true for all trailers by selecting the flag.
Click the
child grid  and in the Vehicle Facilities
tab, select the Facility ID
(s) that each vehicle can be utilized at.
and in the Vehicle Facilities
tab, select the Facility ID
(s) that each vehicle can be utilized at.
Select the Primary facility.
In Admin>Business>General>Definitions, select Drivers.
For each driver, set the Facility Type to “Live Haul”.
Set the Latitude and Longitude for each driver. This is the starting location of the driver; if they start from the plant, then set these to the same as the plant.
Click the
child grid and in the Driver Facilities
tab, select the Facility
No (s) that each driver
can be utilized at.
Select the Primary facility.
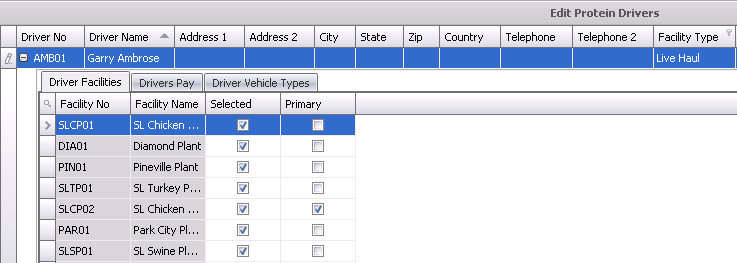
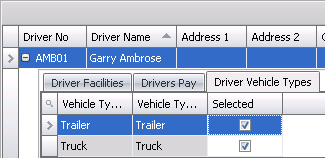
In the Driver Vehicle Types tab, select the Vehicle Type No that each driver can utilize.
In Admin>Business>General>Definitions, select Live Haul Crews.
Set the Latitude and Longitude for each crew. This is the starting location of the crew; if they start from the plant then set these to the same as the plant.
Click the
child grid and in the Drivers tab,
select the Driver (s) for the Live Haul Crew.

Select the Plants tab, select the Plant (s) that each crew can be utilized at.
Select the Primary Plant in the Plant tab.

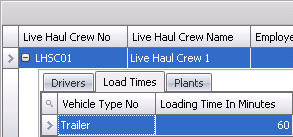
In the Load Times tab, add each Vehicle Type No.
Assign the Loading Time In Minutes.
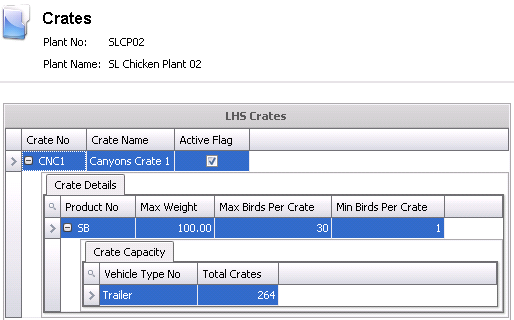
In Admin>Business>Poultry>LHS, select Crates.
From Crate No, for each plant, add the crate (s) used.
Ensure that the Active flag is selected.
Click the
child grid and in the Crate Details tab,
select the Product
No (s) to add the product
group to each crate.
Enter the Max Weight of the crate.
Enter the Max Birds Per Crate.
Enter the Min Birds Per Crate.
Click the
child grid to open the Crate Capacity tab,
and add the Vehicle
Type to each product group.
Enter the total number of crates in the Total Crates field.
To assign Live Haul Crews, Drivers or Vehicles to specific Farms, follow the steps below. Farm areas should be added for each group of resources to be utilized. If this is not required, proceed to Crew Schedules.
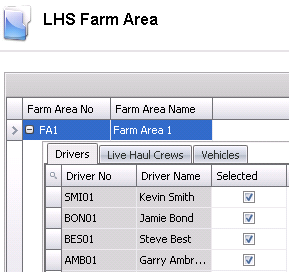
In Admin>Business>Poultry>LHS, select Farm Area.
Click  to
a Farm Area No.
to
a Farm Area No.
Enter the Farm Area Name to describe the farm area.
Click the
child grid and in the Drivers tab, assign
a Driver
No to each farm area.
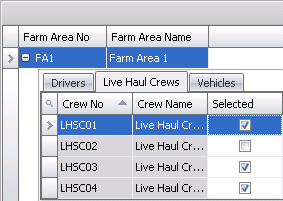
Select Live Haul Crews tab, assign a Crew No to each farm area.
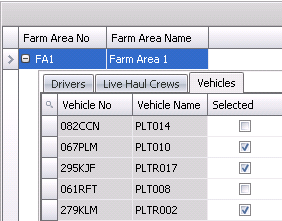
Select Vehicles tab, assign a Vehicle No to each Farm Area.
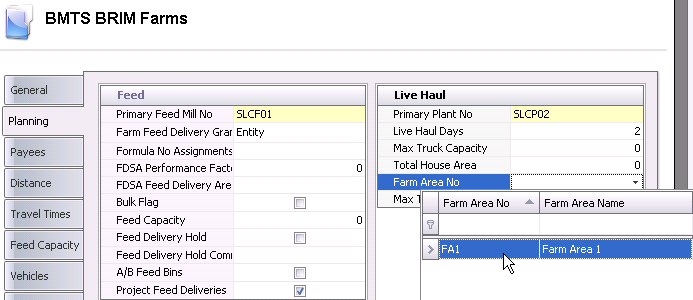
In BMTS>BRIM>Master Data, select Farms.
Edit each
farm by clicking the Edit  button.
Assign the Farm Area No in Planning>Live Haul.
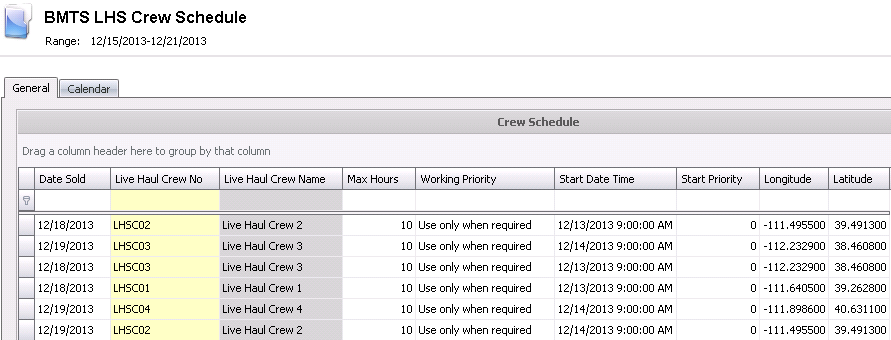
In BMTS>LHS>Planning, select Crew Schedules.
For each Date Sold, add the crews that will be available.
Assign the Working Priority.
Enter the Start Date Time.
Add the Start Priority, the order in which crews will be utilized.
Enter the Max Hours for each crew.
Latitude and Longitude will auto-populate from the Live Haul Crews section.
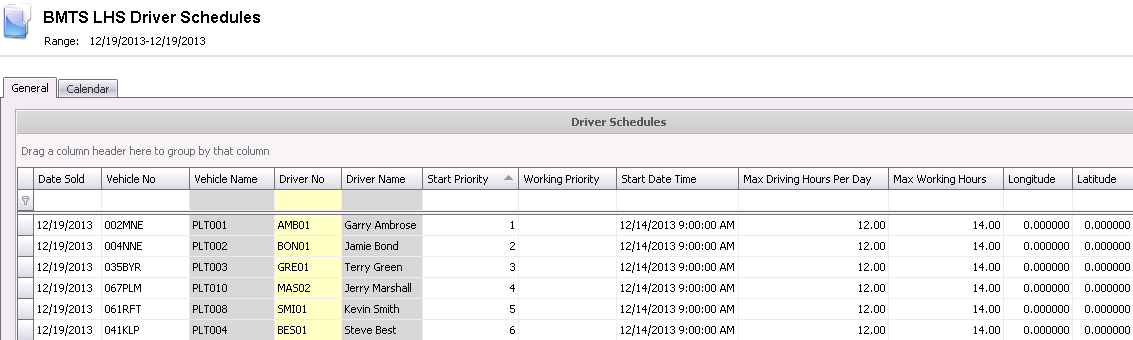
In BMTS>LHS>Planning, select Driver Schedules.
For each Date Sold, add the drivers that will be available.
Assign the Vehicle No if the driver always drives the same vehicle.
Assign the Working Priority.
Enter the Start Date Time.
Add the Start Priority, the order in which drivers will be utilized.
Add the Max Driving Hours Per Day for each driver.
Add the Max Working Hours for each driver.
Latitude and Longitude will auto-populate from the Drivers section.