![]()
Warehouse facility transfers are used when moving inventory from a warehouse to a facility, farm or entity. When a product is purchased into warehouse inventory, it stays there until it is required to be used. Transferring the product out to any facility, farm or entity will credit the warehouse inventory and debit the inventory on the receiving facility, farm or entity. The process will create a transfer out transaction that must be transferred in to the destination facility. There is a registry switch in Product Type that allows the receiving transaction to be automatically created rather than manually having to create the receiving transaction.
The following procedures are outlined in the Facility Transfer document:
The first stage in the process is to create the transfer out from the source to the destination facility.
The first step in the facility transfer process is to create the transfer-out facility transfer. The transfer header in this transfer record contains the base data to outline the facility transfer. The header is divided into three sections to group the data. The information in the Amounts tab is optional, and the fields in the Derived tab default in.
 to create a new facility transfer transaction.
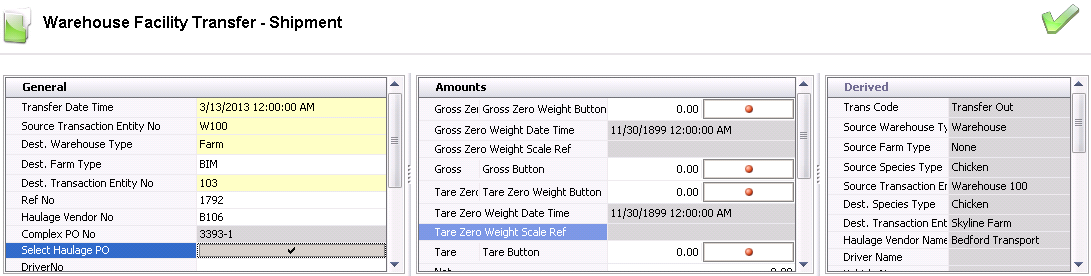
The fields in the Amounts tab are optional and only populated if the weigh scale is used in the facility transfer transaction.
Gross Zero Weight Date Time indicates the date and time that the gross zero weight was recorded.
Gross Zero Weight Scale Ref is a reference number generated from the scale for the gross zero weight.
Gross Button is the total weight of the vehicle and the product. The button is used if there are scales integrated to the receiving process. This field can be manually entered or interfaced from a scale.
Tare Zero/Tare Zero Weight Button is used if a tare zero weight is required.
Tare Zero Weight Date Time displays the date and time that the tare zero weight was recorded at the scale.
Tare Zero Weight Scale Ref is a reference number generated from the scale for the tare zero weight.
Tare/Tare Button is the tare weight of the vehicle. This field can be manually entered or interfaced from a scale.
Net is the difference between gross and tare. This field can be manually entered or, if weights are entered, it is calculated automatically.
Scale No is an optional field to enter the scale on which the truck was weighed. Select the scale from the drop-down menu, if desired. Scales are defined in: Admin>Business>General>Definitions>Weight Scales.
Gross Weight Date Time displays the date and time that the gross weight was recorded at the scale.
Gross Weight Scale Ref displays the reference number for the gross weight scale reading.
Tare Weight Date Time displays the date and time that the tare weight was recorded at the scale.
Tare Weight Scale Ref displays the reference number for the tare weight scale reading.
Gross Auto Manual determines if the gross scale readings are Auto or Manual.
Tare Auto Manual determines if the tare scale readings are Auto or Manual.
The fields in the Derived tab are automatically generated and cannot be modified.
Price displays the total product amount. Price = Units Transferred x Unit Price.
Add On Price displays the total price of the internal add-ons as defined in Internal Pricing.
Freight Units indicates the freight units that are charged. For example, if the freight is charged by load, the value would be 1 load.
Freight Unit Price displays the amount of freight per unit.
Freight Price displays the base price of the freight and indicates the total freight charges before add-ons and taxes.
Freight Premium Add Ons displays the amount of premium freight add-ons on the transaction.
Freight Discount Add Ons displays the amount of discount freight add-ons on the transaction.
Freight Tax Price displays the price of tax on the freight.
Freight Total Price displays the total price of the freight including add-ons and taxes.
Total Price displays the total price of the transaction including add-ons and freight.
After completing the header of the transfer, the Details tab also must
be completed in the creation process. The Details section has several
tabs.
to create a new line detail.
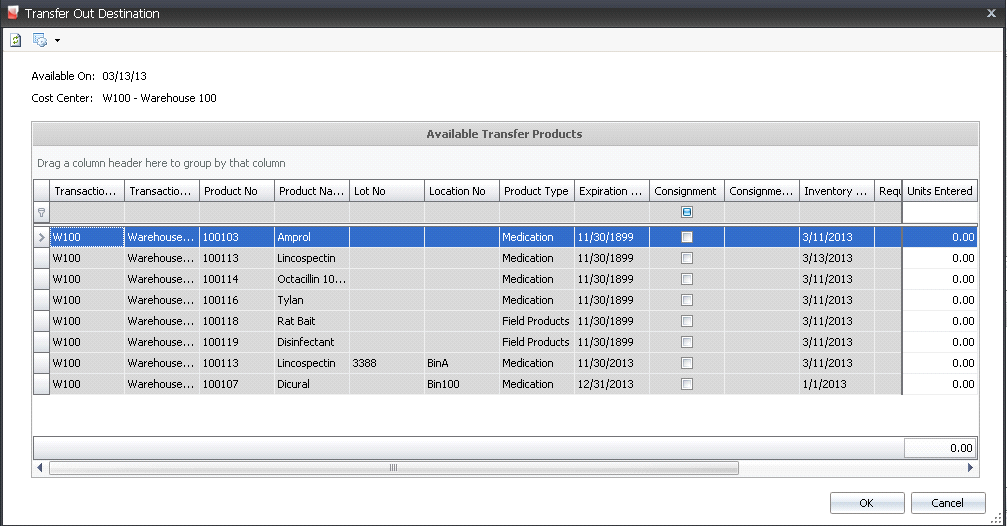

Within the Details tab, there is a child grid with additional details relating to the transfer add-ons. Any add-ons must be previously defined in Internal Prices.
The add-ons must be pre-defined in General>Products>AddOns prior to adding to the transfer transaction.

Transaction Entity ID is a required field if a different Payee Type is selected, and is defined on internal prices.
Rate is the per unit add-on price as initially defined on the product internal add-ons tab and then further defined on internal prices.
Price is the total price of the add-on.
The add-ons in this screen will default based on the values defined in the Freight Only Purchase order that was assigned to the transfer. These fields will not be populated if there is not an external haulage vendor associated with the transaction.

Transaction Entity ID is a required field if a different Payee Type is selected. If Payee Type is set, the selected vendor or cost center name will appear in this field.
Pay Calculation Type defaults from the vendor sku and determines the base amount of the add-on calculation.
Product Amount - the add-on is calculated based on only the product amount and does not include any other add-on in the calculation of the amount.
Net Amount - the add-ons is calculated based on the net amount of the transaction based on the product amount including other add-on amounts, but excluding taxes.
Normal - the add-on is calculated based on the rules established by Transaction Basis and the Payment Type defined in the vendor SKU and sales SKU.
Deduction Only - the add-on is calculated based on the rules established by Transaction Basis, however the add-on is only deducted from the vendor payment.
Taxable identifies if the item is taxable or non-taxable when the add-on is purchased.
Currency No defaults based on the currency assigned to the freight-only purchase order, with no option to modify. Currency Name defaults from Currency No and displays a description of the currency type.
Amount displays the total cost of the add-on.
If the product or add-ons are taxable, the tax code must be assigned
on the Taxes tab. The tax amount will then be calculated based on the
taxable order amounts.

Tax No identifies the tax code to be applied to the product and premiums/discounts for the selected line item. The Taxable flag must be selected in the product and premiums/discounts for taxes to calculate.
Tax Name describes the selected tax code.
Amount is the total amount of tax applicable on the product.
Click  to save the transfer transaction,
and then close the transaction.
to save the transfer transaction,
and then close the transaction.
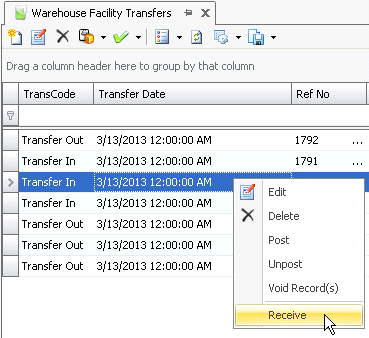
After the Transfer-Out Facility Transfer has been created, the Transfer-In Facility Transfer needs to be completed. There is an option in Registry> Product Type> Facility Receiving Transfer Mode which will automatically create the Transfer In transaction if selected.
Select the required
transfer-out transaction, right-click, and select 'Receive'. Alternatively,
if the Switch is set to ‘Automatic’, it is not necessary to
right-click, as the transfer-in transaction will be automatically
created. Selecting 'Receive' is only required if automatic switch
is not selected in set-up.
This process will create the transfer-out facility (Receiving transaction). All details in the header and details will derive from the transfer-in transaction.
Save the transaction.
![]()
Once the facility transfer has been created and saved, the transfer needs to be posted. The posting process locks the transaction to prevent edits, and creates the journal transaction to record the liability. The UnPost option unlocks the transactions and reverses the journal transactions.
The posting process creates the journal transaction. Depending on the type of transaction, the journals will be different.
The journal process will credit the warehouse inventory and debit the destination product inventory for the farm or facility.
Transfer to Farm/Facility
| DEBIT | Destination Product Inventory |
| CREDIT | Warehouse Inventory |

The posting process will create two journals. The first journal will credit the warehouse inventory and debit the destination product inventory for the farm. The second journal will credit the farm product inventory and debit the entity inventory for the usage. It is important to note that the period end Field Product Allocation task is required to allocate the usage expense to the proper stage.
Transfer to Entity
CREDIT |
Warehouse Inventory |
DEBIT |
Farm Product Inventory |
CREDIT |
Farm Product Inventory |
DEBIT |
Entity Usage |

