The purpose of this document is to outline the process related to establishing base prices and linking the base price to a customer price list. This process will allow the user to update a base price table with a new effective date and this price will be reflected in all customer price lists that have been assigned to the base price list.
Prior to creating a Base Price List, the following items should be created:
The following procedures are outlined related to the base price list:
In General>Sales, select Price Master.
In the Sales
Price Master index, click  to create a new sales price master.
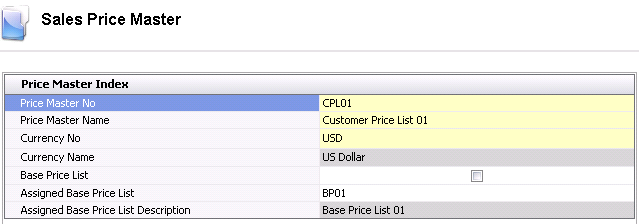
This section outlines the process related to creating the base price list that will be linked to the customer price list. The Index tab contains the base data for creating a new master price list..
Click on the Price Master Index tab.

In the Price Master No field, enter a unique number that identifies the base price list (alphanumeric, max 20 characters).
In the Price Master Name field, enter a description to identify the price list (alphanumeric, max 50 characters).
From the Currency No drop-down menu, select a currency for the price list.
Currency Name defaults from Currency No and displays a description of the currency.
Base Price List indicates whether the price list is a base price list. Select the Base Price List flag.
Assigned Base Price List is not required for a base price list. This field is used to assign the base price list to the customer price list.
Assigned Base Price List Description displays a description of the assigned base price list, if applicable when used in the customer price list.
The Base Price Details contain the pricing details for products, add-ons, commissions, taxes and instructions. These details will be transferred to a customer price list when the base price list is assigned to a customer price list. Details must be defined on the product sales sku prior to being selected in the base price list.
The Effective Date grid contains the details relating to price date and expiration date.

Enter a new effective Price Date to establish the starting date for the base price list. Orders with a ship date equal to or later than the current date will assume the defined price. If there is a pre-existing effective date, all pricing details will transfer to the new effective date where the user can then modify as required.
Optionally, an Expiration Date can be entered to define the expiration date of the price list. Once the expiration date is met, the prices will not longer default to the sales order unless a subsequent price date is defined.
The Details grid contains the base pricing details for the products associated with the base price list.

From Sales SKU No, select the required sales sku for the base price list.
Sales SKU Name defaults and displays the name of the selected sales sku.
Inventory Units displays the inventory units for the sales sku as defined on the product.
Unit Description describes the unit of measure that the product is sold as defined on the sales sku.
From Price Type, select the required price for the sales sku. Options available are:
Unit Price: Price is entered at the value that the product will be sold.
Cost + Amount: Used in a cost plus price definition. If this mode is selected, the amount over the cost price will be entered in the Price field. For example, if the product cost is $5.00 and $0.50 is entered in the Price field, the product will be sold at $5.50.
Cost + Percent: Used in cost plus price definition. If this mode is selected, the percent over the cost price will be entered in the Price field. For example, if the product cost is $5.00 and 5.00 is entered in the Price field, the product will be sold at $5.25.
Enter the Price for the sales sku. The price should be entered based on the sales sku unit. For example, if the product is sold in boxes of 100 inventory units, the selling price of the box should be entered.
Taxable identifies if the item is taxable or non-taxable when the item is purchased. Tax codes must be assigned to the sales order for the taxes to be calculated. The taxable flag defaults from the sales sku.
The Base Price flag will be selected in the detail lines. There is an option to remove the Base Price flag from any of the add-ons assigned to the sales sku. If the Base Price flag is unchecked, the price for the product will not be updated when the base price list is updated.
Within the child grid of the Sales SKU No tab, there are additional tabs that default from the sales sku. With the exception of taxes, nothing else can be added to the sales sku in this screen.
Add-ons must be defined on the sales sku to transfer to the price master. Rates are entered on this screen.

Transaction Basis is a read-only field that defaults from the sales sku, and determines how the add-on amount is calculated on orders. Available options are: Per Unit, Percentage, Flat Rate, or Free Percentage.
Payment Type is a read-only field that defaults from the sales sku, and determines when the add-on payment is made.
Payee Type is a read-only field that defaults from the sales sku, and identifies the type of entity with which the add-on is associated. Available options are: Vendor, Customer, Employee, or Cost Center.
Transaction Entity ID is a read-only field that defaults from the sales sku, and determines the entity that will be invoiced for the add-on charge. If left blank, the system assumes the sales order customer.
The Commissions tab details will default from the selected sales sku. Commissions are generally paid to employees or other parties based on a per unit basis or a percentage of product amount.

AddOn No displays the code of the add-on that has been transferred from the sales sku.
Transaction Basis is a read-only field that defaults from the sales sku, and determines how the add-on amount is calculated on orders. Available options are: Per Unit, Percentage, Flat Rate, or Free Percentage.
Payment Type is a read-only field that defaults from the sales sku, and determines when the add-on payment is made.
Payee Type is a read-only field that defaults from the sales sku, and identifies the type of entity with which the add-on is associated. Available options are: Vendor, Customer, Employee, or Cost Center.
Transaction Entity ID is a read-only field that either defaults from the sales sku or is defined in the price list, and determines the entity that will be invoiced for the add-on charge. If left blank, the system assumes the sales order customer.
Currency No is only used for commission calculations. All other add-ons are processed in the same currency as the transaction. Select the required currency type from the drop-down menu.
Currency Name defaults from Currency No and displays the description for the selected currency.
Taxable transfers from the sales sku and determines if the add-on is taxable or non-taxable when the item is purchased. Tax codes must be added to the tax tab on the price list or in the order for taxes to calculate.
Enter the Rate for the add-on. This rate will transfer to the order. Unit rates should be entered based on the sales sku units.
Taxes can optionally be added to the base price list. Taxes should only be added to the price list if the supply is being distributed to cost centers within the same tax zones. The taxable flag needs to be selected on the sales sku for the taxes to be applied.

 to select the Tax
No for the applicable tax.
to select the Tax
No for the applicable tax.Instructions are defined on the sales sku and represent details related to the product that need to be disclosed on the sales order. The instructions may define how a product is to be handled, packaged or any other details that may be pertinent to the sales process of the product.

Once the base price list is completed and saved, the next step is to assign a price list to a new customer price list A base price list cannot be assigned to an existing price list. The newly created price list will be assigned to the customer.
 to create a new price list.

In the Price Master Name field, enter a description to identify the price list (alphanumeric, max 50 characters).
From the Currency No drop-down menu, select a currency for the price list. The currency must be defined as the same currency as the base price list.
Currency Name defaults from Currency No and displays a description of the currency.
The Base Price List is not selected for a customer price list. Selecting this option will prevent the base price list from being assigned.
Click the drop-down to select the Assigned Base Price List. This field is used to assign the base price list to the customer price list.
Assigned Base Price List Description defaults based on the selected base price list.
The Effective Date and Sales Price Master will default based on the selected base price list.
Assign the price master list to the ship-to customer as outlined in Price Master>Assign Price List.
There are a few options available to update the base price list. When the Base Price List is updated, the price lists assigned to the base price will also be updated with the changes, regardless of the method of update used. Only the price details with the Base Price flag marked will be updated.
Manual - manually create a new effective date and update the prices.
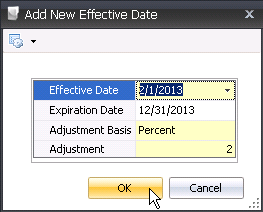
Update by Amount or Percent - use the Add New Effective Date to automatically update the base product price. This option updates product price only and does not include add-ons.
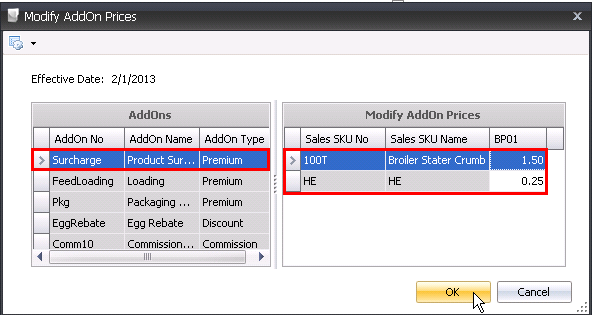
Update Add-on Prices only.

Actual: Updates the base product price with the actual defined amount. For example, if the user enters 0.05 in the Adjustment Amount field, a base price for $1.05 will be updated to $1.10. Add-ons will not be updated.
Percent: Updates the base product by the defined percentage. For example, if the user enters '2' in the Adjustment Amount field, a base price for $1.02 will be updated by 2% to $1.02. Add-ons will not be updated.


