Profiles

Profiles are...
The following
items need to be created before creating a Profile:
The Profiles document is comprised of the following components:
Create a Profile
- In FMTS>FFA>Enterprise,
select Profiles.
- In the FFA Profiles index, click the
 button to create a new profile.
General
The General section contains the basic details about the profile.
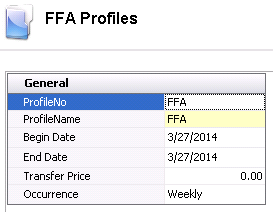
- In the Profile
No field, enter a unique code to identify the profile.
- In the Profile
Name field, enter a name to description the profile.
- In
the Begin Date field, enter
the date the profile will begin being used.
- In
the End Date field, enter
the date the profile will be finished being used.
- Transfer Price is used to enter
the price...
- From
the Occurrence drop-down menu,
select the occurrence of....Available options are: Monthly, Quarter
or Weekly.
Details
The Details section contains details related to the feed, ingredients
and purchases. The section is comprised of the following tabs:
Feed Mills
- Click the Feed Mills tab and select the button.
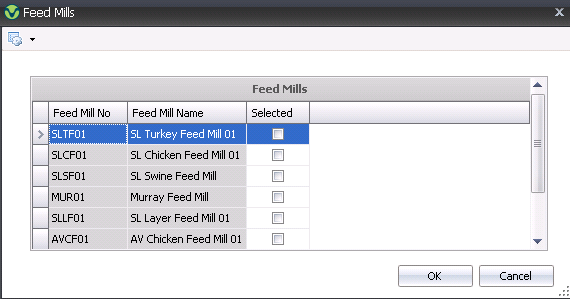
In the Feed Mills dialog box, click all required
feed mills for the profile and click the Selected
flags to include them. Click the OK button and the feed mill details
will appear in the Feed Mills area in the main screen.

- Feed Mill No
identifies the feed mill.
- Feed Mill Name
display a description of the feed mill.
- Production Limit is used to enter
the maximum amount of feed that the feed mill can produce.
Purchase Orders
Purchase Orders
will default in from...

- Complex PO No
identifies the complex purchase order.
- PO Date
indicates the date the purchase order was created.
- Vendor No
indicates the vendor selling the PO product.
- Dest Cost Center
No identifies the cost center receiving the product.
- Supplier Ref
No identifies the supplier, if applicable.
- Contract No
displays the contract code, if applicable.
- Price Mode
determines where in the process the price can be changed.
- Currency No
identifies the currency assigned to the product vendor.
- Currency Name
displays the currency rate that has been selected for the order.
- Vendor SKU No
identifies any vendor SKU product.
- Vendor SKU Name
displays a description of the vendor SKU product.
- Unit Description
displays a description of the vendor units being purchased.
- Product Type
identifies the type of product that is being purchased.
- Freight
TypeIncluded
- Freight is either not charged on the product, or is included in
the vendor unit price.
Excluded: Freight is an additional
charge, and is paid to a separate vendor. The haulage vendor and freight
rate are both known at the time that the purchase order is created.
An additional purchase order line for freight must be created and
assigned to the product lines. If the freight is an additional cost
but paid to the same vendor, the freight charge should be defined
as an add-on on the vendor sku.
Delayed: Freight is an additional
charged and paid to a separate vendor. The haulage vendor and/or freight
rate are not known at the time that the purchase order is created.
An additional purchase order line for freight must be created and
assigned to the product lines. If the freight is an additional cost
but paid to the same vendor, the freight charge should be defined
as an add-on on the vendor sku.
identifies the type of freight for the purchase order.
Vendor Units displays the number
of vendor units being received.
Free Units indicates the number
of free units that are allocated to the purchase order line.
Total Units is a calculated field
that represents the total units being received.
Vendor Unit Price displays the purchase
price that is paid for each vendor unit. (Example: Enter the price
per box)
- Total Add On
Price indicates the total amount of premium add-ons for the
product.
- Total Discounts
indicates the total amount of discount add-ons for the product.
- Total Tax
indicates the total amount of tax for the product and add-ons. T
- Price
is the amount converted to corresponding inventory units.
- Total Price
represents the total amount of the purchase, including the product,
premiums, discounts, and taxes.
Purchase Order
Contracts
Purchase
Order Contracts will default in from...

- Contract No
displays the contract code, if applicable.
- Supplier Ref
No identifies the supplier, if applicable.
- Contract No
displays the date the contract was created.
- Contract Type
displays the type of contract.
Payment Mode
indicates whether the contract is paid for based on purchase order
transactions or if there is a pre-defined payment schedule.
- Vendor No
indicates the vendor selling the product.
- Vendor SKU No
identifies any vendor SKU product.
- Vendor Units
displays the number of vendor units being received.
- Vendor Unit Price
displays the purchase price that is paid for each vendor unit. (Example:
Enter the price per box)
- Payment Term
No identifies the terms for the payment.
- Price Mode
determines where in the process the price can be changed.
- Delivery Date
displays the date the order was delivered.
- Expiration Date
indicates the expiration date of the product, if applicable.
- Freight
TypeIncluded
- Freight is either not charged on the product, or is included in
the vendor unit price.
Excluded: Freight is an additional
charge, and is paid to a separate vendor. The haulage vendor and freight
rate are both known at the time that the purchase order is created.
An additional purchase order line for freight must be created and
assigned to the product lines. If the freight is an additional cost
but paid to the same vendor, the freight charge should be defined
as an add-on on the vendor sku.
Delayed: Freight is an additional
charged and paid to a separate vendor. The haulage vendor and/or freight
rate are not known at the time that the purchase order is created.
An additional purchase order line for freight must be created and
assigned to the product lines. If the freight is an additional cost
but paid to the same vendor, the freight charge should be defined
as an add-on on the vendor sku.
identifies the type of freight for the purchase order.
Ingredient Supply
The Ingredient
Supply tab will

- From Record
Type, select the type of feed record. Available options
are: Inventory, Manual or Planned Shipment.
- Enter the xDate
of the ingredient supply record.
- Feed Mill No identifies the feed
mill.
- Feed Mill Name display a description
of the feed mill.
- Ingredient No
identifies the ingredient.
- Ingredient Name
display a description of the ingredient.
- Amount
displays the total amount of the ingredient.
- Price
displays the total price of the ingredient.
Feed Demand
The Feed
Demand tab will

- From Record
Type, select the type of feed demand record. Available
options are: Average Production, Contracts, Feed Production, Manual
or Planned Orders.
- Enter the xDate
of the feed demand record.
- Feed Mill No identifies the feed
mill.
- Feed Mill Name display a description
of the feed mill.
- Formula No
identifies the formula.
- Formula Name
display a description of the formula.
- Quantity
displays the total amount of the feed demand order.
Feed Supply
The Feed
Supply tab will

- Enter the xDate
of the feed supply record.
- Feed Mill No identifies the feed
mill.
- Feed Mill Name display a description
of the feed mill.
- Formula No
identifies the formula.
- Formula Name
display a description of the formula.
- Amount
displays the total amount of the feed supply.
- Price
displays the total price of the feed supply.
Additional Options
The Profiles transaction screen menu contains additional options related
to the profile:
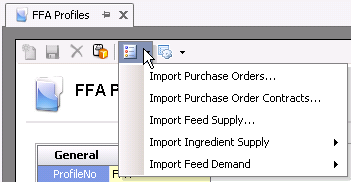
Import Purchase
Orders
*Note: The process for importing
purchase orders, purchase order contracts and feed supply is the same.
- Click the Options
 button and
select `Import Purchase Orders`.
button and
select `Import Purchase Orders`.
- A Confirmation dialog box will appear. Click the
OK button to continue.
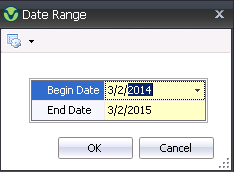
- In the Date range dialog box, enter the Begin
Date of purchase orders to import.
- Enter the Date of purchase orders to import.
- Click the OK button and all purchase orders will
be imported.
Import Ingredient
Supply
- Click the Options button and
select `Import Ingredient Supply`.
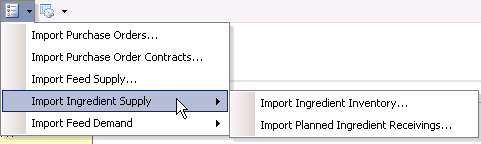
- Select to `Import Ingredient Inventory` or `Import
Planned Ingredient Receivings`.
- A Confirmation dialog box will appear. Click the
OK button to continue and all ingredient inventory or receivings will
be imported.
Import Feed Demand
- Click the Options button and
select `Import Feed Demand`.
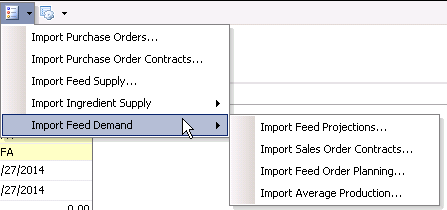
- Select to choose one of the options:
- Import Feed
Projections
- Import Sales
Order Contracts
- Import Feed
Order Planning
- Import Average
Production
- A Confirmation dialog box will appear. Click the
OK button to continue and all necessary records will be imported.