HPA Profiles

HPA
Profiles establish the rules for the HPA supply and demand projection.
Several profiles can be created to analyze various scenarios. There are
several sections within the HPA Profile:
Create HPA Profile
In
BMTS>HPA>Profiles,
select Profiles.
Click
 to
create a new profile.
to
create a new profile.
General
- Enter the Profile
No to identify the profile.
- Enter a description for the profile in Profile
Name.
- In the Start
Egg Inventory Date field, enter the date of the egg inventory
that will be used to start the projection. This date will also be
the start date of the projection. If the start egg inventory date
is not entered, the logic will use the calculated date as the starting
point of beginning HIM egg room inventory.
- In the Ending
Plan Date field, enter the date that the projection will stop.
- Calculated Start
Egg Inventory Date is system generated and represents the most
recent set date of all the hatcheries in the profile.
- Select the Import
Farm Inventory flag if the farm egg inventory
is to be imported to the HPA projection. If the option is not selected,
then only hatchery egg inventory will be used.
- Last Calculated
Date indicates the last date that the projection was generated.
- Select the Order
Status Filter Type to determine the orders that will be used
for the demand in the HPA projection. Available options are: All,
Confirmed Only or Tentative Only.
- Select the Hatchery
Utilization Mode. Available options are:
- Egg Supply
Utilization: Utilize egg supply of each hatchery.
- Hatchery
Demand Enforced: Plan egg transfers to ensure hatcheries
meet their full demand.
- Select the Female
Ratio Mode. Available options are:
Breed:
Use the ratio specified for the breed code.
Calculated:
Calculate the ratio from the actual hatch results.
Registry:
Get the ratio for the hatchery registry settings.

Hatchery
The Hatchery tab assigns the hatcheries to the profile and establishes
the hatchery priority for the profile.
Click on the Hatchery section and click to
add a new hatchery.
From the Hatchery
No drop-down menu, select the hatchery that is to be used in
the profile.
Hatchery Name
will default based on the Hatchery No selected.
Enter the Priority
or order in which hatcheries are to be utilized.
Select the Import
Egg Purchase Orders flag if purchased eggs are to be utilized
as part of supply.
Select the Import
Chick Purchase Order flag if purchased chicks are to utilized
as part of supply.
Select the Use
Hatchery Full Capacity flag to force the hatchery to be utilized
at full capacity. If the option is not selected, then the egg set
volumes will be determined based on the demand.
Select the Transfer
Eggs Full Capacity flag to force the system to continue to
transfer eggs until all of the hatchery capacities have been met or
egg supply is exhausted.
In the Minimum
Transfer Eggs field, enter the minimum number of eggs that
are required to be transferred.

Demand
The Demand section utilizes the sales order as well as the BPRA and
BPA Placement Profiles in order to calculate the total amount of demand
required.
BPRA Profiles
- Select the Profile
No from the drop-down menu. Profiles must be set up previously
in BRPA as a BRPA Profile.
- Profile Name
will default based on the profile selected.
- Enter the Priority
in which the profiles are to be used.
- Select the Source
Info from the drop-down list. Available options are Movements
or Targets.
- Enter the Weeks
Before Targets to determine how many weeks of
movements should be used before switching focus to targets.
BPA Placement Profiles
Select the Profile No from the drop down list.
Must be setup in BPA as a BPA
Profile.
Click on the child
grid  in the Profile No field to select the generation that will be used
in the profile.
in the Profile No field to select the generation that will be used
in the profile.
Profile
Name will default based on the profile selected.
Enter the Priority in which the profiles are
to be used.

Supply
The Supply tab identifies the BPA profiles and the priority that will
be used to source the supply for the projection. Multiple profiles can
be selected.
- Select the Profile
No from the drop down list. Must be setup in BPA as a
BPA Profile.
- Profile Name
will default based on the profile selected.
- Enter the Priority
in which the profiles are to be used.

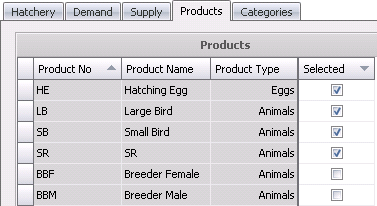
Products
The Product tab specifies the products to be used in the profile.
- Product No
will default when products are created in the Animal
or Egg Products.
- Product Name
will default when products are created in the Animal or Egg Products.
- Product Type
will default when products are created in the Animal or Egg Products.
- Check the Selected
box if product is to be used in the profile.
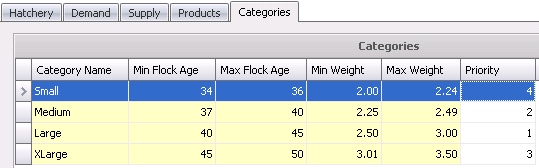
Categories
The Categories tab further defines the projection into user
defined categories based upon bird age and weight.
- Enter a Category
Name to define the category.
- Enter the Min
Flock Age to be used in the category.
- Enter the Max
Flock Age to be used in the category.
- Enter the Min
Weight to be used in the category.
- Enter the Max
Weight to be used in the category.
- Enter the Priority
in which the categories are to be used.
- Save and close the profile.