
The purpose of this document is to outline the basic steps to define the parameters and... The following sections are outlined in this document to assist the user in the required day-to-day tasks and represent the typical order of data entry and data generation.
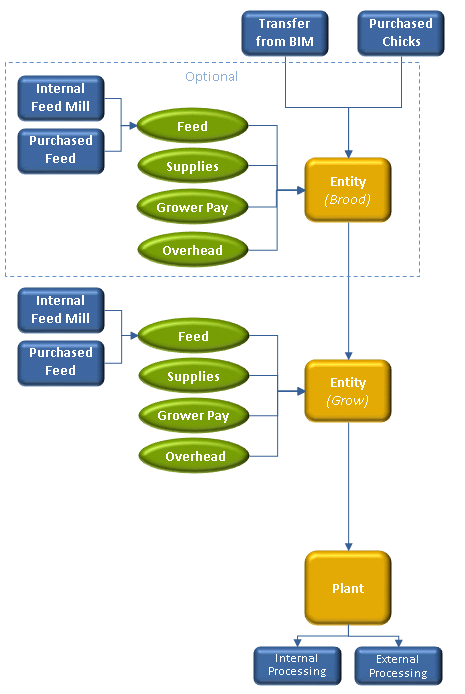
The cost centers must be configured prior to the creation of farms or other facilities. Multiple farms can be assigned to a single cost center, however other facilities such as warehouse and feed mills are assigned one cost center to one facility. The cost center structure should be based on a similar structure as the financial system. Certain functions within the system allow costs to be defined by cost center so that should be considered as well when defining the cost center structure.

Cost Center No – unique identifier assigned by the customer to use as a code for the cost center.
Cost Center Name – alphanumeric character code to enter a name for the cost center.
Division No – assigns the cost center to a division for reporting purposes.
Cost Center Type – indicates the type of cost center for farm. Available options are Cost Center, Profit Center or External.
Facility Type – establishes the facility type. Availble options are Admin, Farm, Feed Mill, Plant or Warehouse.
Farm Type – when creating cost centers for farms, the cost center must be defined as BIM or BRIM. All other cost centers do not require this field to be completed.
Products are the basis of the system and provide the base information required for the journal transactions. The following types of products may be used in the BRIM:
Animals – used to create the live product that exists at the farms. Available options for BRIM are: Broiler Male, Broiler Female and Straight Run.
Feed Formulas – defines the feed formulas that are feed to the animal products.
Field – field products are inventory and non-inventory products used at the farms. Examples are: medications, vaccinations and other miscellaneous supplies.
Freight – freight products are assigned to other products in the purchasing process. Freight products may or may not be included in the cost of the product.
Add-ons – add-ons are used to attach costs to other products within the system. Some examples of add-ons are: surcharges, levies, delivery costs.
Miscellaneous – non-inventory charges used in the inventory system that do not require the use of purchase orders. Examples are: electricity, consulting charges, property taxes.
Products are defined within the system with purchasing and sales relationships defined for each product. Related to purchasing, a vendor sku must be created for each vendor that the product is purchased from. Sales skus must also be defined if the product is sold to internal or external customers.
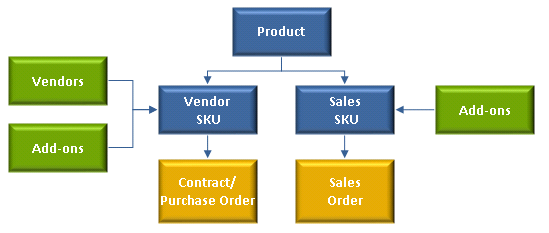
The Product section is comprised of the following components:
Feed Formulas
Field Products
Freight Products
Add-ons
Miscellaneous Products
Animals are the live products that exist at the farm. Each entity within the system must be assigned a product. There are several tabs to configure for each product created. Some tabs are optional depending on the nature of the business.
There are numerous tabs to complete in the Animals transaction:
The General tab defines the basics about the animal product.
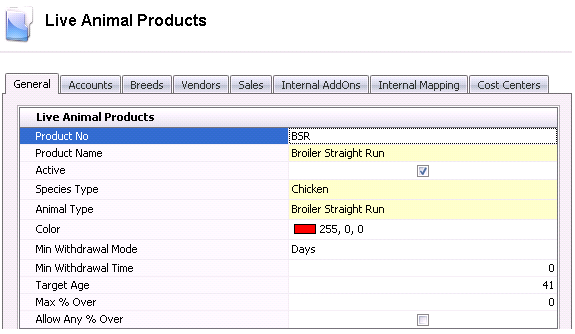
Product No – alphanumeric 50 character code to identify the product.
Product Name – alphanumeric 250 character code to enter a name for the product.
Active – determines if the product is active or no longer used.
Species – establishes the species of the product. Available options within the system are: Chicken, Duck, Layer, Swine and Turkey. All BRIM products will be set to either Chicken or Turkey.
Animal Type– determines the type of product. Options for BRIM are Broiler Female, Broiler Male or Broiler Straight Run.
Color – for planning purposes, products can be color coded for easy view.
Min Withdrawal Mode – determines whether the feed withdrawal is based on days or lbs/kgs per day.
Min Withdrawal Time – based on the parameter established in Min Withdrawal Mode, determines the number of days or lbs/kgs that are required for withdrawal.
Target Age – defines the target number of days from hatch date to process date.
Max % Over – if the product has a tolerance percentage for the receiving transaction, the percentage is entered in this field. For example, the purchase order has 100 units. Max % Over is defined as 5% which means that the receiving transaction will allow up to and including 5 units.
Allow Any % Over – selecting this option will allow the user to receive any quantity over the purchase order units.
The Accounts tab defines the account segments that will be used in each journal process throughout the system. If the segment is blank, then the transaction will pick up account according to the location and stage within of the product. The default accounts will be displayed when the product is created. Although not recommended, some of the segments can be modified if required. If a default account is modified, the new account must be created within the Chart of Accounts for the transactions to be processed.

The Breed tab is optional depending on whether breeds are used for the product being created. Breed Codes must be created prior to creating the product.

Breed No – identifies the breed code(s) that relate to the product.
Sex – defines the sex as Male or Female for the product breed.
Primary Breed – if there are multiple breeds assigned to the product, select the breed that is primarily used for planning.
Generation – determines the generation of the product. Options are GGGP, GGP, GP, Parent or Pedigree. BRIM is almost always set to Parent.
Before a product can be purchased, the vendor/product relationship must be established. This option allows the user to define the unit of measure and any additional costs or discounts associated with the product. If the product is purchased from the same vendor in different units, a vendor sku must be created for each unit.

In the child grid within the vendor sku, there is the option to define additional charges or discounts on the product. Depending on how the add-ons are configured, they can be included or excluded from the product costs.
Premium add-ons add to the cost of the product. Discount add-ons reduce the cost of the product. The add-ons must be pre-defined before adding to the vendor sku. The add-ons can be configured to be included in the cost of the product or alternatively, be coded to an entirely different account which is not included in the product cost.
Optionally, the tax codes can be defined at the vendor sku. It is recommended that the tax codes are only entered on the vendor sku if that vendor only delivers within the same state or province as different tax rate can be applied depending on the destination. Tax codes must be previously defined. Rates will default to the purchase order based on the rate that is in effect on the on the purchase order date.

If the product is sold to external sources, a sales sku must be created prior to creating a sales order.

Sales SKU No– alphanumeric, max 50. Enter the code that is used when selling the product to customer. This is optional and can be the same as the product code, however the sales sku must be unique within the Sales tab.
Sales SKU Name – alphanumeric, max 100. Enter a description for the sales sku.
Unit Description – alphanumeric, max 40. Describes the unit of measure that the product is being sold to the customer. For example, tons, lbs, tonnes, kg, drum, box, etc.
Inventory Units – enter the number of units in each sales unit. For example, if a box has 100 units, then enter Unit Description=Box and Inventory Units=100.
Active – if the product is no longer sold, the active flag can be removed.
Taxable – if the product is taxable then the flag must be check for taxes to calculate on the product. There is validation on the sales order that if the taxable flag is marked on the sales sku, then the applicable tax codes must be added to the order.
In the child grid within the sales sku, there is the option to define additional charges or discounts on the product.¸
Premium add-ons add to the price of the product. Discount add-ons reduce the price of the product. The add-ons must be pre-defined before adding to the sales sku. The add-ons can be configured to be included in the revenue of the product or alternatively, be coded to an entirely different account which is not included in the product revenue.
Product No – selected from a list of previously defined premium add-ons.
Transaction Basis – defaults from the add-on and determines how the add-on is calculated. Options as defined in the add-on are: Per Unit, Percentage, Flat Rate and Free Quantity.
Payment Type – determines how the payment of the add-on is handled. Available options are: Transaction, Rebate and Internal. Transaction is recorded at time of shipment and will flow to the sales invoice. Rebate will record the accrual amount at time of shipment but will not transfer to the invoice and not be included in the customer invoice as payment/invoice will be processed at a later date. Internal is for internal cost center charges. For example, there is an internal haulage department that gets a credit for hauling products.
Payee Type – this field is optional. If left blank, then it assumes the order customer for the add-ons. Alternatively, a separate customer can be paid for the add-on if necessary. There is also the option to select Cost Center that is generally used for Internal payment type where the cost center will be automatically debited or credited for the internal charge.
Transaction Entity ID – if a different Payee Type is selected, then the appropriate customer or cost center must be selected.
Internal add-ons are used when transferring products between facilities. The add-on must be defined on this tab before the pricing is established in Internal Pricing.

Add-on Type – determines whether the internal add-on is a premium or discount add-on. Premium will increase the cost to the destination mill while the discount will reduce the cost to the destination mill.
Product No – selected from a list of previously defined premium add-ons.
Transaction Basis – defaults from the add-on and determines how the add-on is calculated. Options as defined in the add-on are Per Unit, Percentage, Flat Rate and Free Quantity.
Payment Type – determines how the cost of the add-on is handled. Available options are: Transaction, Rebate and Internal, however only Transaction and Internal should be used for internal add-ons. Transaction is recorded at time of transfer. Internal is for internal cost center charges. For example, there is an internal haulage department that gets a credit for hauling raw materials.
Payee Type – only required if Internal payment type is selected.
Transaction Entity ID – if Internal payment type is selected, then the internal cost center must be selected.
Rate – if the rate is standard for all transactions, the rate can be entered in this field. If the rate is defined by cost center, then rates must be applied in Internal Pricing.
The Internal Mapping tab is used to identify products that can be used interchangeably if the original product is not available. This is used for planning purposes.

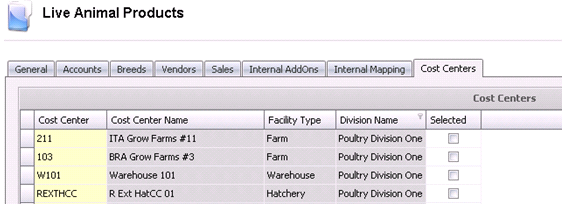
The system has the ability to identify which cost centers the product applies to. If none of the options are selected, then the product can be supplied to all facilities. If one or more cost centers are selected, then the product can only be utilized at that facility. The system has the ability to identify which cost centers the product applies to. If none of the options are selected, then the product can be supplied to all facilities. If one or more cost centers are selected, then the product can only be utilized at that facility.
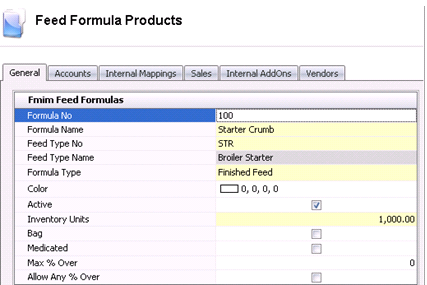
Generally Feed Formula setup is handled in the FMIM module. However, if that module is not being utilized, the basic feed formula details must be defined.
There are numerous tabs to complete in the Feed Formulas transaction:
The General tab contains the basic information related to the feed formula.
