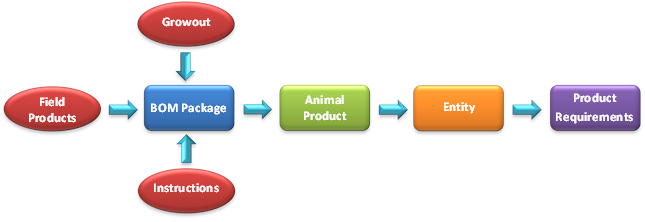
Product Requirements

The Product Requirements displays the field products required for the
entity throughout the life cycle of the entity as defined in BOM Packages.
The product requirements are generated based on the entity and planned
head placed. The quantities can be modified prior to the record being
posted.
The following sections are outlined in the Product Requirements document:
Create Product Requirements
Product Requirements are generated from the Entity Selection index.
- In BMTS>BIM>Transactions>MRP>Planning,
select Entity Selection.
- Right-click and select `Create Planning`.
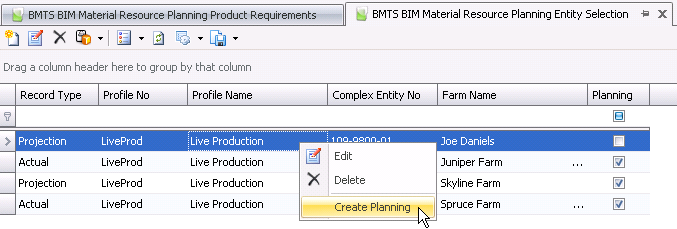
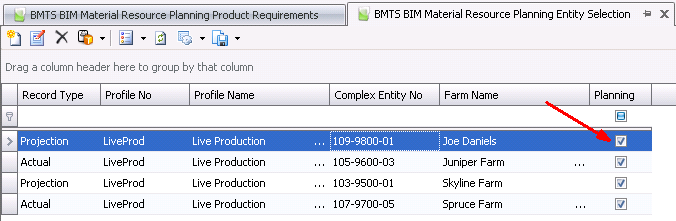
- When the process is complete, the Planning flag
will be selected.
Edit Product Requirement
Record
The Product Requirement record can be edited if the Post Status is set
to Active or Reversed and the user has permissions to edit.
- In the Product Requirements index, select the
required record and right-click to select 'Edit'.
- The Product Requirements edit screen will open.
There are two sections on the screen:
- Calendar
- the top section of the screen is a calendar with the transactions
assigned to the respective dates. The user can hover over the
transaction on the calendar to view more details. The details
displayed on the hover can be modified by selecting Options>Define
Appointment Bubble/Tool Tip. Users can also drag and drop the
bubble to an alternative date and/or time which will also update
the planning record.
- Planning
- the bottom section of the screen represents the details of the
product requirement record. The details in this section can be
modified providing that the user has the required permissions.
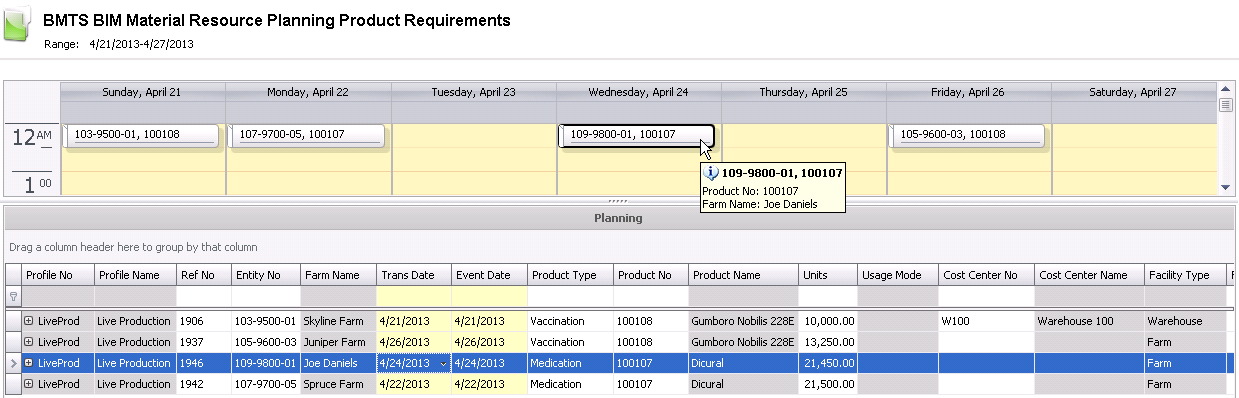
- Profile No
and Profile Name represent
the profile that has been assigned to the entity. This will be used
for generating global MRP data.
- Record Type
will default from the source entity to indicate if the entity is a
Planned entity with is sourced from
or Actual entity which is sourced from BIM>Master
Data>Entities. Planned movement records must be posted to be
selected in planning requirements.
- Ref No
is an auto-generated system reference number that uniquely identifies
the record within the system.
- Entity No
displays the entity for the Product Requirements record. If the entity
is incorrect, the requirement record needs to be voided or deleted
and the Create Planning
function needs to be generated again.
- Farm Name
is derived based on the selected entity.
- Placement Date
represents the planned or actual placement date depending if the entity
is a planned or actual entity.
- Head Placed
represents the number of head that are planned or actually placed.
If the Record Type=Planned, the planned head placed will be derived
from . If the Record Type=Actual,
the planned head will be derived from the actual head placed in BIM>Master Data>Entities.
- Trans Date
is the date that the product is required.
- Event Date
will default to the Trans Date but can be modified to represent an
alternative date. The Trans Date will be used for all transactions.
- Product Type
represents the type of product that is assigned to the entity. The
Product Type can be modified by selecting the drop-down to select
a different product type.
- Product No
represents the product that is assigned to the entity. The Product
No can be modified by selecting the drop-down to select a different
product. The available products will be filtered based on the product
type.
- Product Name
is derived from the selected Product No.
- Units
it the calculated quantity based on the head placed and the required
quantity per head as defined in . The
amount can be modified by manually entering a revised quantity.
- Usage Mode
is derived based on the data defined in .
- Cost Center No
represents the cost center that will source the product. If the Cost
Center No is blank, the product will be purchased and sourced
from the entity cost center.
- Cost Center Name
is derived from the Cost Center No.
- Facility Type
is derived from the source Cost Center No and displays the type of
facility that will source the product such as warehouse, farm, hatchery.
- Field Crew No
can be selected to assign the field crew to the planning requirement.
Field Crew Name will be derived
based on the selected Field Crew No. Field crews are defined in .
- Veterinarian
No can be selected to assign the veterinarian to the planning
requirement. Veterinarian Name
will be derived based on the selected Veterinarian No. Veterinarians
are defined in .
- The Override
flag will be selected if any of the fields are modified on the planning
requirement record.
- Void nullifies
the planning record for future transactions.
- Notes
are derived from the planned or actual entity. The data will be defined
in the source entity record in
or BIM>Master Data>Entities.
- Comments
is a text field to enter any required details for the planned requirements
record.
- Approval Status
must be set to Ready for Approval for the record to be posted. Security
can be assigned so that only defined users can approve the planning
requirement. The default value is 'Not Set'.
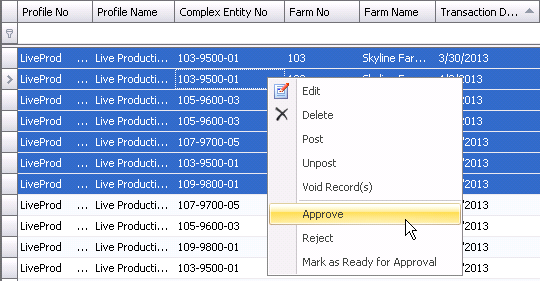
Approve Product Requirements
The Product Requirement must be approved prior to the transaction being
posted. Permissions can be established so that only specified users can
approve the requirements if necessary.
- Product Requirements must has the Approval Status
set to 'Ready for Approval' prior to final approval.
- In the Product Requirements index, select the
transactions to be approved and right-click to select Approve.
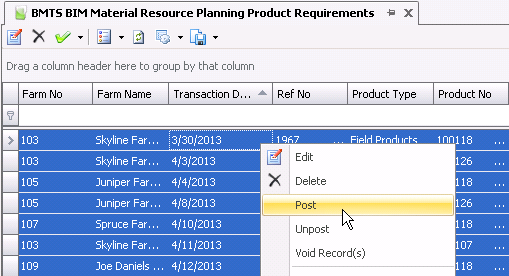
Post Product Requirements
Posting the Product Requirement creates the requisition transaction.
Depending on the cost center assignment, the following transactions will
occur:
- No Cost Center
Defined - If there is no cost center defined on the requisition
record, the global purchase requisition will be automatically created
for the farm cost center when the product requirement is posted.
- Cost Center
Defined - If there is a cost center defined on the requisition
record, the transfer requisition will be automatically created for
the source cost center when the product requirement is posted.
- Ensure that the Approval Status for the product
requirements is set to Approved.
- Select the required product requirements to post.
- Right-click and select Post.
- The Post status will be set to Post.